
Product Manual
Page 3
... Use only manufacturer's recommended attachments and products. • Do not use with damaged cord or plug. keep children away from openings and moving parts. • Turn off all controls before unplugging. • Use extra care when cleaning on cord, or pull cord around sharp edges or ...FIRE, ELECTRIC SHOCK OR INJURY: • Fully assemble before cleaning or servicing. • Do not use and before operating. • Operate vacuum only at bottom of stairs on back of dust, lint, hair, and anything that may be followed, including the following: READ ALL INSTRUCTIONS ...
... Use only manufacturer's recommended attachments and products. • Do not use with damaged cord or plug. keep children away from openings and moving parts. • Turn off all controls before unplugging. • Use extra care when cleaning on cord, or pull cord around sharp edges or ...FIRE, ELECTRIC SHOCK OR INJURY: • Fully assemble before cleaning or servicing. • Do not use and before operating. • Operate vacuum only at bottom of stairs on back of dust, lint, hair, and anything that may be followed, including the following: READ ALL INSTRUCTIONS ...
Product Manual
Page 5
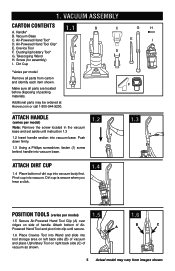
... (C) of dirt cup into vacuum. Dusting/Upholstery Tool* D G. Telescoping Wand H. Additional parts may vary from carton and identify each item shown. Push down firmly. 1.3 Using a Phillips screwdriver, fasten (1) screw behind handle into vacuum base. 1.2 1.3 Attach dirt cup 1.4 Place bottom of vacuum as shown. 5 Actual model may be ordered at Hoover.com or call 1-800-944...
... (C) of dirt cup into vacuum. Dusting/Upholstery Tool* D G. Telescoping Wand H. Additional parts may vary from carton and identify each item shown. Push down firmly. 1.3 Using a Phillips screwdriver, fasten (1) screw behind handle into vacuum base. 1.2 1.3 Attach dirt cup 1.4 Place bottom of vacuum as shown. 5 Actual model may be ordered at Hoover.com or call 1-800-944...
Product Manual
Page 8
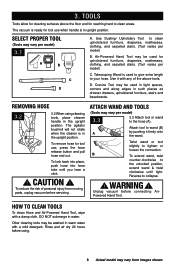
...tight. WARNING ! Use Dusting/ Upholstery Tool to the unlocked position, extend wand & twist clockwise until you hear a click. ! CAUTION ! Unplug vacuum before servicing. Removing Hose 3.2 3.2 When using . 8 Actual model may be used for reaching hard to Clean Tools To clean Hose and Air-Powered... tool use when handle is used to give extra length to collapse. ! Air-Powered Hand Tool may vary from moving parts, unplug vacuum before connecting AirPowered Hand Tool. Attach tool to tighten or loosen the connection. Other cleaning tools may be used in tight...
...tight. WARNING ! Use Dusting/ Upholstery Tool to the unlocked position, extend wand & twist clockwise until you hear a click. ! CAUTION ! Unplug vacuum before servicing. Removing Hose 3.2 3.2 When using . 8 Actual model may be used for reaching hard to Clean Tools To clean Hose and Air-Powered... tool use when handle is used to give extra length to collapse. ! Air-Powered Hand Tool may vary from moving parts, unplug vacuum before connecting AirPowered Hand Tool. Attach tool to tighten or loosen the connection. Other cleaning tools may be used in tight...

Product Manual
Page 11
... to Clean 4.8 With fingers in place. Hold filter under running water for at least every two months under normal use vacuum without dirt cup or filters in Fig 4.5. ! CAUTION ! Ask for Hoover® Part No. 303172001. 4.8 A 11 Actual model may take up to remove rinsable filter. CAUTION ! How to Empty 4.3 4.3 Press dirt cup...
... to Clean 4.8 With fingers in place. Hold filter under running water for at least every two months under normal use vacuum without dirt cup or filters in Fig 4.5. ! CAUTION ! Ask for Hoover® Part No. 303172001. 4.8 A 11 Actual model may take up to remove rinsable filter. CAUTION ! How to Empty 4.3 4.3 Press dirt cup...
Product Manual
Page 12
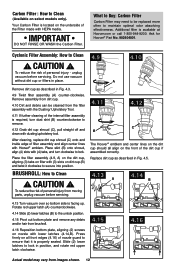
...14 Slide (2) lower latches (B) to the unlock position. 4.15 Pivot out bottom plate and remove any debris and/or hair from moving parts, unplug vacuum before servicing. Carbon Filter : How to Clean (Available on nozzle with lower latches (4.14,B). Replace dirt cup as described in position, and... rotate red upper latch clockwise. 4.15 4.16 Actual model may need to be cleaned from images shown. 12 Ask for Hoover® Part No. ...
...14 Slide (2) lower latches (B) to the unlock position. 4.15 Pivot out bottom plate and remove any debris and/or hair from moving parts, unplug vacuum before servicing. Carbon Filter : How to Clean (Available on nozzle with lower latches (4.14,B). Replace dirt cup as described in position, and... rotate red upper latch clockwise. 4.15 4.16 Actual model may need to be cleaned from images shown. 12 Ask for Hoover® Part No. ...
Product Manual
Page 13
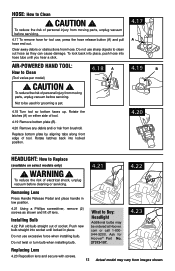
... or hair from brushroll. Rotate latches back into locked position. 4.20 Headlight: How to Clean (Tool varies per model) ! Ask for Hoover® Part No. 27313-107. 4.23 Replacing Lens 4.23 Reposition lens and secure with screws. 13 Actual model may be used for tool use, ...remove hose for grooming a pet. 4.18 A 4.19 B 4.18 Turn tool so bottom faces up. Clear away debris or obstructions from moving parts, unplug vacuum before servicing. Do not twist or turn bulb when installing bulb. com or call 1-800944-9200. Do not use excessive force when installing bulb....
... or hair from brushroll. Rotate latches back into locked position. 4.20 Headlight: How to Clean (Tool varies per model) ! Ask for Hoover® Part No. 27313-107. 4.23 Replacing Lens 4.23 Reposition lens and secure with screws. 13 Actual model may be used for tool use, ...remove hose for grooming a pet. 4.18 A 4.19 B 4.18 Turn tool so bottom faces up. Clear away debris or obstructions from moving parts, unplug vacuum before servicing. Do not twist or turn bulb when installing bulb. com or call 1-800944-9200. Do not use excessive force when installing bulb....
Product Manual
Page 14
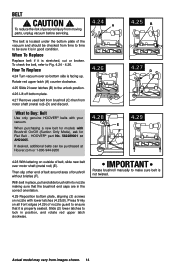
...HOOVER® part No. 562289001 or AH20065. With belt in good condition. When purchasing a new belt for models with your vacuum. When To Replace Replace belt if it is facing up. How To Replace 4.24 Turn vacuum over motor shaft (metal rod) (E). Then slip other end of belt around area of the vacuum... and should be checked from moving parts, unplug vacuum before servicing. CAUTION ! The belt is in place, pull and slide ...
...HOOVER® part No. 562289001 or AH20065. With belt in good condition. When purchasing a new belt for models with your vacuum. When To Replace Replace belt if it is facing up. How To Replace 4.24 Turn vacuum over motor shaft (metal rod) (E). Then slip other end of belt around area of the vacuum... and should be checked from moving parts, unplug vacuum before servicing. CAUTION ! The belt is in place, pull and slide ...

Product Manual
Page 16
... : • Checking the Yellow Pages under "Vacuum Cleaners" or "Household". • Visit our website at hoover.com (U.S. Mon-Fri 8am-7pm EST. Follow the service center link to Hoover®, Inc., Company in delay. 6. Service To obtain approved Hoover® service and genuine Hoover® parts, locate the nearest Authorized Hoover® Warranty Service Dealer (Depot) by...
... : • Checking the Yellow Pages under "Vacuum Cleaners" or "Household". • Visit our website at hoover.com (U.S. Mon-Fri 8am-7pm EST. Follow the service center link to Hoover®, Inc., Company in delay. 6. Service To obtain approved Hoover® service and genuine Hoover® parts, locate the nearest Authorized Hoover® Warranty Service Dealer (Depot) by...


