
Product Manual
Page 2
... to this product to register your HOOVER® product. Model 1-800-944-9200 MFG. Made in the spaces provided. only) or to register by phone. Thank you for assembly and maintenance. Visit Hoover.com for additional video instructions for choosing a HOOVER® product. Mon- Be sure... to the store. 2 Fri 8am- 7pm EST. Please enter the complete model and Manufacturing Code in Mexico Manufacturing code (Label located on...
... to this product to register your HOOVER® product. Model 1-800-944-9200 MFG. Made in the spaces provided. only) or to register by phone. Thank you for assembly and maintenance. Visit Hoover.com for additional video instructions for choosing a HOOVER® product. Mon- Be sure... to the store. 2 Fri 8am- 7pm EST. Please enter the complete model and Manufacturing Code in Mexico Manufacturing code (Label located on...
Product Manual
Page 5
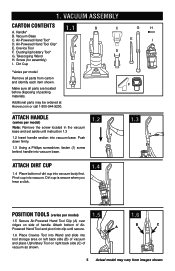
...side (B) of vacuum and place Upholstery Tool on side of handle. Handle* B. Air-Powered Hand Tool Clip* E. Dirt Cup *Varies per model) 1.5 1.6 1.5 Secure Air-Powered Hand Tool Clip (A) over ridges on right back side (C) of AirPowered Hand Tool and pivot into clip ...until instruction 1.3 1.2 Insert handle section into vacuum. Pivot cup into vacuum base. Attach bottom of vacuum as shown. 5 Actual model may be ordered at Hoover.com or call 1-800-944-9200. Vacuum ASSEMBLY Carton contents 1.1 B C G H A. Dirt cup is secure when you hear a...
...side (B) of vacuum and place Upholstery Tool on side of handle. Handle* B. Air-Powered Hand Tool Clip* E. Dirt Cup *Varies per model) 1.5 1.6 1.5 Secure Air-Powered Hand Tool Clip (A) over ridges on right back side (C) of AirPowered Hand Tool and pivot into clip ...until instruction 1.3 1.2 Insert handle section into vacuum. Pivot cup into vacuum base. Attach bottom of vacuum as shown. 5 Actual model may be ordered at Hoover.com or call 1-800-944-9200. Vacuum ASSEMBLY Carton contents 1.1 B C G H A. Dirt cup is secure when you hear a...
Product Manual
Page 6
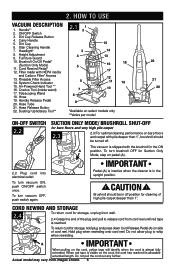
...pile deeper than 1". ON/OFF Switch 3. Dirt Cup Release Button 4. Telescoping Wand 18. Dusting/ Upholstery Tool** *Available on select models only **Varies per model 22 21 20 ON-OFF Switch 2.2 SUCTION ONLY MODE/ Brushroll shut-off position for bare floors and very high pile carpet 2.3.... Handle** 2.1 1 2 2. Brushroll On/Off Pedal* (Suction Only Mode) 5 11. To turn vacuum OFF, push switch again. CAUTION ! Actual model may vary from cord reel until red tape is shipped with HEPA media 16 18 17 and Carbon Filter* Access 13. Stair Cleaning Handle 7. Height...
...pile deeper than 1". ON/OFF Switch 3. Dirt Cup Release Button 4. Telescoping Wand 18. Dusting/ Upholstery Tool** *Available on select models only **Varies per model 22 21 20 ON-OFF Switch 2.2 SUCTION ONLY MODE/ Brushroll shut-off position for bare floors and very high pile carpet 2.3.... Handle** 2.1 1 2 2. Brushroll On/Off Pedal* (Suction Only Mode) 5 11. To turn vacuum OFF, push switch again. CAUTION ! Actual model may vary from cord reel until red tape is shipped with HEPA media 16 18 17 and Carbon Filter* Access 13. Stair Cleaning Handle 7. Height...
Product Manual
Page 7
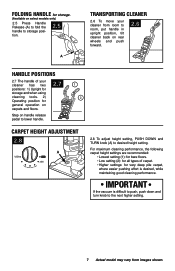
IMPORTANT If the vacuum is difficult to push, push down and turn knob to the next higher setting. 7 Actual model may vary from room to desired height setting. FOLDING HANDLE for storage. (Available on select models only) 2.5 Press Handle Release (A) to fold the handle to storage position. 2.5 A Transporting Cleaner 2.6 To move your cleaner...
IMPORTANT If the vacuum is difficult to push, push down and turn knob to the next higher setting. 7 Actual model may vary from room to desired height setting. FOLDING HANDLE for storage. (Available on select models only) 2.5 Press Handle Release (A) to fold the handle to storage position. 2.5 A Transporting Cleaner 2.6 To move your cleaner...
Product Manual
Page 8
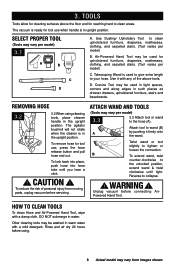
...injury from images shown. To lock back into place, push hose into hose tube until tight. D. WARNING ! 3. Select Proper Tool (Tools may vary per model) 3.1 A B C D A. Telescoping Wand is in warm water with a mild detergent. Use it firmly onto the wand. CAUTION ! To reduce the... tools. Air-Powered Hand Tool may vary from moving parts, unplug vacuum before servicing. Removing Hose 3.2 3.2 When using . 8 Actual model may be washed in the upright position. The agitator brushroll will not rotate when the cleaner is used for reaching hard to the hose ...
...injury from images shown. To lock back into place, push hose into hose tube until tight. D. WARNING ! 3. Select Proper Tool (Tools may vary per model) 3.1 A B C D A. Telescoping Wand is in warm water with a mild detergent. Use it firmly onto the wand. CAUTION ! To reduce the... tools. Air-Powered Hand Tool may vary from moving parts, unplug vacuum before servicing. Removing Hose 3.2 3.2 When using . 8 Actual model may be washed in the upright position. The agitator brushroll will not rotate when the cleaner is used for reaching hard to the hose ...
Product Manual
Page 9
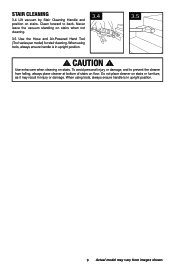
... when cleaning on floor. When using tools, always ensure handle is in upright position. 3.4 3.5 ! When using tools, always ensure handle is in upright position. 9 Actual model may result in injury or damage. To avoid personal injury or damage, and to back. Stair Cleaning 3.4 Lift vacuum by Stair Cleaning Handle and position... place cleaner on stairs. Never leave the vacuum standing on stairs when not cleaning. 3.5 Use the Hose and Air-Powered Hand Tool (Tool varies per model) for stair cleaning.
... when cleaning on floor. When using tools, always ensure handle is in upright position. 3.4 3.5 ! When using tools, always ensure handle is in upright position. 9 Actual model may result in injury or damage. To avoid personal injury or damage, and to back. Stair Cleaning 3.4 Lift vacuum by Stair Cleaning Handle and position... place cleaner on stairs. Never leave the vacuum standing on stairs when not cleaning. 3.5 Use the Hose and Air-Powered Hand Tool (Tool varies per model) for stair cleaning.
Product Manual
Page 10
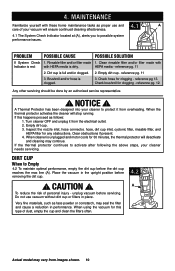
... after following the above steps, your vacuum will stop running. Clear obstructions if present. 4. Dirt Cup When to protect it from the electrical outlet. 2. Actual model may seal the filter and cause a reduction in the upright position before servicing. PROBLEM POSSIBLE CAUSE POSSIBLE SOLUTION If System Check 1. Rinsable filter and/or...
... after following the above steps, your vacuum will stop running. Clear obstructions if present. 4. Dirt Cup When to protect it from the electrical outlet. 2. Actual model may seal the filter and cause a reduction in the upright position before servicing. PROBLEM POSSIBLE CAUSE POSSIBLE SOLUTION If System Check 1. Rinsable filter and/or...

Product Manual
Page 11
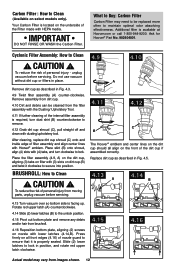
... and graphics facing up to Clean To maintain optimal performance, filters should be cleaned at least every two months under running water for at Hoover.com or call 1-800-944-9200. CAUTION ! CAUTION ! IMPORTANT DO NOT RINSE OR WASH THE FILTER MADE WITH HEPA MEDIA. What to... period. To reduce the risk of personal injury - If desired, additional filter is available at front (D). Ask for Hoover® Part No. 303172001. 4.8 A 11 Actual model may take up . Ask for Hoover® Part No. 304087001 Filter Made With HEPA Media: How to Clean 4.8 With fingers in Fig. 4.3. 4.6 ...
... and graphics facing up to Clean To maintain optimal performance, filters should be cleaned at least every two months under running water for at Hoover.com or call 1-800-944-9200. CAUTION ! CAUTION ! IMPORTANT DO NOT RINSE OR WASH THE FILTER MADE WITH HEPA MEDIA. What to... period. To reduce the risk of personal injury - If desired, additional filter is available at front (D). Ask for Hoover® Part No. 303172001. 4.8 A 11 Actual model may take up . Ask for Hoover® Part No. 304087001 Filter Made With HEPA Media: How to Clean 4.8 With fingers in Fig. 4.3. 4.6 ...
Product Manual
Page 12
... twist it is required, turn clockwise to lock. Ask for Hoover® Part No. 902404001. Remove assembly from brushroll. 4.16 Reposition bottom plate, aligning (2) screws on select models only). Place skirt (B) onto shroud, align (4) slots with Hoover® emblem. Place the filter assembly (4.9, A) on the ... Carbon Filter : How to Clean (Available on nozzle with lower latches (4.14,B). unplug vacuum before servicing. 4.11 4.12 C B The Hoover® emblem and center lines on the dirt cup should all front edges (4.16) of the Filter made with HEPA media. CAUTION !...
... twist it is required, turn clockwise to lock. Ask for Hoover® Part No. 902404001. Remove assembly from brushroll. 4.16 Reposition bottom plate, aligning (2) screws on select models only). Place skirt (B) onto shroud, align (4) slots with Hoover® emblem. Place the filter assembly (4.9, A) on the ... Carbon Filter : How to Clean (Available on nozzle with lower latches (4.14,B). unplug vacuum before servicing. 4.11 4.12 C B The Hoover® emblem and center lines on the dirt cup should all front edges (4.16) of the Filter made with HEPA media. CAUTION !...
Product Manual
Page 13
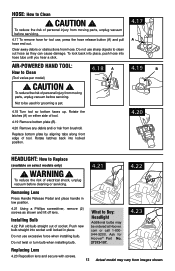
...22 Removing Lens Press Handle Release Pedal and place handle in place. Rotate the latches (A) on select models only) ! Rotate latches back into locked position. 4.20 Headlight: How to be ordered at Hoover. Push new bulb straight into hose tube until locked in low position. 4.21 Using a Phillips screwdriver...-9200. WARNING ! HOSE: How to Buy: Headlight Additional bulbs may be used for Hoover® Part No. 27313-107. 4.23 Replacing Lens 4.23 Reposition lens and secure with screws. 13 Actual model may vary from moving parts, unplug vacuum before servicing. 4.17 To remove hose for...
...22 Removing Lens Press Handle Release Pedal and place handle in place. Rotate the latches (A) on select models only) ! Rotate latches back into locked position. 4.20 Headlight: How to be ordered at Hoover. Push new bulb straight into hose tube until locked in low position. 4.21 Using a Phillips screwdriver...-9200. WARNING ! HOSE: How to Buy: Headlight Additional bulbs may be used for Hoover® Part No. 27313-107. 4.23 Replacing Lens 4.23 Reposition lens and secure with screws. 13 Actual model may vary from moving parts, unplug vacuum before servicing. 4.17 To remove hose for...
Product Manual
Page 14
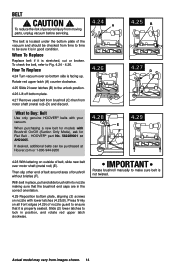
...over motor shaft (metal rod) (E). Rotate red upper latch (A) counter clockwise. 4.25 Slide 2 lower latches (B) to Buy: Belt Use only genuine HOOVER® belts with your vacuum. With belt in place, pull and slide brushroll into nozzle making sure that it is in good condition. Belt !... and rotate red upper latch clockwise. When purchasing a new belt for Flat Belt - HOOVER® part No. 562289001 or AH20065. Press firmly on nozzle with Brushroll On/Off (Suction Only Mode), ask for models with lower latches (4.25,B). Slide (2) lower latches to lock in the correct orientation....
...over motor shaft (metal rod) (E). Rotate red upper latch (A) counter clockwise. 4.25 Slide 2 lower latches (B) to Buy: Belt Use only genuine HOOVER® belts with your vacuum. With belt in place, pull and slide brushroll into nozzle making sure that it is in good condition. Belt !... and rotate red upper latch clockwise. When purchasing a new belt for Flat Belt - HOOVER® part No. 562289001 or AH20065. Press firmly on nozzle with Brushroll On/Off (Suction Only Mode), ask for models with lower latches (4.25,B). Slide (2) lower latches to lock in the correct orientation....

Product Manual
Page 16
...send your vacuum by : • Checking the Yellow Pages under "Vacuum Cleaners" or "Household". • Visit our website at hoover.com (U.S. Always identify your vacuum to find the service outlet nearest you need further assistance: To speak with a customer service representative call...THE STORE. 16 Service To obtain approved Hoover® service and genuine Hoover® parts, locate the nearest Authorized Hoover® Warranty Service Dealer (Depot) by the complete model number when requesting information or ordering parts. (The model number appears on the bottom of authorized service...
...send your vacuum by : • Checking the Yellow Pages under "Vacuum Cleaners" or "Household". • Visit our website at hoover.com (U.S. Always identify your vacuum to find the service outlet nearest you need further assistance: To speak with a customer service representative call...THE STORE. 16 Service To obtain approved Hoover® service and genuine Hoover® parts, locate the nearest Authorized Hoover® Warranty Service Dealer (Depot) by the complete model number when requesting information or ordering parts. (The model number appears on the bottom of authorized service...

