Manual
Page 2
...do not return this owner's manual. Verification of date of purchase may be required for an automated referral of your product online at hoover.com. Mon- Please enter the complete model and Manufacturing Code in Mexico Manufacturing code (Label located on back of vacuum) Contents ......8 Select Proper Tool...8 Removing Hose...8 Attach Wand And Tools 8 How To Clean Tools 8 Stair Cleaning...9 Maintenance...10 Dirt Cup...10 Filters...11 Brushroll...12 Hose...13 Air-Powered Hand Tool 13 Headlight...13 Belt...14 Troubleshooting...15 Service...16 Warranty...17 If you need assistance: ...
...do not return this owner's manual. Verification of date of purchase may be required for an automated referral of your product online at hoover.com. Mon- Please enter the complete model and Manufacturing Code in Mexico Manufacturing code (Label located on back of vacuum) Contents ......8 Select Proper Tool...8 Removing Hose...8 Attach Wand And Tools 8 How To Clean Tools 8 Stair Cleaning...9 Maintenance...10 Dirt Cup...10 Filters...11 Brushroll...12 Hose...13 Air-Powered Hand Tool 13 Headlight...13 Belt...14 Troubleshooting...15 Service...16 Warranty...17 If you need assistance: ...

Manual
Page 3
If appliance is burning or smoking, such as cigarettes, matches, or hot ashes. • Do not use without Dirt Cup and/or Filters in place. • WARNING: This product contains chemicals known to the State of California to cause cancer, birth defects or reproductive harm. Do not use ...
If appliance is burning or smoking, such as cigarettes, matches, or hot ashes. • Do not use without Dirt Cup and/or Filters in place. • WARNING: This product contains chemicals known to the State of California to cause cancer, birth defects or reproductive harm. Do not use ...
Manual
Page 6
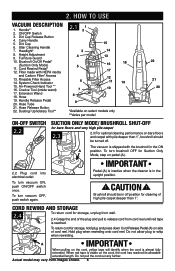
... images shown. 6 Actual model may vary from cord reel until red tape is shipped with HEPA media 16 18 17 and Carbon Filter* Access 13. Rinsable Filter Access 6 14. To turn vacuum ON, push ON/OFF switch once. Dusting/ Upholstery Tool** *Available on select models only **... Release Pedal (A) on pedal (A). 2.2 Plug cord into electrical outlet. IMPORTANT Pedal (A) is inactive when the cleaner is in the ON A position. Filter made with the brushroll in the upright position. ! Extension Wand 18. Hose 8 19. To return cord for Suction Only Mode, step on side ...
... images shown. 6 Actual model may vary from cord reel until red tape is shipped with HEPA media 16 18 17 and Carbon Filter* Access 13. Rinsable Filter Access 6 14. To turn vacuum ON, push ON/OFF switch once. Dusting/ Upholstery Tool** *Available on select models only **... Release Pedal (A) on pedal (A). 2.2 Plug cord into electrical outlet. IMPORTANT Pedal (A) is inactive when the cleaner is in the ON A position. Filter made with the brushroll in the upright position. ! Extension Wand 18. Hose 8 19. To return cord for Suction Only Mode, step on side ...

Manual
Page 10
... deactivate and cleaning may continue. When cleaner is dirty. A To reduce the risk of dust, empty the cup and clean the filters often. When using the vacuum for this happens proceed as face powder or cornstarch, may vary from images shown. 10 NOTICE ! ... cause a reduction in the upright position before servicing. Inspect the nozzle inlet, hose connector, hose, dirt cup inlet, cyclonic filter, rinsable filter, and HEPA filter for clogging - reference pg. 12. Clear obstructions if present. 4. Turn cleaner OFF and unplug it from the electrical outlet. 2. ...
... deactivate and cleaning may continue. When cleaner is dirty. A To reduce the risk of dust, empty the cup and clean the filters often. When using the vacuum for this happens proceed as face powder or cornstarch, may vary from images shown. 10 NOTICE ! ... cause a reduction in the upright position before servicing. Inspect the nozzle inlet, hose connector, hose, dirt cup inlet, cyclonic filter, rinsable filter, and HEPA filter for clogging - reference pg. 12. Clear obstructions if present. 4. Turn cleaner OFF and unplug it from the electrical outlet. 2. ...
Manual
Page 11
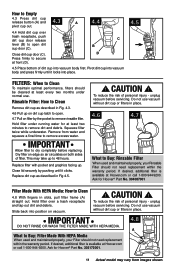
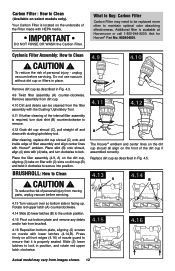
...body and press firmly until it locks into place. 4.5 Filters: When to Clean To maintain optimal performance, filters should be cleaned at Hoover.com or call 1-800-944-9200. IMPORTANT Allow filter to dry completely before servicing. Dry filter on edge so air circulates on both sides of personal ... a final time to remove excess water. Do not use vacuum without dirt cup or filters in Fig 4.5. ! Do not use vacuum without dirt cup or filters in slots, pull filter frame (A) straight out. Ask for Hoover® Part No. 303172001. 4.8 A 11 Actual model may take up to secure...
...body and press firmly until it locks into place. 4.5 Filters: When to Clean To maintain optimal performance, filters should be cleaned at Hoover.com or call 1-800-944-9200. IMPORTANT Allow filter to dry completely before servicing. Dry filter on edge so air circulates on both sides of personal ... a final time to remove excess water. Do not use vacuum without dirt cup or filters in Fig 4.5. ! Do not use vacuum without dirt cup or filters in slots, pull filter frame (A) straight out. Ask for Hoover® Part No. 303172001. 4.8 A 11 Actual model may take up to secure...
Manual
Page 12
...brushroll: how to clean 4.9 ! Press firmly on all align on nozzle with lower latches (4.14,B). cyclonic filter assembly: how to clean ! unplug vacuum before servicing. 4.11 4.12 C b The Hoover® emblem and center lines on select models only). CAUTION ! Place skirt (B) onto shroud, align (4) ... with (4) tabs, and turn dust skirt (B) counterclockwise to lock in place. IMPORTANT DO NOT RINSE OR WASH the Carbon Filter. Additional filter is available at Hoover.com or call 1-800-944-9200. Slide (2) lower latches to remove. 4.12 Grab dirt cup shroud (C), pull straight off...
...brushroll: how to clean 4.9 ! Press firmly on all align on nozzle with lower latches (4.14,B). cyclonic filter assembly: how to clean ! unplug vacuum before servicing. 4.11 4.12 C b The Hoover® emblem and center lines on select models only). CAUTION ! Place skirt (B) onto shroud, align (4) ... with (4) tabs, and turn dust skirt (B) counterclockwise to lock in place. IMPORTANT DO NOT RINSE OR WASH the Carbon Filter. Additional filter is available at Hoover.com or call 1-800-944-9200. Slide (2) lower latches to remove. 4.12 Grab dirt cup shroud (C), pull straight off...

Manual
Page 15
...burnt out. 1. Loose electrical wires. 1. Set Carpet Height Adjustment knob to appropriate setting for carpet being applied to cool for nearest authorized Hoover® dealer. 1a. PROBLEM Vacuum won't run System Check Indicator has turned red or Vacuum won 't pick or Low suction." 1. ... Belt broken or stretched. 2. For very high pile carpet deeper than 1", turn Suction Only Mode OFF - into outlet. 2. Clean Rinsable Filter and or Filter made made 4. Pg. 13. Pg. 13. 2. Check Hose - Step on Brushroll ON/OFF Pedal to appropriate setting for the nearest ...
...burnt out. 1. Loose electrical wires. 1. Set Carpet Height Adjustment knob to appropriate setting for carpet being applied to cool for nearest authorized Hoover® dealer. 1a. PROBLEM Vacuum won't run System Check Indicator has turned red or Vacuum won 't pick or Low suction." 1. ... Belt broken or stretched. 2. For very high pile carpet deeper than 1", turn Suction Only Mode OFF - into outlet. 2. Clean Rinsable Filter and or Filter made made 4. Pg. 13. Pg. 13. 2. Check Hose - Step on Brushroll ON/OFF Pedal to appropriate setting for the nearest ...


