
Manual
Page 6
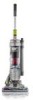
... the carry handle (C). Hose Release Button 15. Stair Hose* 2.1 6 7 8 9 14 15 18 1 2 3 10 20 17 16 19 Operate cleaner only at voltage specified on data plate on bottom of cleaner. 2. To turn vacuum ON, push ON/OFF switch (A) once.
... the carry handle (C). Hose Release Button 15. Stair Hose* 2.1 6 7 8 9 14 15 18 1 2 3 10 20 17 16 19 Operate cleaner only at voltage specified on data plate on bottom of cleaner. 2. To turn vacuum ON, push ON/OFF switch (A) once.
Manual
Page 12
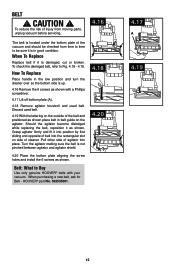
Discard used belt. Should the agitator become dislodged while replacing the belt, reposition it is located under the bottom plate of the belt and positioned as shown. HOOVER® part No. 562535001. 4.18 4.20 4.17 A 4.19 12 Grasp agitator firmly and fit it is not pinched between ... shown. Belt: What to Fig. 4.16 - 4.18. CAUTION ! To check the damaged belt, refer to Buy Use only genuine HOOVER® belts with a Phillips screwdriver. 4.17 Lift off bottom plate (A). 4.18 Remove agitator brushroll and used belt. 4.19 With the lettering on side of belt into place.
Discard used belt. Should the agitator become dislodged while replacing the belt, reposition it is located under the bottom plate of the belt and positioned as shown. HOOVER® part No. 562535001. 4.18 4.20 4.17 A 4.19 12 Grasp agitator firmly and fit it is not pinched between ... shown. Belt: What to Fig. 4.16 - 4.18. CAUTION ! To check the damaged belt, refer to Buy Use only genuine HOOVER® belts with a Phillips screwdriver. 4.17 Lift off bottom plate (A). 4.18 Remove agitator brushroll and used belt. 4.19 With the lettering on side of belt into place.

