Manual
Page 3
... continues to prevent the cleaner from falling, always place cleaner at voltage specified on data label on select models only). • Turn off all parts of cleaner. • Do not leave appliance when plugged in. WASH HANDS AFTER HANDLING. 3 Close supervision is burning or smoking, such as ...on select models only). • Unplug before operating. • Operate vacuum only at bottom of stairs on floor. Unplug from openings and moving parts. Use only manufacturer's recommended attachments and products. • Do not use outdoors or on wet surfaces. • Do not allow plug to...
... continues to prevent the cleaner from falling, always place cleaner at voltage specified on data label on select models only). • Turn off all parts of cleaner. • Do not leave appliance when plugged in. WASH HANDS AFTER HANDLING. 3 Close supervision is burning or smoking, such as ...on select models only). • Unplug before operating. • Operate vacuum only at bottom of stairs on floor. Unplug from openings and moving parts. Use only manufacturer's recommended attachments and products. • Do not use outdoors or on wet surfaces. • Do not allow plug to...
Manual
Page 5
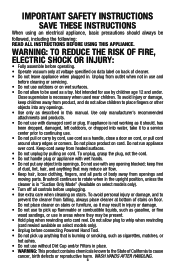
... A ridges on right back side (C) of dirt cup into vacuum. Screw (for assembly) I F Attach handle (varies per model Remove all parts are located before disposing of handle. Vacuum Base C. Make sure all parts from images shown. 1. Vacuum ASSEMBLY Carton contents A. Handle* B. Dirt Cup 1.1 A *Varies per model) Note: Remove the screw located in...
... A ridges on right back side (C) of dirt cup into vacuum. Screw (for assembly) I F Attach handle (varies per model Remove all parts are located before disposing of handle. Vacuum Base C. Make sure all parts from images shown. 1. Vacuum ASSEMBLY Carton contents A. Handle* B. Dirt Cup 1.1 A *Varies per model) Note: Remove the screw located in...
Manual
Page 9
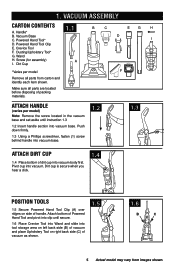
...using the vacuum for Hoover® Part No.303173001. 9 Actual model may vary from moving parts, unplug vacuum before servicing. C B D 4.5 Place bottom of injury from images shown. If desired, additional filter is available at front (D). CAUTION ! Press firmly to secure at Hoover.com or call 1-800...filter to dry completely before removing the dirt cup. 4.2 ! Place the vacuum in performance. Do not use . Remove from moving parts, unplug vacuum before the dirt cup reaches the max line (A). This may seal the filter and cause a reduction in the upright ...
...using the vacuum for Hoover® Part No.303173001. 9 Actual model may vary from moving parts, unplug vacuum before servicing. C B D 4.5 Place bottom of injury from images shown. If desired, additional filter is available at front (D). CAUTION ! Press firmly to secure at Hoover.com or call 1-800...filter to dry completely before removing the dirt cup. 4.2 ! Place the vacuum in performance. Do not use . Remove from moving parts, unplug vacuum before the dirt cup reaches the max line (A). This may seal the filter and cause a reduction in the upright ...
Manual
Page 10
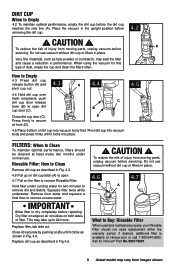
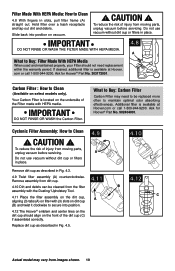
...located on the underside of injury from the filter B assembly with HEPA media. Additional filter is available at Hoover.com or call 1-800-944-9200. Ask for Hoover® Part No. 303172001. CAUTION ! To reduce the risk of the Filter made with the Dusting/ Upholstery Tool. Replace...FILTER MADE WITH HEPA MEDIA. A What to Clean ! If desired, additional filter is available at Hoover. com or call 1-800-944-9200. What to Buy: Carbon Filter Carbon Filter may vary from moving parts, unplug vacuum before servicing. C 4.11 Place the filter assembly on the dirt cup, A ...
...located on the underside of injury from the filter B assembly with HEPA media. Additional filter is available at Hoover.com or call 1-800-944-9200. Ask for Hoover® Part No. 303172001. CAUTION ! To reduce the risk of the Filter made with the Dusting/ Upholstery Tool. Replace...FILTER MADE WITH HEPA MEDIA. A What to Clean ! If desired, additional filter is available at Hoover. com or call 1-800-944-9200. What to Buy: Carbon Filter Carbon Filter may vary from moving parts, unplug vacuum before servicing. C 4.11 Place the filter assembly on the dirt cup, A ...
Manual
Page 11
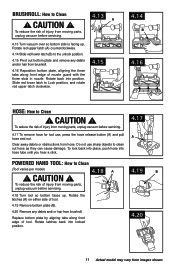
...counterclockwise. 4.14 Slide red lower latch (B) to the unlock position. 4.15 Pivot out bottom plate and remove any debris and/ or hair from moving parts, unplug vacuum before servicing. 4.13 A 4.13 Turn vacuum over so bottom side is facing up . Replace bottom plate by aligning tabs along front ...bottom plate, aligning the three tabs along front edge of tool. 4.19 Remove bottom plate (B). 4.20 Remove any debris and/or hair from moving parts, unplug vacuum before servicing. 4.17 To remove hose for tool use sharp objects to Clean (Tool varies per model) ! Rotate the latches (A) ...
...counterclockwise. 4.14 Slide red lower latch (B) to the unlock position. 4.15 Pivot out bottom plate and remove any debris and/ or hair from moving parts, unplug vacuum before servicing. 4.13 A 4.13 Turn vacuum over so bottom side is facing up . Replace bottom plate by aligning tabs along front ...bottom plate, aligning the three tabs along front edge of tool. 4.19 Remove bottom plate (B). 4.20 Remove any debris and/or hair from moving parts, unplug vacuum before servicing. 4.17 To remove hose for tool use sharp objects to Clean (Tool varies per model) ! Rotate the latches (A) ...
Manual
Page 12
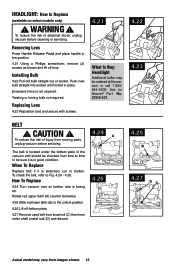
...4.26 4.25 b 4.27 DC Actual model may be sure it is facing up. how to be ordered at Hoover. com or call 1-800944-9200. To reduce the risk of socket. Ask for Hoover® Part No. 27313-107. 4.22 4.23 belt ! when to buy: headlight Additional bulbs may vary from moving... parts, unplug vacuum before cleaning or servicing. CAUTION ! Excessive force is in good condition. headliGht: how to Fig. 4.24 -...
...4.26 4.25 b 4.27 DC Actual model may be sure it is facing up. how to be ordered at Hoover. com or call 1-800944-9200. To reduce the risk of socket. Ask for Hoover® Part No. 27313-107. 4.22 4.23 belt ! when to buy: headlight Additional bulbs may vary from moving... parts, unplug vacuum before cleaning or servicing. CAUTION ! Excessive force is in good condition. headliGht: how to Fig. 4.24 -...
Manual
Page 13
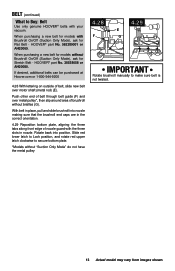
... lower latch to Lock position, and rotate red upper latch clockwise to secure bottom plate. *Models without bristles (G). HOOVER® part No. 562289001 or AH20065. If desired, additional belts can be purchased at Hoover.com or 1-800-944-9200 4.28 With lettering on outside of brushroll without "Suction Only Mode" do not have...
... lower latch to Lock position, and rotate red upper latch clockwise to secure bottom plate. *Models without bristles (G). HOOVER® part No. 562289001 or AH20065. If desired, additional belts can be purchased at Hoover.com or 1-800-944-9200 4.28 With lettering on outside of brushroll without "Suction Only Mode" do not have...

Manual
Page 15
...Mon-Fri 8am-7pm EST. Service To obtain approved Hoover® service and genuine Hoover® parts, locate the nearest Authorized Hoover® Warranty Service Dealer (Depot) by the complete model number when requesting information or ordering parts. (The model number appears on the bottom of authorized... : • Checking the Yellow Pages under "Vacuum Cleaners" or "Household". • Visit our website at hoover.com (U.S. Follow the service center link to Hoover®, Inc., Company in delay. Always identify your vacuum to find the service outlet nearest you need further assistance...
...Mon-Fri 8am-7pm EST. Service To obtain approved Hoover® service and genuine Hoover® parts, locate the nearest Authorized Hoover® Warranty Service Dealer (Depot) by the complete model number when requesting information or ordering parts. (The model number appears on the bottom of authorized... : • Checking the Yellow Pages under "Vacuum Cleaners" or "Household". • Visit our website at hoover.com (U.S. Follow the service center link to Hoover®, Inc., Company in delay. Always identify your vacuum to find the service outlet nearest you need further assistance...

Manual
Page 16
...of consequential damages, so the above exclusion may not be paid one way. The Warranty Period will provide labor and parts, at www.hoover. IN NO EVENT WILL HOOVER BE LIABLE FOR ANY SPECIAL, INDIRECT, INCIDENTAL OR CONSEQUENTIAL DAMAGES OF ANY KIND OR NATURE TO OWNER OR ANY ... of Ohio. For an automated referral to authorized service outlets in a commercial operation (such as warranted, take or send the product to a Hoover® Authorized Warranty Service Dealer, cost of the product by the original owner. WARRANTY Limited TWO Year Warranty (Domestic Use) WHAT THIS WARRANTY...
...of consequential damages, so the above exclusion may not be paid one way. The Warranty Period will provide labor and parts, at www.hoover. IN NO EVENT WILL HOOVER BE LIABLE FOR ANY SPECIAL, INDIRECT, INCIDENTAL OR CONSEQUENTIAL DAMAGES OF ANY KIND OR NATURE TO OWNER OR ANY ... of Ohio. For an automated referral to authorized service outlets in a commercial operation (such as warranted, take or send the product to a Hoover® Authorized Warranty Service Dealer, cost of the product by the original owner. WARRANTY Limited TWO Year Warranty (Domestic Use) WHAT THIS WARRANTY...


