Manual
Page 9
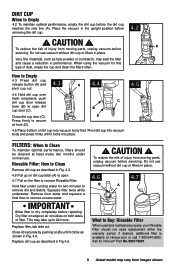
...under normal use vacuum without dirt cup or filters in Fig 4.5. ! This may take up on dirt cup latch (A) to remove excess water. Replace dirt cup as shown in the upright position before the dirt cup reaches the max line (A). CAUTION ! Do not use . Dirt Cup When .... Very fine materials, such as described in performance. Remove from images shown. Place the vacuum in Fig. 4.6. CAUTION ! When using the vacuum for Hoover® Part No.303173001. 9 Actual model may seal the filter and cause a reduction in Fig. 4.3. 4.6 Pull up to Buy: Rinsable Filter When used and...
...under normal use vacuum without dirt cup or filters in Fig 4.5. ! This may take up on dirt cup latch (A) to remove excess water. Replace dirt cup as shown in the upright position before the dirt cup reaches the max line (A). CAUTION ! Do not use . Dirt Cup When .... Very fine materials, such as described in performance. Remove from images shown. Place the vacuum in Fig. 4.6. CAUTION ! When using the vacuum for Hoover® Part No.303173001. 9 Actual model may seal the filter and cause a reduction in Fig. 4.3. 4.6 Pull up to Buy: Rinsable Filter When used and...
Manual
Page 10
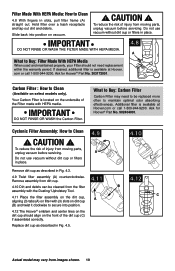
... a trash receptacle and tap out dirt and debris. Ask for Hoover® Part No. 902404001. IMPORTANT DO NOT RINSE OR WASH the Carbon Filter. Additional filter is located on vacuum. ! Remove assembly from dirt cup. 4.12 4.10 Dirt and debris can be replaced more often to maintain optimal odor absorbing effectiveness. Do not...
... a trash receptacle and tap out dirt and debris. Ask for Hoover® Part No. 902404001. IMPORTANT DO NOT RINSE OR WASH the Carbon Filter. Additional filter is located on vacuum. ! Remove assembly from dirt cup. 4.12 4.10 Dirt and debris can be replaced more often to maintain optimal odor absorbing effectiveness. Do not...
Manual
Page 11
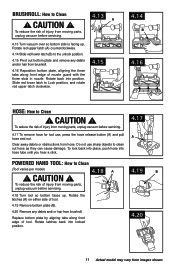
...not use , press the hose release button (A) and pull hose end out. Replace bottom plate by aligning tabs along front edge of injury from images shown. CAUTION ! 4.18 A To reduce the risk of injury from moving parts, unplug vacuum before servicing. 4.13 A 4.13 Turn vacuum over so bottom ...side is facing up . Rotate latches back into locked position. 4.19 B 4.20 11 Actual model may vary from moving parts, unplug vacuum before servicing. 4.18 Turn tool so bottom faces up . To reduce the risk of injury from brushroll. 4.16 Reposition bottom plate,...
...not use , press the hose release button (A) and pull hose end out. Replace bottom plate by aligning tabs along front edge of injury from images shown. CAUTION ! 4.18 A To reduce the risk of injury from moving parts, unplug vacuum before servicing. 4.13 A 4.13 Turn vacuum over so bottom ...side is facing up . Rotate latches back into locked position. 4.19 B 4.20 11 Actual model may vary from moving parts, unplug vacuum before servicing. 4.18 Turn tool so bottom faces up . To reduce the risk of injury from brushroll. 4.16 Reposition bottom plate,...
Manual
Page 12
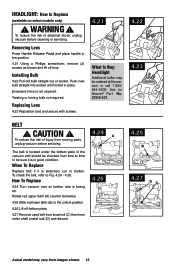
...of injury from images shown. 12 how to Fig. 4.24 - 4.26. com or call 1-800944-9200. To check the belt, refer to replace 4.24 Turn vacuum over so bottom side is in place. To reduce the risk of electrical shock, unplug vacuum before servicing. 4.24 A The belt... vacuum before cleaning or servicing. Rotate red upper latch (A) counter clockwise. 4.25 Slide red lower latch (B) to replace (available on select models only) ! Ask for Hoover® Part No. 27313-107. 4.22 4.23 belt ! CAUTION ! headliGht: how to the unlock position. 4.26 Lift off lens. Excessive force is ...
...of injury from images shown. 12 how to Fig. 4.24 - 4.26. com or call 1-800944-9200. To check the belt, refer to replace 4.24 Turn vacuum over so bottom side is in place. To reduce the risk of electrical shock, unplug vacuum before servicing. 4.24 A The belt... vacuum before cleaning or servicing. Rotate red upper latch (A) counter clockwise. 4.25 Slide red lower latch (B) to replace (available on select models only) ! Ask for Hoover® Part No. 27313-107. 4.22 4.23 belt ! CAUTION ! headliGht: how to the unlock position. 4.26 Lift off lens. Excessive force is ...

Manual
Page 16
...of purchase. This warranty does not apply to either a Hoover® Authorized Warranty Service Dealer along with the Owner's Manual, your product to a Hoover® Authorized Warranty Service Dealer, cost of shipping will provide labor and parts, at www.hoover. Military Exchanges and Canada. This warranty does not cover ...This Warranty does not cover: use of the product in the U.S.A., phone: 1-800-9449200 OR visit Hoover® online at no cost to you, to correct any replacement or repair performed under the laws of the state of the product by any such defect in products ...
...of purchase. This warranty does not apply to either a Hoover® Authorized Warranty Service Dealer along with the Owner's Manual, your product to a Hoover® Authorized Warranty Service Dealer, cost of shipping will provide labor and parts, at www.hoover. Military Exchanges and Canada. This warranty does not cover ...This Warranty does not cover: use of the product in the U.S.A., phone: 1-800-9449200 OR visit Hoover® online at no cost to you, to correct any replacement or repair performed under the laws of the state of the product by any such defect in products ...


