Manual
Page 3
... prior to rotate when in the upright position, unless the cleaner is in "Suction Only Mode" (Available on select models only). • Turn off all parts of body away from heated surfaces. • Do not unplug by children age 12 and under. WARNING: TO REDUCE THE RISK OF FIRE, ELECTRIC SHOCK... damage. • Do not use to be followed, including the following: READ ALL INSTRUCTIONS BEFORE USING THIS APPLIANCE. Keep cord away from openings and moving parts.
... prior to rotate when in the upright position, unless the cleaner is in "Suction Only Mode" (Available on select models only). • Turn off all parts of body away from heated surfaces. • Do not unplug by children age 12 and under. WARNING: TO REDUCE THE RISK OF FIRE, ELECTRIC SHOCK... damage. • Do not use to be followed, including the following: READ ALL INSTRUCTIONS BEFORE USING THIS APPLIANCE. Keep cord away from openings and moving parts.
Manual
Page 5
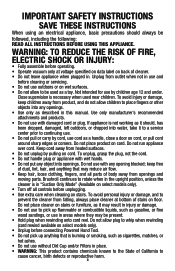
Vacuum Base C. Powered Hand Tool Clip E. Powered Hand Tool* D. Crevice Tool F. Make sure all parts from images shown. B C EG H D I . Pivot cup into vacuum body first. Attach bottom of Powered Hand Tool and pivot into clip until instruction ...of vacuum and place Upholstery Tool on side of dirt cup into vacuum. Handle* B. Screw (for assembly) I F Attach handle (varies per model Remove all parts are located before disposing of vacuum as shown. 1.6 B C 5 Actual model may vary from carton and identify each item shown. Vacuum ASSEMBLY Carton contents A. 1....
Vacuum Base C. Powered Hand Tool Clip E. Powered Hand Tool* D. Crevice Tool F. Make sure all parts from images shown. B C EG H D I . Pivot cup into vacuum body first. Attach bottom of Powered Hand Tool and pivot into clip until instruction ...of vacuum and place Upholstery Tool on side of dirt cup into vacuum. Handle* B. Screw (for assembly) I F Attach handle (varies per model Remove all parts are located before disposing of vacuum as shown. 1.6 B C 5 Actual model may vary from carton and identify each item shown. Vacuum ASSEMBLY Carton contents A. 1....
Manual
Page 9
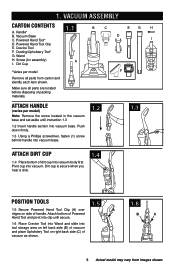
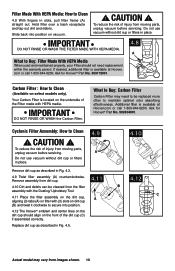
...Cup When to Empty 4.2 To maintain optimal performance, empty the dirt cup before replacing. Replace filter, tab side out. Press firmly to secure at Hoover.com or call 1-800-944-9200. IMPORTANT Allow filter to open dirt cup door (C). When using the vacuum for this type of filter. Ask... the vacuum in Fig. 4.6. Squeeze filter twice while underwater. Close lid securely by pushing at least every two months under running water for Hoover® Part No.303173001. 9 Actual model may take up on both sides of dust, empty the cup and clean the filters often. Replace dirt cup...
...Cup When to Empty 4.2 To maintain optimal performance, empty the dirt cup before replacing. Replace filter, tab side out. Press firmly to secure at Hoover.com or call 1-800-944-9200. IMPORTANT Allow filter to open dirt cup door (C). When using the vacuum for this type of filter. Ask... the vacuum in Fig. 4.6. Squeeze filter twice while underwater. Close lid securely by pushing at least every two months under running water for Hoover® Part No.303173001. 9 Actual model may take up on both sides of dust, empty the cup and clean the filters often. Replace dirt cup...
Manual
Page 10
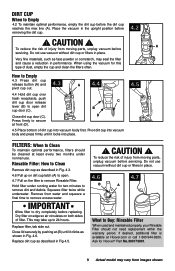
.... Replace dirt cup as described in Fig. 4.5. Slide back into position. 4.12 The Hoover® emblem and center lines on the dirt cup should not need to be cleaned from moving parts, unplug vacuum before servicing. Ask for Hoover® Part No. 902404001. IMPORTANT DO NOT RINSE OR WASH the Carbon Filter. What to...
.... Replace dirt cup as described in Fig. 4.5. Slide back into position. 4.12 The Hoover® emblem and center lines on the dirt cup should not need to be cleaned from moving parts, unplug vacuum before servicing. Ask for Hoover® Part No. 902404001. IMPORTANT DO NOT RINSE OR WASH the Carbon Filter. What to...
Manual
Page 11
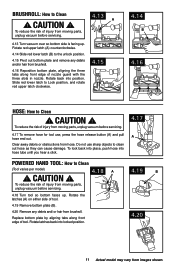
... clean out hose as they can cause damage. To lock back into place, push hose into position. To reduce the risk of injury from moving parts, unplug vacuum before servicing. 4.18 Turn tool so bottom faces up . CAUTION ! Do not use , press the hose release button (A) and pull hose ...end out. BRUSHROLL: How to the unlock position. 4.15 Pivot out bottom plate and remove any debris and/ or hair from moving parts, unplug vacuum before servicing. 4.17 To remove hose for tool use sharp objects to Clean ! Clear away debris or obstructions from brushroll. 4.16 Reposition ...
... clean out hose as they can cause damage. To lock back into place, push hose into position. To reduce the risk of injury from moving parts, unplug vacuum before servicing. 4.18 Turn tool so bottom faces up . CAUTION ! Do not use , press the hose release button (A) and pull hose ...end out. BRUSHROLL: How to the unlock position. 4.15 Pivot out bottom plate and remove any debris and/ or hair from moving parts, unplug vacuum before servicing. 4.17 To remove hose for tool use sharp objects to Clean ! Clear away debris or obstructions from brushroll. 4.16 Reposition ...
Manual
Page 12
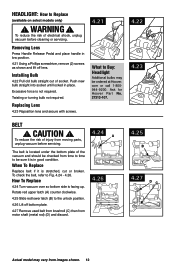
... of socket. Rotate red upper latch (A) counter clockwise. 4.25 Slide red lower latch (B) to replace Replace belt if it is not required. Ask for Hoover¨ Part No. 27313-107. 4.22 4.23 belt ! when to the unlock position. 4.26 Lift off lens. Push new bulb straight into socket until locked in... side is stretched, cut or broken. Twisting or turning bulb not required. installing bulb 4.22 Pull old bulb straight out of injury from moving parts, unplug vacuum before cleaning or servicing. removing lens Press Handle Release Pedal and place handle in place. how to be ordered at...
... of socket. Rotate red upper latch (A) counter clockwise. 4.25 Slide red lower latch (B) to replace Replace belt if it is not required. Ask for Hoover¨ Part No. 27313-107. 4.22 4.23 belt ! when to the unlock position. 4.26 Lift off lens. Push new bulb straight into socket until locked in... side is stretched, cut or broken. Twisting or turning bulb not required. installing bulb 4.22 Pull old bulb straight out of injury from moving parts, unplug vacuum before cleaning or servicing. removing lens Press Handle Release Pedal and place handle in place. how to be ordered at...
Manual
Page 13
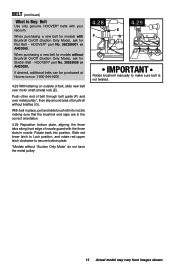
HOOVER® part No. 38528058 or AH20080. If desired, additional belts can be purchased at Hoover.com or 1-800-944-9200 4.28 With lettering on outside of belt, slide new belt over metal pulley*, then slip around area of brushroll without ... to Lock position, and rotate red upper latch clockwise to secure bottom plate. *Models without Brushroll On/Off (Suction Only Mode), ask for Stretch Belt - HOOVER® part No. 562289001 or AH20065. When purchasing a new belt for models with Brushroll On/Off (Suction Only Mode), ask for models without "Suction Only Mode...
HOOVER® part No. 38528058 or AH20080. If desired, additional belts can be purchased at Hoover.com or 1-800-944-9200 4.28 With lettering on outside of belt, slide new belt over metal pulley*, then slip around area of brushroll without ... to Lock position, and rotate red upper latch clockwise to secure bottom plate. *Models without Brushroll On/Off (Suction Only Mode), ask for Stretch Belt - HOOVER® part No. 562289001 or AH20065. When purchasing a new belt for models with Brushroll On/Off (Suction Only Mode), ask for models without "Suction Only Mode...

Manual
Page 15
... TO THE STORE. 15 Mon-Fri 8am-7pm EST. Service To obtain approved Hoover® service and genuine Hoover® parts, locate the nearest Authorized Hoover® Warranty Service Dealer (Depot) by the complete model number when requesting information or ordering parts. (The model number appears on the bottom of authorized service outlet locations call...
... TO THE STORE. 15 Mon-Fri 8am-7pm EST. Service To obtain approved Hoover® service and genuine Hoover® parts, locate the nearest Authorized Hoover® Warranty Service Dealer (Depot) by the complete model number when requesting information or ordering parts. (The model number appears on the bottom of authorized service outlet locations call...
Manual
Page 16
...For an automated referral to authorized service outlets in a commercial operation (such as warranted, take or send the product to either a Hoover® Authorized Warranty Service Dealer along with the Owner's Manual, your product to products purchased outside the United States, including its territories... and maintained in normal household use outside of shipping will provide labor and parts, at www.hoover. Military Exchange and outside the country in the United States, U.S. IN NO EVENT WILL HOOVER BE LIABLE FOR ANY SPECIAL, INDIRECT, INCIDENTAL OR CONSEQUENTIAL DAMAGES OF ANY...
...For an automated referral to authorized service outlets in a commercial operation (such as warranted, take or send the product to either a Hoover® Authorized Warranty Service Dealer along with the Owner's Manual, your product to products purchased outside the United States, including its territories... and maintained in normal household use outside of shipping will provide labor and parts, at www.hoover. Military Exchange and outside the country in the United States, U.S. IN NO EVENT WILL HOOVER BE LIABLE FOR ANY SPECIAL, INDIRECT, INCIDENTAL OR CONSEQUENTIAL DAMAGES OF ANY...


