Manual
Page 2
... 6 Folding Handle 6 Carpet Height Adjustment 7 Tools ...7 Select Proper Tool 7 Removing Hose 7 Attach Wand And Tools 7 Stair Cleaning 8 How To Clean Tools 8 Maintenance...8 Dirt Cup...9 Filters...9 Brushroll...11 Hose...11 Powered Hand Tool 11 Headlight...12 Belt...13 Troubleshooting 14 Service...15 Warranty...16 If you need assistance: Visit our website at Hoover.com or call 1-800-944-9200...
... 6 Folding Handle 6 Carpet Height Adjustment 7 Tools ...7 Select Proper Tool 7 Removing Hose 7 Attach Wand And Tools 7 Stair Cleaning 8 How To Clean Tools 8 Maintenance...8 Dirt Cup...9 Filters...9 Brushroll...11 Hose...11 Powered Hand Tool 11 Headlight...12 Belt...13 Troubleshooting 14 Service...15 Warranty...16 If you need assistance: Visit our website at Hoover.com or call 1-800-944-9200...

Manual
Page 3
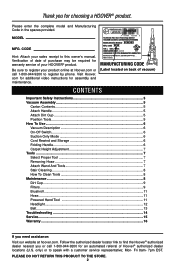
...supervision is in "Suction Only Mode" (Available on floor. Keep cord away from heated surfaces. • Do not unplug by pulling on cord. WASH HANDS AFTER HANDLING. 3 Not intended for use with damaged cord or plug. Do not place product on cord. To unplug, grasp the plug, not the... the cleaner from openings and moving parts. WARNING: TO REDUCE THE RISK OF FIRE, ELECTRIC SHOCK OR INJURY: • Fully assemble before connecting Powered Hand Tool. • Do not pick up flammable or combustible liquids, such as gasoline, or fine wood sandings, or use in areas where they may ...
...supervision is in "Suction Only Mode" (Available on floor. Keep cord away from heated surfaces. • Do not unplug by pulling on cord. WASH HANDS AFTER HANDLING. 3 Not intended for use with damaged cord or plug. Do not place product on cord. To unplug, grasp the plug, not the... the cleaner from openings and moving parts. WARNING: TO REDUCE THE RISK OF FIRE, ELECTRIC SHOCK OR INJURY: • Fully assemble before connecting Powered Hand Tool. • Do not pick up flammable or combustible liquids, such as gasoline, or fine wood sandings, or use in areas where they may ...
Manual
Page 5
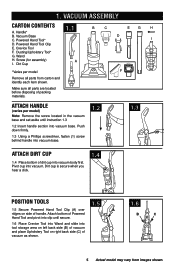
... slide into vacuum body first. Dirt cup is secure when you hear a click. 1.4 Position Tools 1.5 1.5 Secure Powered Hand Tool Clip (A) over A ridges on right back side (C) of Powered Hand Tool and pivot into clip until instruction 1.3 1.2 Insert handle section into vacuum. Dusting/Upholstery Tool* G. Vacuum Base C. Wand H. Attach bottom of vacuum as shown. 1.6 B C 5 Actual model may vary from...
... slide into vacuum body first. Dirt cup is secure when you hear a click. 1.4 Position Tools 1.5 1.5 Secure Powered Hand Tool Clip (A) over A ridges on right back side (C) of Powered Hand Tool and pivot into clip until instruction 1.3 1.2 Insert handle section into vacuum. Dusting/Upholstery Tool* G. Vacuum Base C. Wand H. Attach bottom of vacuum as shown. 1.6 B C 5 Actual model may vary from...
Manual
Page 6
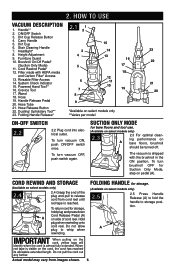
... be turned off. To turn brushroll OFF for bare floors and tool use. (Available on select models only) 2.3 2.3 For optimal cleaning performance on pedal (A). Stair Cleaning Handle 7. Powered Hand Tool** 16. ON/OFF Switch 3. Dirt Cup 6. Wand 18. Dusting/ Upholstery Tool** 23. Folding Handle Release* 2.1 1 2 15 3 14 ... and press down Cord Release Pedal (A) A on select models only) 2.4 2.4 Grasp the end of cord reel. Handle** 2. Crevice Tool 17. Headlight* 8. Rinsable Filter Access 14. Brushroll On/Off Pedal* (Suction Only Mode) 11. To return cord for storage. (...
... be turned off. To turn brushroll OFF for bare floors and tool use. (Available on select models only) 2.3 2.3 For optimal cleaning performance on pedal (A). Stair Cleaning Handle 7. Powered Hand Tool** 16. ON/OFF Switch 3. Dirt Cup 6. Wand 18. Dusting/ Upholstery Tool** 23. Folding Handle Release* 2.1 1 2 15 3 14 ... and press down Cord Release Pedal (A) A on select models only) 2.4 2.4 Grasp the end of cord reel. Handle** 2. Crevice Tool 17. Headlight* 8. Rinsable Filter Access 14. Brushroll On/Off Pedal* (Suction Only Mode) 11. To return cord for storage. (...
Manual
Page 7
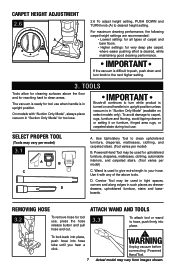
...in "Suction Only Mode" for upholstered furniture, draperies, mattresses, clothing, automobile interiors, and carpeted stairs. (Tool varies per model) C. Powered Hand Tool may vary per model) B. Crevice Tool may vary from images shown. Actual model may be used to give extra length to carpet, rugs, furniture... wand to desired height setting. Wand is desired, while maintaining good cleaning performance. WARNING Unplug vacuum before connecting Powered Hand Tool. CARPET HEIGHT ADJUSTMENT 2.6 A 2.6 To adjust height setting, PUSH DOWN and TURN knob (A) to hose, push firmly ...
...in "Suction Only Mode" for upholstered furniture, draperies, mattresses, clothing, automobile interiors, and carpeted stairs. (Tool varies per model) C. Powered Hand Tool may vary per model) B. Crevice Tool may vary from images shown. Actual model may be used to give extra length to carpet, rugs, furniture... wand to desired height setting. Wand is desired, while maintaining good cleaning performance. WARNING Unplug vacuum before connecting Powered Hand Tool. CARPET HEIGHT ADJUSTMENT 2.6 A 2.6 To adjust height setting, PUSH DOWN and TURN knob (A) to hose, push firmly ...
Manual
Page 8
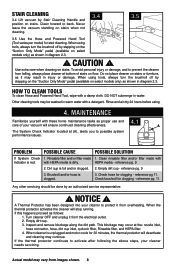
...outlet. 2. reference pg. 9 2. Any other servicing should be washed in water. NOTICE ! If the thermal protector continues to Clean Tools To clean Hose and Powered Hand Tool, wipe with these home maintenance tasks as proper use and care of stairs on stairs when not cleaning. 3.4 3.5 3.5 Use the Hose... and Powered Hand Tool (Tool varies per model) for 30 minutes, the thermal protector will stop running. CAUTION ! How to activate after following the above ...
...outlet. 2. reference pg. 9 2. Any other servicing should be washed in water. NOTICE ! If the thermal protector continues to Clean Tools To clean Hose and Powered Hand Tool, wipe with these home maintenance tasks as proper use and care of stairs on stairs when not cleaning. 3.4 3.5 3.5 Use the Hose... and Powered Hand Tool (Tool varies per model) for 30 minutes, the thermal protector will stop running. CAUTION ! How to activate after following the above ...
Manual
Page 11
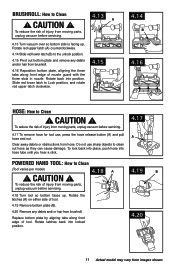
...to the unlock position. 4.15 Pivot out bottom plate and remove any debris and/ or hair from moving parts, unplug vacuum before servicing. 4.18 Turn tool so bottom faces up . Rotate latches back into position. Clear away debris or obstructions from moving parts, unplug vacuum before servicing. 4.17 To remove hose...press the hose release button (A) and pull hose end out. To lock back into place, push hose into hose tube until you hear a click. 4.17 A Powered Hand Tool: How to clean out hose as they can cause damage. Rotate the latches (A) on either side of injury from hose.
...to the unlock position. 4.15 Pivot out bottom plate and remove any debris and/ or hair from moving parts, unplug vacuum before servicing. 4.18 Turn tool so bottom faces up . Rotate latches back into position. Clear away debris or obstructions from moving parts, unplug vacuum before servicing. 4.17 To remove hose...press the hose release button (A) and pull hose end out. To lock back into place, push hose into hose tube until you hear a click. 4.17 A Powered Hand Tool: How to clean out hose as they can cause damage. Rotate the latches (A) on either side of injury from hose.
Manual
Page 14
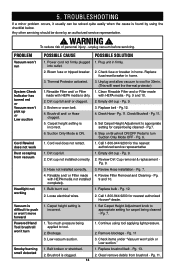
... Dirt cup not installed correctly. 2. Replace bulb - Belt broken or stretched. 2. Pg. 11 3. Pg. 11. Power cord not firmly plugged 1. Empty dirt cup - Pg. 11. 5. Set Carpet Height Adjustment to turn Smoky/burning smell ... cup full and/ or clogged. 2. Brushroll and/ or Hose clogged. 4. Call 1-800-944-9200 for nearest authorized Hoover® dealer. 1. Review Hose installation - Pg. 7. 4. Pg. 12. 2. Any other servicing should be solved ...clogged. 14 1. Unplug and allow vacuum to push or won't move forward Powered Hand Tool brushroll won 't pick or Low suction." 1. 5.
... Dirt cup not installed correctly. 2. Replace bulb - Belt broken or stretched. 2. Pg. 11 3. Pg. 11. Power cord not firmly plugged 1. Empty dirt cup - Pg. 11. 5. Set Carpet Height Adjustment to turn Smoky/burning smell ... cup full and/ or clogged. 2. Brushroll and/ or Hose clogged. 4. Call 1-800-944-9200 for nearest authorized Hoover® dealer. 1. Review Hose installation - Pg. 7. 4. Pg. 12. 2. Any other servicing should be solved ...clogged. 14 1. Unplug and allow vacuum to push or won't move forward Powered Hand Tool brushroll won 't pick or Low suction." 1. 5.


