Manual
Page 3
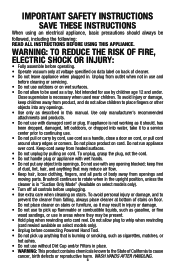
... or reproductive harm. WARNING: TO REDUCE THE RISK OF FIRE, ELECTRIC SHOCK OR INJURY: • Fully assemble before operating. • Operate vacuum only at bottom of body away from outlet when not in use and before cleaning or servicing. • Do not use outdoors or on wet..., such as gasoline, or fine wood sandings, or use in this manual. Do not run appliance over cord. Unplug from openings and moving parts. IMPORTANT SAFETY INSTRUCTIONS SAVE THESE INSTRUCTIONS When using an electrical appliance, basic precautions should , has been dropped, damaged, left outdoors, or dropped ...
... or reproductive harm. WARNING: TO REDUCE THE RISK OF FIRE, ELECTRIC SHOCK OR INJURY: • Fully assemble before operating. • Operate vacuum only at bottom of body away from outlet when not in use and before cleaning or servicing. • Do not use outdoors or on wet..., such as gasoline, or fine wood sandings, or use in this manual. Do not run appliance over cord. Unplug from openings and moving parts. IMPORTANT SAFETY INSTRUCTIONS SAVE THESE INSTRUCTIONS When using an electrical appliance, basic precautions should , has been dropped, damaged, left outdoors, or dropped ...
Manual
Page 5
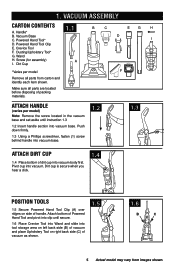
... shown. Powered Hand Tool Clip E. Screw (for assembly) I F Attach handle (varies per model Remove all parts are located before disposing of dirt cup into vacuum. Dirt cup is secure when you hear a click. 1.4 Position Tools 1.5 1.5 Secure Powered Hand Tool Clip... Cup 1.1 A *Varies per model) Note: Remove the screw located in the vacuum base and set aside until secure. 1.6 Place Crevice Tool into Wand and slide into vacuum base. Make sure all parts from images shown. Handle* B. Vacuum Base C. Push down firmly. 1.3 Using a Phillips screwdriver, fasten (1) screw behind...
... shown. Powered Hand Tool Clip E. Screw (for assembly) I F Attach handle (varies per model Remove all parts are located before disposing of dirt cup into vacuum. Dirt cup is secure when you hear a click. 1.4 Position Tools 1.5 1.5 Secure Powered Hand Tool Clip... Cup 1.1 A *Varies per model) Note: Remove the screw located in the vacuum base and set aside until secure. 1.6 Place Crevice Tool into Wand and slide into vacuum base. Make sure all parts from images shown. Handle* B. Vacuum Base C. Push down firmly. 1.3 Using a Phillips screwdriver, fasten (1) screw behind...
Manual
Page 9
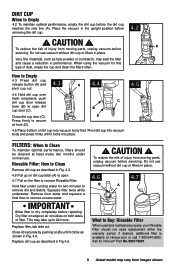
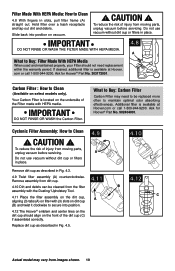
...injury from images shown. Close dirt cup door (C). This may vary from moving parts, unplug vacuum before removing the dirt cup. 4.2 ! Close lid securely by pushing at Hoover.com or call 1-800-944-9200. Place the vacuum in Fig. 4.3. 4.6 Pull up to Clean To maintain optimal performance, filters ... the warranty period. A To reduce the risk of filter. Do not use vacuum without dirt cup or filters in Fig 4.5. ! Very fine materials, such as described in place. When using the vacuum for Hoover® Part No.303173001. 9 Actual model may take up on dirt cup latch (A) to...
...injury from images shown. Close dirt cup door (C). This may vary from moving parts, unplug vacuum before removing the dirt cup. 4.2 ! Close lid securely by pushing at Hoover.com or call 1-800-944-9200. Place the vacuum in Fig. 4.3. 4.6 Pull up to Clean To maintain optimal performance, filters ... the warranty period. A To reduce the risk of filter. Do not use vacuum without dirt cup or filters in Fig 4.5. ! Very fine materials, such as described in place. When using the vacuum for Hoover® Part No.303173001. 9 Actual model may take up on dirt cup latch (A) to...
Manual
Page 10
... on select models only). Slide back into position. 4.12 The Hoover® emblem and center lines on the front of the Filter made with the Dusting/ Upholstery Tool. Remove assembly from moving parts, unplug vacuum before servicing. Hold filter over a trash receptacle and tap out ...dirt and debris. IMPORTANT 4.8 DO NOT RINSE OR WASH THE FILTER MADE WITH HEPA MEDIA. Ask for Hoover® Part No. 902404001. Your Carbon Filter is ...
... on select models only). Slide back into position. 4.12 The Hoover® emblem and center lines on the front of the Filter made with the Dusting/ Upholstery Tool. Remove assembly from moving parts, unplug vacuum before servicing. Hold filter over a trash receptacle and tap out ...dirt and debris. IMPORTANT 4.8 DO NOT RINSE OR WASH THE FILTER MADE WITH HEPA MEDIA. Ask for Hoover® Part No. 902404001. Your Carbon Filter is ...
Manual
Page 11
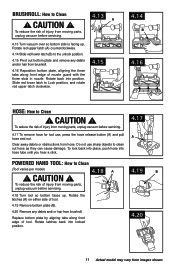
...Tool varies per model) ! Rotate back into position. Clear away debris or obstructions from brushroll. To reduce the risk of injury from moving parts, unplug vacuum before servicing. 4.18 Turn tool so bottom faces up . To reduce the risk of nozzle guard with the three slots in nozzle. Replace ...bottom plate by aligning tabs along front edge of injury from moving parts, unplug vacuum before servicing. 4.17 To remove hose for tool use sharp objects to the unlock position. 4.15 Pivot out bottom plate and remove...
...Tool varies per model) ! Rotate back into position. Clear away debris or obstructions from brushroll. To reduce the risk of injury from moving parts, unplug vacuum before servicing. 4.18 Turn tool so bottom faces up . To reduce the risk of nozzle guard with the three slots in nozzle. Replace ...bottom plate by aligning tabs along front edge of injury from moving parts, unplug vacuum before servicing. 4.17 To remove hose for tool use sharp objects to the unlock position. 4.15 Pivot out bottom plate and remove...
Manual
Page 12
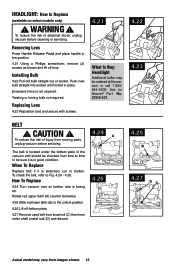
...what to replace Replace belt if it is facing up. CAUTION ! To check the belt, refer to replace 4.24 Turn vacuum over so bottom side is in good condition. Ask for Hoover® Part No. 27313-107. 4.22 4.23 belt ! how to Fig. 4.24 - 4.26. removing lens Press Handle Release ... (B) to be checked from time to time to the unlock position. 4.26 Lift off lens. To reduce the risk of injury from moving parts, unplug vacuum before cleaning or servicing. Excessive force is stretched, cut or broken. Push new bulb straight into socket until locked in low position. 4.21...
...what to replace Replace belt if it is facing up. CAUTION ! To check the belt, refer to replace 4.24 Turn vacuum over so bottom side is in good condition. Ask for Hoover® Part No. 27313-107. 4.22 4.23 belt ! how to Fig. 4.24 - 4.26. removing lens Press Handle Release ... (B) to be checked from time to time to the unlock position. 4.26 Lift off lens. To reduce the risk of injury from moving parts, unplug vacuum before cleaning or servicing. Excessive force is stretched, cut or broken. Push new bulb straight into socket until locked in low position. 4.21...
Manual
Page 13
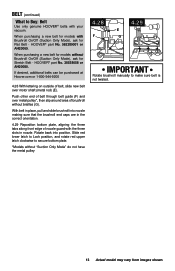
...secure bottom plate. *Models without Brushroll On/Off (Suction Only Mode), ask for Flat Belt - HOOVER® part No. 38528058 or AH20080. With belt in place, pull and slide brushroll into position. Belt (continued)... What to Buy: Belt Use only genuine HOOVER® belts with the three slots in nozzle.... 13 Actual model may vary from images shown. If desired, additional belts can be purchased at Hoover.com or 1-800-944-9200 4.28 With lettering on outside of belt, slide new belt over ...
...secure bottom plate. *Models without Brushroll On/Off (Suction Only Mode), ask for Flat Belt - HOOVER® part No. 38528058 or AH20080. With belt in place, pull and slide brushroll into position. Belt (continued)... What to Buy: Belt Use only genuine HOOVER® belts with the three slots in nozzle.... 13 Actual model may vary from images shown. If desired, additional belts can be purchased at Hoover.com or 1-800-944-9200 4.28 With lettering on outside of belt, slide new belt over ...
Manual
Page 15
... number when requesting information or ordering parts. (The model number appears on the bottom of authorized service outlet locations call 1-800-944-9200; Do not send your vacuum by : • Checking the Yellow Pages under "Vacuum Cleaners" or "Household". • Visit our website at hoover.com (U.S. Customers) or hoover.ca (Canadian customers). Follow the service...
... number when requesting information or ordering parts. (The model number appears on the bottom of authorized service outlet locations call 1-800-944-9200; Do not send your vacuum by : • Checking the Yellow Pages under "Vacuum Cleaners" or "Household". • Visit our website at hoover.com (U.S. Customers) or hoover.ca (Canadian customers). Follow the service...


