Manual
Page 2
...service representative; Manufacturing code (Label located on back of vacuum) Contents Important Safety Instructions 3 Vacuum Assembly 5 Carton Contents 5 Attach Handle 5 Attach Bag Door 5 Position Tools 5 How To Use...6 Vacuum Description 6 On-Off Switch 6 Suction Only Mode 6 Folding Handle 6 Cord Storage 6 ...Maintenance...8 Filter Bag...9 Filters...10 Brushroll...10 Hose...11 Powered Hand Tool 11 Headlight...11 Belt...12 Troubleshooting 13 Service...14 Warranty...15 If you need assistance: Visit our website at Hoover.com or call 1-800-944-9200 for choosing a HOOVER® ...
...service representative; Manufacturing code (Label located on back of vacuum) Contents Important Safety Instructions 3 Vacuum Assembly 5 Carton Contents 5 Attach Handle 5 Attach Bag Door 5 Position Tools 5 How To Use...6 Vacuum Description 6 On-Off Switch 6 Suction Only Mode 6 Folding Handle 6 Cord Storage 6 ...Maintenance...8 Filter Bag...9 Filters...10 Brushroll...10 Hose...11 Powered Hand Tool 11 Headlight...11 Belt...12 Troubleshooting 13 Service...14 Warranty...15 If you need assistance: Visit our website at Hoover.com or call 1-800-944-9200 for choosing a HOOVER® ...
Manual
Page 3
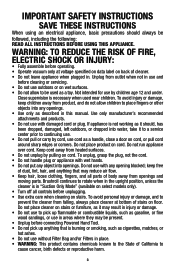
... wet surfaces. • Do not allow children to be followed, including the following: READ ALL INSTRUCTIONS BEFORE USING THIS APPLIANCE. Do not use without Filter Bag and/or Filters in "Suction Only Mode" (available on select models only). • Turn off all parts of dust, lint, hair, and anything that may...
... wet surfaces. • Do not allow children to be followed, including the following: READ ALL INSTRUCTIONS BEFORE USING THIS APPLIANCE. Do not use without Filter Bag and/or Filters in "Suction Only Mode" (available on select models only). • Turn off all parts of dust, lint, hair, and anything that may...
Manual
Page 5
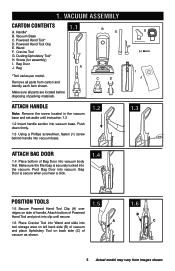
... Attach bottom of Powered Hand Tool and pivot into clip until instruction 1.3 1.2 Insert handle section into vacuum. Bag Door J. Remove all parts are located before disposing of Bag Door into A tool storage area on left back side (B) of vacuum and place Upholstery Tool on side of... base and set aside until secure. 1.6 Place Crevice Tool into Wand and slide into vacuum body first. Bag Door is securely tucked into vacuum base. 1.2 G F H I . Make sure the filter bag is secure when you hear a click. 1.4 Position Tools 1.5 1.5 Secure Powered Hand Tool Clip (A) over...
... Attach bottom of Powered Hand Tool and pivot into clip until instruction 1.3 1.2 Insert handle section into vacuum. Bag Door J. Remove all parts are located before disposing of Bag Door into A tool storage area on left back side (B) of vacuum and place Upholstery Tool on side of... base and set aside until secure. 1.6 Place Crevice Tool into Wand and slide into vacuum body first. Bag Door is securely tucked into vacuum base. 1.2 G F H I . Make sure the filter bag is secure when you hear a click. 1.4 Position Tools 1.5 1.5 Secure Powered Hand Tool Clip (A) over...
Manual
Page 6
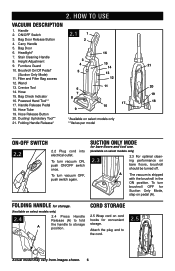
...For optimal cleaning performance on cord hooks for convenient storage. Cord STORAGE 2.5 Wrap cord on bare floors, brushroll should be turned off. Bag Check Indicator 16. A The vacuum is shipped with the brushroll in the ON position. To turn brushroll OFF for storage. (Available on... per model 21 20 19 18 ON-OFF Switch 2.2 2.2 Plug cord into electrical outlet. Stair Cleaning Handle 8. Hose 15. Filter and Filter Bag access 12. Folding Handle Release* *Available on pedal (A). HOW TO USE Vacuum Description 1. Crevice Tool 14. Handle 2. Furniture Guard 10. Dusting...
...For optimal cleaning performance on cord hooks for convenient storage. Cord STORAGE 2.5 Wrap cord on bare floors, brushroll should be turned off. Bag Check Indicator 16. A The vacuum is shipped with the brushroll in the ON position. To turn brushroll OFF for storage. (Available on... per model 21 20 19 18 ON-OFF Switch 2.2 2.2 Plug cord into electrical outlet. Stair Cleaning Handle 8. Hose 15. Filter and Filter Bag access 12. Folding Handle Release* *Available on pedal (A). HOW TO USE Vacuum Description 1. Crevice Tool 14. Handle 2. Furniture Guard 10. Dusting...
Manual
Page 8
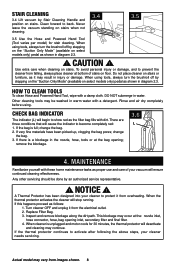
... Protector has been designed into your cleaner needs servicing. This blockage may continue. If very fine materials have been picked up, clogging the bag pores; NOTICE ! DO NOT submerge in warm water with a damp cloth. There are three conditions that will stop running. change the... bag. 2. Replace Filter Bag. 3. When cleaner is full; Do not place cleaner on stairs when not cleaning. 3.4 3.5 3.5 Use the Hose and Powered Hand Tool (Tool varies per...
... Protector has been designed into your cleaner needs servicing. This blockage may continue. If very fine materials have been picked up, clogging the bag pores; NOTICE ! DO NOT submerge in warm water with a damp cloth. There are three conditions that will stop running. change the... bag. 2. Replace Filter Bag. 3. When cleaner is full; Do not place cleaner on stairs when not cleaning. 3.4 3.5 3.5 Use the Hose and Powered Hand Tool (Tool varies per...
Manual
Page 9
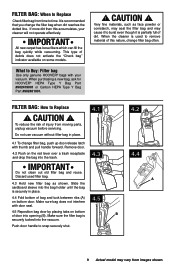
...carpet has loose fibers which can fill the bag quickly while vacuuming. What to Buy: Filter bag Use only genuine HOOVER® bags with thumb and pull handle forward. CAUTION ! Make sure bag does not interfere with door seal. 4.5 Reposition bag door by placing tabs on bottom door. To...some models. It is used filter bag. 4.3 Hold new filter bag as face powder or cornstarch, may seal the filter bag and may vary from images shown. CAUTION ! When purchasing a new bag, ask for HOOVER® HEPA Type Y Bag Part #902419001 or Carbon HEPA Type Y Bag Part #902481001. ! Slide the ...
...carpet has loose fibers which can fill the bag quickly while vacuuming. What to Buy: Filter bag Use only genuine HOOVER® bags with thumb and pull handle forward. CAUTION ! Make sure bag does not interfere with door seal. 4.5 Reposition bag door by placing tabs on bottom door. To...some models. It is used filter bag. 4.3 Hold new filter bag as face powder or cornstarch, may seal the filter bag and may vary from images shown. CAUTION ! When purchasing a new bag, ask for HOOVER® HEPA Type Y Bag Part #902419001 or Carbon HEPA Type Y Bag Part #902481001. ! Slide the ...
Manual
Page 13
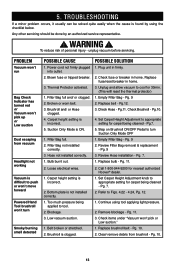
.... 11. 2. Any other servicing should be solved quite easily when the cause is found by an authorized service representative. ! PROBLEM Vacuum won't run Bag Check Indicator has turned red or Vacuum won't pick up or Low suction Dust escaping from brushroll - Plug unit in firmly. 2. Pg. 9 2....or won't move forward Powered Hand Tool brushroll won 't pick or Low suction." 1. Carpet height setting is difficult to appropriate setting for nearest authorized Hoover® dealer. 1. Replace brushroll belt - Call 1-800-944-9200 for carpet being applied to Figs. 4.22 - 4.24, Pg. 12....
.... 11. 2. Any other servicing should be solved quite easily when the cause is found by an authorized service representative. ! PROBLEM Vacuum won't run Bag Check Indicator has turned red or Vacuum won't pick up or Low suction Dust escaping from brushroll - Plug unit in firmly. 2. Pg. 9 2....or won't move forward Powered Hand Tool brushroll won 't pick or Low suction." 1. Carpet height setting is difficult to appropriate setting for nearest authorized Hoover® dealer. 1. Replace brushroll belt - Call 1-800-944-9200 for carpet being applied to Figs. 4.22 - 4.24, Pg. 12....


