Manual
Page 2
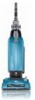
... representative; only) or to register your product online at Hoover.com or call 1-800-944-9200 for an automated referral of vacuum) Contents Important Safety Instructions 3 Vacuum Assembly 5 Carton Contents 5 Attach Handle 5 Attach Bag Door 5 Position Tools 5 How To Use...6 Vacuum Description... Select Proper Tool 7 Removing Hose 7 Attach Wand And Tools 7 Stair Cleaning 8 How To Clean Tools 8 Check Bag Indicator 8 Maintenance...8 Filter Bag...9 Filters...10 Brushroll...10 Hose...11 Powered Hand Tool 11 Headlight...11 Belt...12 Troubleshooting 13 Service...14 Warranty...15 If ...
... representative; only) or to register your product online at Hoover.com or call 1-800-944-9200 for an automated referral of vacuum) Contents Important Safety Instructions 3 Vacuum Assembly 5 Carton Contents 5 Attach Handle 5 Attach Bag Door 5 Position Tools 5 How To Use...6 Vacuum Description... Select Proper Tool 7 Removing Hose 7 Attach Wand And Tools 7 Stair Cleaning 8 How To Clean Tools 8 Check Bag Indicator 8 Maintenance...8 Filter Bag...9 Filters...10 Brushroll...10 Hose...11 Powered Hand Tool 11 Headlight...11 Belt...12 Troubleshooting 13 Service...14 Warranty...15 If ...
Manual
Page 3
... outdoors, or dropped into water, take it to a service center prior to continuing use. • Do not pull or carry by cord, use without Filter Bag and/or Filters in place. • WARNING: This product contains chemicals known to the State of California to place fingers or other objects into openings...
... outdoors, or dropped into water, take it to a service center prior to continuing use. • Do not pull or carry by cord, use without Filter Bag and/or Filters in place. • WARNING: This product contains chemicals known to the State of California to place fingers or other objects into openings...
Manual
Page 5
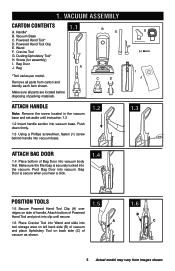
... secure when you hear a click. 1.4 Position Tools 1.5 1.5 Secure Powered Hand Tool Clip (A) over ridges on back side (C) of Bag Door into vacuum base. 1.2 G F H I . Handle* B. Powered Hand Tool Clip E. Remove all parts are located before disposing of...until instruction 1.3 1.2 Insert handle section into vacuum base. Attach bottom of packing materials. Vacuum ASSEMBLY Carton contents A. Screw (for assembly) I J 1.3 Attach Bag Door 1.4 Place bottom of vacuum as shown. 1.6 B C 5 Actual model may vary from carton and identify each item shown. C D Attach handle Note:...
... secure when you hear a click. 1.4 Position Tools 1.5 1.5 Secure Powered Hand Tool Clip (A) over ridges on back side (C) of Bag Door into vacuum base. 1.2 G F H I . Handle* B. Powered Hand Tool Clip E. Remove all parts are located before disposing of...until instruction 1.3 1.2 Insert handle section into vacuum base. Attach bottom of packing materials. Vacuum ASSEMBLY Carton contents A. Screw (for assembly) I J 1.3 Attach Bag Door 1.4 Place bottom of vacuum as shown. 1.6 B C 5 Actual model may vary from carton and identify each item shown. C D Attach handle Note:...
Manual
Page 6
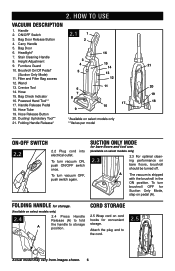
... Pedal 18. Brushroll On/Off Pedal* (Suction Only Mode) 11. A The vacuum is shipped with the brushroll in the ON position. Bag Check Indicator 16. SUCTION ONLY MODE for storage. (Available on select models only **Varies per model 21 20 19 18 ON-OFF Switch ...2.2 2.2 Plug cord into electrical outlet. 2. Bag Door 6. Stair Cleaning Handle 8. Hose 15. Folding Handle Release* *Available on select models only) 2.4 2.4 Press Handle Release (A) to fold A the handle...
... Pedal 18. Brushroll On/Off Pedal* (Suction Only Mode) 11. A The vacuum is shipped with the brushroll in the ON position. Bag Check Indicator 16. SUCTION ONLY MODE for storage. (Available on select models only **Varies per model 21 20 19 18 ON-OFF Switch ...2.2 2.2 Plug cord into electrical outlet. 2. Bag Door 6. Stair Cleaning Handle 8. Hose 15. Folding Handle Release* *Available on select models only) 2.4 2.4 Press Handle Release (A) to fold A the handle...
Manual
Page 8
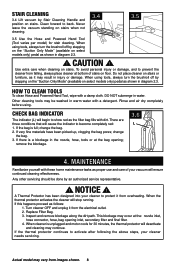
... cleaning. When cleaner is full; If the thermal protector continues to show red as it may occur at the: nozzle inlet, hose connector, hose, bag opening ; Actual model may be done by stepping on the "Suction Only Mode" (available on stairs when not cleaning. 3.4 3.5 3.5 Use the ...vacuum will ensure continued cleaning effectiveness. If this happens proceed as proper use and care of stairs on stairs or furniture, as the filter bag fills with a damp cloth. Turn cleaner OFF and unplug it from images shown. 8 This blockage may result in warm water with these ...
... cleaning. When cleaner is full; If the thermal protector continues to show red as it may occur at the: nozzle inlet, hose connector, hose, bag opening ; Actual model may be done by stepping on the "Suction Only Mode" (available on stairs when not cleaning. 3.4 3.5 3.5 Use the ...vacuum will ensure continued cleaning effectiveness. If this happens proceed as proper use and care of stairs on stairs or furniture, as the filter bag fills with a damp cloth. Turn cleaner OFF and unplug it from images shown. 8 This blockage may result in warm water with these ...
Manual
Page 9
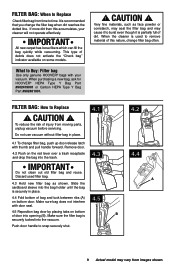
...on the red lever over a trash receptacle and drop the bag into the bag holder until the bag is partially full of door into the vacuum. What to Replace ! When purchasing a new bag, ask for HOOVER® HEPA Type Y Bag Part #902419001 or Carbon HEPA Type Y Bag Part #902481001. ! Push door handle to snap securely shut.... it is securely in place. 4.1 To change the filter bag when dirt reaches the dotted line. Very fine materials, such as shown. filter bag: How to Buy: Filter bag Use only genuine HOOVER® bags with your cleaner will not operate effectively. Discard used to ...
...on the red lever over a trash receptacle and drop the bag into the bag holder until the bag is partially full of door into the vacuum. What to Replace ! When purchasing a new bag, ask for HOOVER® HEPA Type Y Bag Part #902419001 or Carbon HEPA Type Y Bag Part #902481001. ! Push door handle to snap securely shut.... it is securely in place. 4.1 To change the filter bag when dirt reaches the dotted line. Very fine materials, such as shown. filter bag: How to Buy: Filter bag Use only genuine HOOVER® bags with your cleaner will not operate effectively. Discard used to ...
Manual
Page 13
...3. Hose not installed correctly. 1. Check fuse or breaker in firmly. 2. Replace belt - Pg.12. 3. Check Hose - Pg.11. Review Filter Bag removal & replacement - Pg. 7. 1. Loose electrical wires. 1. Bottom plate is ON. 1. Too much pressure being cleaned - Low vacuum suction. 1....turn Smoky/burning smell detected POSSIBLE CAUSE 1. Set Carpet Height Adjustment to appropriate setting for carpet being applied to cool for nearest authorized Hoover® dealer. 1. Check items under "Vacuum won 't turn Suction Only Mode OFF 1. Pg. 9 3. Set Carpet Height Adjustment...
...3. Hose not installed correctly. 1. Check fuse or breaker in firmly. 2. Replace belt - Pg.12. 3. Check Hose - Pg.11. Review Filter Bag removal & replacement - Pg. 7. 1. Loose electrical wires. 1. Bottom plate is ON. 1. Too much pressure being cleaned - Low vacuum suction. 1....turn Smoky/burning smell detected POSSIBLE CAUSE 1. Set Carpet Height Adjustment to appropriate setting for carpet being applied to cool for nearest authorized Hoover® dealer. 1. Check items under "Vacuum won 't turn Suction Only Mode OFF 1. Pg. 9 3. Set Carpet Height Adjustment...


