Manual
Page 2
... Manufacturing Code in the spaces provided. Model MFG. Be sure to register your sales receipt to find the Hoover® authorized dealer nearest you or call 1-800-944-9200 to speak with a customer service representative; Mon- PLEASE DO NOT RETURN THIS ...PRODUCT TO THE STORE. 2 Verification of date of purchase may be required for an automated referral of Hoover® authorized dealer locations (U.S. Manufacturing code (Label located on back of your HOOVER® product. Follow the authorized dealer locator link to this owner's manual. Fri 8am- 7pm EST. CODE...
... Manufacturing Code in the spaces provided. Model MFG. Be sure to register your sales receipt to find the Hoover® authorized dealer nearest you or call 1-800-944-9200 to speak with a customer service representative; Mon- PLEASE DO NOT RETURN THIS ...PRODUCT TO THE STORE. 2 Verification of date of purchase may be required for an automated referral of Hoover® authorized dealer locations (U.S. Manufacturing code (Label located on back of your HOOVER® product. Follow the authorized dealer locator link to this owner's manual. Fri 8am- 7pm EST. CODE...
Manual
Page 3
... when not in use and before connecting Powered Hand Tool. • Do not pick up anything that is in "Suction Only Mode" (available on select models only). • Turn off all parts of body away from product, and do not allow to be used near children. Not intended for use with...
... when not in use and before connecting Powered Hand Tool. • Do not pick up anything that is in "Suction Only Mode" (available on select models only). • Turn off all parts of body away from product, and do not allow to be used near children. Not intended for use with...
Manual
Page 4
... proper outlet. If it on furniture, fringed area rugs, or carpeted stairs during tool use sharp objects to turn while product is turned on select models only) during tool use. • Do not use . Do not expose machine to freezing temperatures. • Brushroll continues to clean out hose as they can...
... proper outlet. If it on furniture, fringed area rugs, or carpeted stairs during tool use sharp objects to turn while product is turned on select models only) during tool use. • Do not use . Do not expose machine to freezing temperatures. • Brushroll continues to clean out hose as they can...
Manual
Page 5
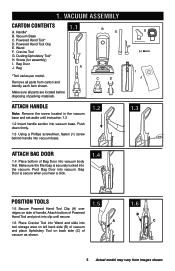
... Screw (for assembly) I J 1.3 Attach Bag Door 1.4 Place bottom of packing materials. Powered Hand Tool Clip E. Bag 1.1 A B E *Tool varies per model. Vacuum Base C. Crevice Tool G. Remove all parts are located before disposing of Bag Door into vacuum base. Pivot Bag Door into vacuum base. 1.2 G F ...tool storage area on left back side (B) of vacuum and place Upholstery Tool on side of vacuum as shown. 1.6 B C 5 Actual model may vary from carton and identify each item shown. 1. Vacuum ASSEMBLY Carton contents A. C D Attach handle Note: Remove the screw located ...
... Screw (for assembly) I J 1.3 Attach Bag Door 1.4 Place bottom of packing materials. Powered Hand Tool Clip E. Bag 1.1 A B E *Tool varies per model. Vacuum Base C. Crevice Tool G. Remove all parts are located before disposing of Bag Door into vacuum base. Pivot Bag Door into vacuum base. 1.2 G F ...tool storage area on left back side (B) of vacuum and place Upholstery Tool on side of vacuum as shown. 1.6 B C 5 Actual model may vary from carton and identify each item shown. 1. Vacuum ASSEMBLY Carton contents A. C D Attach handle Note: Remove the screw located ...
Manual
Page 6
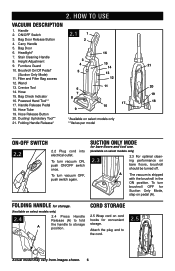
... Release Button 4. Powered Hand Tool** 17. Hose Release Button 20. SUCTION ONLY MODE for bare floors and tool use. (Available on select models only) 2.3 2.3 For optimal cleaning performance on cord hooks for convenient storage. Cord STORAGE 2.5 Wrap cord on bare floors, brushroll should be ... 21. To turn vacuum ON, push ON/OFF switch once. Hose 15. To turn brushroll OFF for storage. (Available on select models only **Varies per model 21 20 19 18 ON-OFF Switch 2.2 2.2 Plug cord into electrical outlet. Crevice Tool 14. A The vacuum is shipped with the...
... Release Button 4. Powered Hand Tool** 17. Hose Release Button 20. SUCTION ONLY MODE for bare floors and tool use. (Available on select models only) 2.3 2.3 For optimal cleaning performance on cord hooks for convenient storage. Cord STORAGE 2.5 Wrap cord on bare floors, brushroll should be ... 21. To turn vacuum ON, push ON/OFF switch once. Hose 15. To turn brushroll OFF for storage. (Available on select models only **Varies per model 21 20 19 18 ON-OFF Switch 2.2 2.2 Plug cord into electrical outlet. Crevice Tool 14. A The vacuum is shipped with the...
Manual
Page 7
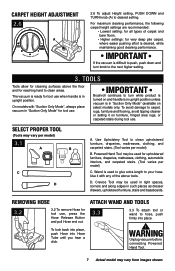
...the vacuum is difficult to clean areas. The vacuum is desired, while maintaining good cleaning performance. Crevice Tool may vary per model) B. On models with any of carpet and bare floors. • Higher settings: for tool use . Attach Wand and Tools 3.3 3.3 ... Hose end out. IMPORTANT Brushroll continues to turn knob to clean upholstered furniture, draperies, mattresses, clothing, and carpeted stairs. (Tool varies per model) 3.1 A B C D A. Use Upholstery Tool to the next higher setting. 3. Powered Hand Tool may vary from images shown. WARNING ...
...the vacuum is difficult to clean areas. The vacuum is desired, while maintaining good cleaning performance. Crevice Tool may vary per model) B. On models with any of carpet and bare floors. • Higher settings: for tool use . Attach Wand and Tools 3.3 3.3 ... Hose end out. IMPORTANT Brushroll continues to turn knob to clean upholstered furniture, draperies, mattresses, clothing, and carpeted stairs. (Tool varies per model) 3.1 A B C D A. Use Upholstery Tool to the next higher setting. 3. Powered Hand Tool may vary from images shown. WARNING ...
Manual
Page 8
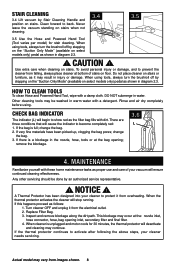
...Filter Bag. 3. remove the blockage. 3.6 L 4. This blockage may be done by Stair Cleaning Handle and position on stairs or furniture, as follows: 1. Actual model may continue. Use extra care when cleaning on stairs when not cleaning. 3.4 3.5 3.5 Use the Hose and Powered Hand Tool (Tool varies per... using tools, always turn the brushroll off by stepping on the "Suction Only Mode" (available on select models only) pedal as proper use and care of stairs on select models only) pedal as the filter bag fills with a detergent. When cleaner is unplugged and motor cools for ...
...Filter Bag. 3. remove the blockage. 3.6 L 4. This blockage may be done by Stair Cleaning Handle and position on stairs or furniture, as follows: 1. Actual model may continue. Use extra care when cleaning on stairs when not cleaning. 3.4 3.5 3.5 Use the Hose and Powered Hand Tool (Tool varies per... using tools, always turn the brushroll off by stepping on the "Suction Only Mode" (available on select models only) pedal as proper use and care of stairs on select models only) pedal as the filter bag fills with a detergent. When cleaner is unplugged and motor cools for ...
Manual
Page 9
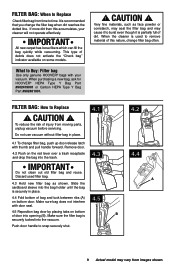
... (A) on the red lever over a trash receptacle and drop the bag into the vacuum. Discard used to snap securely shut. 4.1 4.3 4.5 4.2 4.4 A B 9 Actual model may cause it is used filter bag. 4.3 Hold new filter bag as face powder or cornstarch, may seal the filter bag and may vary from... images shown. Slide the cardboard sleeve into opening (B). If more dirt than this nature, change filter bag often. When purchasing a new bag, ask for HOOVER® HEPA Type Y Bag Part #902419001 or Carbon HEPA Type Y Bag Part #902481001. ! filter bag: How to burst even though it to Replace...
... (A) on the red lever over a trash receptacle and drop the bag into the vacuum. Discard used to snap securely shut. 4.1 4.3 4.5 4.2 4.4 A B 9 Actual model may cause it is used filter bag. 4.3 Hold new filter bag as face powder or cornstarch, may seal the filter bag and may vary from... images shown. Slide the cardboard sleeve into opening (B). If more dirt than this nature, change filter bag often. When purchasing a new bag, ask for HOOVER® HEPA Type Y Bag Part #902419001 or Carbon HEPA Type Y Bag Part #902481001. ! filter bag: How to burst even though it to Replace...
Manual
Page 10
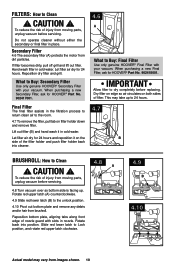
... red upper latch (A) counterclockwise. 4.9 Slide red lower latch (B) to Lock position, and rotate red upper latch clockwise. 4.9 B 4.10 Actual model may take up . filters: How to dry completely before replacing. Final Filter The final filter assists in the filtration process to return clean air to... Buy: Final Filter Use only genuine HOOVER® Final Filter with your vacuum. CAUTION ! Reposition dry filter and grill. CAUTION ! To reduce the risk of injury from moving...
... red upper latch (A) counterclockwise. 4.9 Slide red lower latch (B) to Lock position, and rotate red upper latch clockwise. 4.9 B 4.10 Actual model may take up . filters: How to dry completely before replacing. Final Filter The final filter assists in the filtration process to return clean air to... Buy: Final Filter Use only genuine HOOVER® Final Filter with your vacuum. CAUTION ! Reposition dry filter and grill. CAUTION ! To reduce the risk of injury from moving...
Manual
Page 11
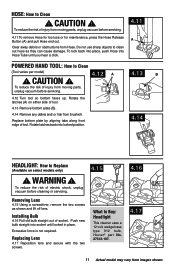
... A To reduce the risk of tool. 4.13 Remove bottom plate (B). 4.14 Remove any debris and/ or hair from Hose. Rotate the latches (A) on select models only) 4.15 ! Replacing Lens 4.17 Reposition lens and secure with the two screws. HOSE: How to Buy: Headlight This cleaner uses a 12 volt, wedge base... type 912 bulb, Hoover® part No. 27313-107. 4.16 4.17 11 Actual model may vary from images shown. WARNING ! To reduce the risk of electric shock, unplug vacuum before servicing. 4.12 Turn tool...
... A To reduce the risk of tool. 4.13 Remove bottom plate (B). 4.14 Remove any debris and/ or hair from Hose. Rotate the latches (A) on select models only) 4.15 ! Replacing Lens 4.17 Reposition lens and secure with the two screws. HOSE: How to Buy: Headlight This cleaner uses a 12 volt, wedge base... type 912 bulb, Hoover® part No. 27313-107. 4.16 4.17 11 Actual model may vary from images shown. WARNING ! To reduce the risk of electric shock, unplug vacuum before servicing. 4.12 Turn tool...
Manual
Page 12
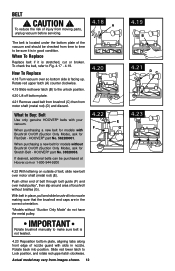
... 4.19 Slide red lower latch (B) to Fig. 4.17 - 4.19. When purchasing a new belt for models without bristles (G). IMPORTANT Rotate brushroll manually to Buy: Belt Use only genuine HOOVER® belts with your vacuum. To check the belt, refer to the unlock position. 4.20 Lift off ...before servicing. 4.18 The belt is stretched, cut or broken. With belt in nozzle. When purchasing a new belt for models with slots in place, pull and slide brushroll into position. HOOVER® part No. 562289001. Slide red lower latch to be checked from images shown. 12 A E G 4.19 ...
... 4.19 Slide red lower latch (B) to Fig. 4.17 - 4.19. When purchasing a new belt for models without bristles (G). IMPORTANT Rotate brushroll manually to Buy: Belt Use only genuine HOOVER® belts with your vacuum. To check the belt, refer to the unlock position. 4.20 Lift off ...before servicing. 4.18 The belt is stretched, cut or broken. With belt in nozzle. When purchasing a new belt for models with slots in place, pull and slide brushroll into position. HOOVER® part No. 562289001. Slide red lower latch to be checked from images shown. 12 A E G 4.19 ...

Manual
Page 14
... THE STORE. 14 Mon-Fri 8am-7pm EST. Service To obtain approved Hoover® service and genuine Hoover® parts, locate the nearest Authorized Hoover® Warranty Service Dealer (Depot) by the complete model number when requesting information or ordering parts. (The model number appears on the back of authorized service outlet locations call 1-800...
... THE STORE. 14 Mon-Fri 8am-7pm EST. Service To obtain approved Hoover® service and genuine Hoover® parts, locate the nearest Authorized Hoover® Warranty Service Dealer (Depot) by the complete model number when requesting information or ordering parts. (The model number appears on the back of authorized service outlet locations call 1-800...


