
Manual
Page 2
TABLE OF CONTENTS TABLE OF CONTENTS S afety Ins tr ucti ons 3 - 4 1. WARRANTY 13 2 OWNER'S INSTRUCTIONS English pp. 1-13 Español pàg.E1-E13 Français p. VACUUM CONTROLS 7 4. G ENERA L MA IN TEN A N CE 9 Changing Bag 9 Replacing Brushroll 10 6. HOW TO OPERATE 8 Handle Release 8 Automatic Height Adjustment 8 Carrying Cleaner 8 Stair Cleaning 8 5. F EATU RE S 5 2. S ERVIC E 12 8. F1-F13 TROUBLESHOOTING GUIDE 11 7. HOW TO ASSEMBLE 6 Carton Contents 6 Attach Handle 6 3.
TABLE OF CONTENTS TABLE OF CONTENTS S afety Ins tr ucti ons 3 - 4 1. WARRANTY 13 2 OWNER'S INSTRUCTIONS English pp. 1-13 Español pàg.E1-E13 Français p. VACUUM CONTROLS 7 4. G ENERA L MA IN TEN A N CE 9 Changing Bag 9 Replacing Brushroll 10 6. HOW TO OPERATE 8 Handle Release 8 Automatic Height Adjustment 8 Carrying Cleaner 8 Stair Cleaning 8 5. F EATU RE S 5 2. S ERVIC E 12 8. F1-F13 TROUBLESHOOTING GUIDE 11 7. HOW TO ASSEMBLE 6 Carton Contents 6 Attach Handle 6 3.
Manual
Page 3
... or pull cord around sharp edges or corners. Use only manufacturer's • Do not unplug by cord, use cord as a handle, close a door • Do not allow to a Hoover sales and service center not in use with wet hands. ing as it to be followed, including the following: • READ ALL...COMPOUNDS, KNOWN TO THE STATE OF CALIFORNIA TO CAUSE CANCER AND BIRTH DEFECTS OR OTHER REPRODUCTIVE HARM. Close attention is not work- • Do not handle plug or appliance with damaged cord or plug. the cord. • Do not use and before servicing. To unplug, grasp the plug, not ...
... or pull cord around sharp edges or corners. Use only manufacturer's • Do not unplug by cord, use cord as a handle, close a door • Do not allow to a Hoover sales and service center not in use with wet hands. ing as it to be followed, including the following: • READ ALL...COMPOUNDS, KNOWN TO THE STATE OF CALIFORNIA TO CAUSE CANCER AND BIRTH DEFECTS OR OTHER REPRODUCTIVE HARM. Close attention is not work- • Do not handle plug or appliance with damaged cord or plug. the cord. • Do not use and before servicing. To unplug, grasp the plug, not ...
Manual
Page 4
Do not use without dust bag and/or filters in place. • Do not leave product running in this manual should be performed by Hoover; This plug will be present. • Do not pick up anything that is wider than what has been stated in upright position. • Avoid ...up flammable or combustible liquids, such as gasoline, fine wood sandings or use . Inspect the exhaust, inlet, and filters for its intended use with the handle locked in bare feet or when wearing open toe shoes or sandals. • Turn off all controls before unplugging. • Use extra care when ...
Do not use without dust bag and/or filters in place. • Do not leave product running in this manual should be performed by Hoover; This plug will be present. • Do not pick up anything that is wider than what has been stated in upright position. • Avoid ...up flammable or combustible liquids, such as gasoline, fine wood sandings or use . Inspect the exhaust, inlet, and filters for its intended use with the handle locked in bare feet or when wearing open toe shoes or sandals. • Turn off all controls before unplugging. • Use extra care when ...

Manual
Page 5
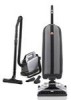
1. FEATURES 1 Handle 2 On-Off Button 3 Hi-Low Button 4 Check Bag Indicator 5 Upper/Lower Cord Hooks 6 Carrying Handle 7 Bag Door 8 Stair Cleaning Handle 9 Headlight 10 Handle Release Pedal 11 Furniture Guard 12 Edge Groomers 1.1 2 3 4 1 7 5 6 9 8 10 11 12 5 FEATURES
1. FEATURES 1 Handle 2 On-Off Button 3 Hi-Low Button 4 Check Bag Indicator 5 Upper/Lower Cord Hooks 6 Carrying Handle 7 Bag Door 8 Stair Cleaning Handle 9 Headlight 10 Handle Release Pedal 11 Furniture Guard 12 Edge Groomers 1.1 2 3 4 1 7 5 6 9 8 10 11 12 5 FEATURES

Manual
Page 6
HOW TO ASSEMBLE 2. HOW TO ASSEMBLE A B C Carton Contents Remove all parts are located before disposing of cleaner. 2.3 Using a screwdriver, tighten screw securely. 2.2 2.3 6 A Handle B Cleaner body C Bagged screw (Attached to upper cord wrap.) 2.1 Attach Handle TOOL REQUIRED: PHILLIPS OR FLATHEAD SCREWDRIVER 2.2Push handle into opening at top of packing. Make sure all parts from carton and identify each item shown.
HOW TO ASSEMBLE 2. HOW TO ASSEMBLE A B C Carton Contents Remove all parts are located before disposing of cleaner. 2.3 Using a screwdriver, tighten screw securely. 2.2 2.3 6 A Handle B Cleaner body C Bagged screw (Attached to upper cord wrap.) 2.1 Attach Handle TOOL REQUIRED: PHILLIPS OR FLATHEAD SCREWDRIVER 2.2Push handle into opening at top of packing. Make sure all parts from carton and identify each item shown.
Manual
Page 8
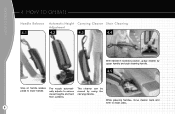
The cleaner can be moved by upper handle and stair cleaning handle. 4.5 Step on handle release pedal to lower handle. While grasping handles, move cleaner back and forth to various carpet heights and hard floor surfaces. HOW TO OPERATE 4. The nozzle automatically adjusts to clean stairs. 8 HOW TO OPERATE Handle Release 4.1 Automatic Height Carrying Cleaner Stair Cleaning Adjustment 4.2 4.3 4.4 With handle in lowered position, grasp cleaner by using the carrying handle.
The cleaner can be moved by upper handle and stair cleaning handle. 4.5 Step on handle release pedal to lower handle. While grasping handles, move cleaner back and forth to various carpet heights and hard floor surfaces. HOW TO OPERATE 4. The nozzle automatically adjusts to clean stairs. 8 HOW TO OPERATE Handle Release 4.1 Automatic Height Carrying Cleaner Stair Cleaning Adjustment 4.2 4.3 4.4 With handle in lowered position, grasp cleaner by using the carrying handle.


