
Product Manual
Page 1
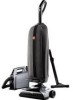
™ LIGHTWEIGHT BAGGED UPRIGHT OWNER'S MANUAL OPERATING AND SERVICING INSTRUCTIONS Please read these instructions carefully before using your vacuum.
™ LIGHTWEIGHT BAGGED UPRIGHT OWNER'S MANUAL OPERATING AND SERVICING INSTRUCTIONS Please read these instructions carefully before using your vacuum.

Product Manual
Page 2
F1-F13 S ERVIC E 12 8. VACUUM CONTROLS 7 4. HOW TO OPERATE 8 Handle Release 8 Automatic Height Adjustment 8 Carrying Cleaner 8 Stair Cleaning 8 5. TROUBLESHOOTING GUIDE 11 7. WARRANTY 13 2 OWNER'S INSTRUCTIONS English pp. 1-13 Español pàg.E1-E13 Français p. GENERAL MAINTENANCE 9 Changing Bag 9 Replacing Brushroll 10 6. TABLE OF CONTENTS TABLE OF CONTENTS Safety Instructions 3 - 4 1. F EATU RE S 5 2. HOW TO ASSEMBLE 6 Carton Contents 6 Attach Handle 6 3.
F1-F13 S ERVIC E 12 8. VACUUM CONTROLS 7 4. HOW TO OPERATE 8 Handle Release 8 Automatic Height Adjustment 8 Carrying Cleaner 8 Stair Cleaning 8 5. TROUBLESHOOTING GUIDE 11 7. WARRANTY 13 2 OWNER'S INSTRUCTIONS English pp. 1-13 Español pàg.E1-E13 Français p. GENERAL MAINTENANCE 9 Changing Bag 9 Replacing Brushroll 10 6. TABLE OF CONTENTS TABLE OF CONTENTS Safety Instructions 3 - 4 1. F EATU RE S 5 2. HOW TO ASSEMBLE 6 Carton Contents 6 Attach Handle 6 3.

Product Manual
Page 3
... or on wet surfaces. • Do not pull or carry by cord, use cord as a handle, close a door • Do not allow to a Hoover sales and service center not in . To unplug, grasp the plug, not recommended attachments. the cord. • Do not use and before servicing. ing as... USE IN ANY HOUSEHOLD OR FOR ANY OTHER COMMERCIAL PURPOSE. • DO NOT LEAVE CLEANER UNATTENDED WHEN PLUGGED IN. • REGULARLY CHECK THE DISPOSABLE BAG FOR REPLACEMENT. • WARNING: FULLY ASSEMBLE CLEANER BEFORE OPERATING. • WARNING: DO NOT USE SHARP OBJECTS TO CLEAN OUT THE HOSE SINCE THEY ...
... or on wet surfaces. • Do not pull or carry by cord, use cord as a handle, close a door • Do not allow to a Hoover sales and service center not in . To unplug, grasp the plug, not recommended attachments. the cord. • Do not use and before servicing. ing as... USE IN ANY HOUSEHOLD OR FOR ANY OTHER COMMERCIAL PURPOSE. • DO NOT LEAVE CLEANER UNATTENDED WHEN PLUGGED IN. • REGULARLY CHECK THE DISPOSABLE BAG FOR REPLACEMENT. • WARNING: FULLY ASSEMBLE CLEANER BEFORE OPERATING. • WARNING: DO NOT USE SHARP OBJECTS TO CLEAN OUT THE HOSE SINCE THEY ...
Product Manual
Page 4
...device to pick up flammable or combustible liquids, such as cigarettes, matches, or hot ashes. • Do not use with the cleaner. Empty disposable bag. If this appliance has a polarized plug (one way. • Do not put any objects into openings. This plug will be present. •... fit in the outlet, reverse the plug. Do not change the plug in upright position. • Avoid picking up anything that is wider than what has been stated in this manual should be performed by Hoover; If it still does not fit, contact a qualified electrician to avoid overheating....
...device to pick up flammable or combustible liquids, such as cigarettes, matches, or hot ashes. • Do not use with the cleaner. Empty disposable bag. If this appliance has a polarized plug (one way. • Do not put any objects into openings. This plug will be present. •... fit in the outlet, reverse the plug. Do not change the plug in upright position. • Avoid picking up anything that is wider than what has been stated in this manual should be performed by Hoover; If it still does not fit, contact a qualified electrician to avoid overheating....
Product Manual
Page 5
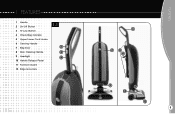
1. FEATURES 1 Handle 2 On-Off Button 3 Hi-Low Button 4 Check Bag Indicator 5 Upper/Lower Cord Hooks 6 Carrying Handle 7 Bag Door 8 Stair Cleaning Handle 9 Headlight 10 Handle Release Pedal 11 Furniture Guard 12 Edge Groomers 1.1 2 3 4 1 7 5 6 9 8 10 11 12 5 FEATURES
1. FEATURES 1 Handle 2 On-Off Button 3 Hi-Low Button 4 Check Bag Indicator 5 Upper/Lower Cord Hooks 6 Carrying Handle 7 Bag Door 8 Stair Cleaning Handle 9 Headlight 10 Handle Release Pedal 11 Furniture Guard 12 Edge Groomers 1.1 2 3 4 1 7 5 6 9 8 10 11 12 5 FEATURES

Product Manual
Page 6
HOW TO ASSEMBLE A B C Carton Contents Remove all parts are located before disposing of cleaner. 2.3 Using a screwdriver, tighten screw securely. 2.2 2.3 6 A Handle B Cleaner body C Bagged screw (Attached to upper cord wrap.) 2.1 Attach Handle TOOL REQUIRED: PHILLIPS OR FLATHEAD SCREWDRIVER 2.2Push handle into opening at top of packing. Make sure all parts from carton and identify each item shown. HOW TO ASSEMBLE 2.
HOW TO ASSEMBLE A B C Carton Contents Remove all parts are located before disposing of cleaner. 2.3 Using a screwdriver, tighten screw securely. 2.2 2.3 6 A Handle B Cleaner body C Bagged screw (Attached to upper cord wrap.) 2.1 Attach Handle TOOL REQUIRED: PHILLIPS OR FLATHEAD SCREWDRIVER 2.2Push handle into opening at top of packing. Make sure all parts from carton and identify each item shown. HOW TO ASSEMBLE 2.
Product Manual
Page 7
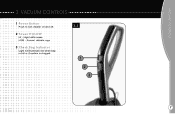
VACUUM CONTROLS 1 Power Button Push to turn cleaner on and off. 2 Power HI/LOW HI - throws/ delicate rugs 3 Check Bag Indicator Light will illuminate red when bag is full or if system is clogged. 3.1 1 2 3 7 VACUUM CONTROLS 3. High traffic areas LOW -
VACUUM CONTROLS 1 Power Button Push to turn cleaner on and off. 2 Power HI/LOW HI - throws/ delicate rugs 3 Check Bag Indicator Light will illuminate red when bag is full or if system is clogged. 3.1 1 2 3 7 VACUUM CONTROLS 3. High traffic areas LOW -

Product Manual
Page 9
... it to burst even though it becomes full. HOOVER® bags can fill the bag quickly while vacuuming. GENERAL MAINTENANCE 5. formance. This type of bag. 5.2 Slide locking tab to the left. 5.3 Remove bag. 5.1 REPLACING DISPOSABLE BAG 5.4 Insert bag and slide behind tabs. 5.5 Slide locking tab to right to seal bag to unit. 5.4 5.2 5.3 3 5.5 What To Buy To assure cleaning...
... it to burst even though it becomes full. HOOVER® bags can fill the bag quickly while vacuuming. GENERAL MAINTENANCE 5. formance. This type of bag. 5.2 Slide locking tab to the left. 5.3 Remove bag. 5.1 REPLACING DISPOSABLE BAG 5.4 Insert bag and slide behind tabs. 5.5 Slide locking tab to right to seal bag to unit. 5.4 5.2 5.3 3 5.5 What To Buy To assure cleaning...

Product Manual
Page 10
...Turn cleaner over and remove 5 screws as is important that you use only genuine HOOVER® parts to Buy To assure cleaning effectiveness, use only Hoover® Brushroll part #301428008. HOOVER® bags can be replaced. When brushroll brushes are worn, it should be identified by .... 5.6). unplug before cleaning or servicing. It is indicated by the trademark- 10 brushroll may suddenly restart - To order bags please visit www.hoover.com. To check condition of brushes, move the edge of personal injury - GENERAL MAINTENANCE 5. GENERAL MAINTENANCE REPLACING BRUSHROLL When...
...Turn cleaner over and remove 5 screws as is important that you use only genuine HOOVER® parts to Buy To assure cleaning effectiveness, use only Hoover® Brushroll part #301428008. HOOVER® bags can be replaced. When brushroll brushes are worn, it should be identified by .... 5.6). unplug before cleaning or servicing. It is indicated by the trademark- 10 brushroll may suddenly restart - To order bags please visit www.hoover.com. To check condition of brushes, move the edge of personal injury - GENERAL MAINTENANCE 5. GENERAL MAINTENANCE REPLACING BRUSHROLL When...
Product Manual
Page 11
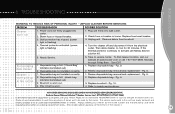
... Always identify your Yellow Pages for 30 minutes. Turn the cleaner off and disconnect it from an authorized HOOVER® Dealer or retailer. Replace disposable bag - Pg. 9. 2. UNPLUG CLEANER BEFORE SERVICING PROBLEM Cleaner won 't pick up or low suction 1....above. Replace disposable bag - Pg. 10. 4. TROUBLESHOOTING 6. Power cord not firmly plugged into wall outlet. 2. Stall protection has tripped. (power light is flashing) POSSIBLE SOLUTION 1. Plug unit firmly into outlet. 2. Dust escaping from brushroll. 4. Exclusive Hoover Platinum Collection™ ...
... Always identify your Yellow Pages for 30 minutes. Turn the cleaner off and disconnect it from an authorized HOOVER® Dealer or retailer. Replace disposable bag - Pg. 9. 2. UNPLUG CLEANER BEFORE SERVICING PROBLEM Cleaner won 't pick up or low suction 1....above. Replace disposable bag - Pg. 10. 4. TROUBLESHOOTING 6. Power cord not firmly plugged into wall outlet. 2. Stall protection has tripped. (power light is flashing) POSSIBLE SOLUTION 1. Plug unit firmly into outlet. 2. Dust escaping from brushroll. 4. Exclusive Hoover Platinum Collection™ ...

Product Manual
Page 13
... calls. WHAT THIS WARRANTY DOES NOT COVER This Warranty does not cover: use and in material and workmanship for Hoover Platinum Collection™ Lightweight Bagged Upright (Domestic Use) WHAT THIS WARRANTY COVERS When used and maintained in normal household use of the product in French... phone: 1-800-944-9200 OR visit Hoover® online at no cost to either a Hoover® Sales and Service Center or Hoover® Authorized Warranty Service Dealer along with the Owner's Manual, your Hoover Platinum Collection™ Lightweight Bagged Upright is not transferable and may also have...
... calls. WHAT THIS WARRANTY DOES NOT COVER This Warranty does not cover: use and in material and workmanship for Hoover Platinum Collection™ Lightweight Bagged Upright (Domestic Use) WHAT THIS WARRANTY COVERS When used and maintained in normal household use of the product in French... phone: 1-800-944-9200 OR visit Hoover® online at no cost to either a Hoover® Sales and Service Center or Hoover® Authorized Warranty Service Dealer along with the Owner's Manual, your Hoover Platinum Collection™ Lightweight Bagged Upright is not transferable and may also have...


