Manual
Page 2
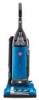
...provided. Mon- Please do not return this owner's manual. Be sure to the store. 2 Model 1-800-944-9200 MFG. only) or to register by phone. Please enter the complete model and Manufacturing Code in China Manufacturing code (Label located on lower handle of cleaner) Contents Important Safeguards...Service...18 If you need assistance: Visit our website at Hoover.com or call 1-800-944-9200 for an automated referral of Hoover® authorized dealer locations (U.S. Verification of date of purchase may be required for choosing a HOOVER® product. Fri 8am- 7pm EST. Thank you...
...provided. Mon- Please do not return this owner's manual. Be sure to the store. 2 Model 1-800-944-9200 MFG. only) or to register by phone. Please enter the complete model and Manufacturing Code in China Manufacturing code (Label located on lower handle of cleaner) Contents Important Safeguards...Service...18 If you need assistance: Visit our website at Hoover.com or call 1-800-944-9200 for an automated referral of Hoover® authorized dealer locations (U.S. Verification of date of purchase may be required for choosing a HOOVER® product. Fri 8am- 7pm EST. Thank you...
Manual
Page 4
... thermal protector activates the cleaner will deactivate and cleaning may occur at the: nozzle inlet, hose, hose tube, dirt tube, and filter bag inlet. 4. Actual model may cause damage. • Store in any way. • A Thermal Protector has been designed into your cleaner needs servicing. Turn cleaner OFF and unplug it...
... thermal protector activates the cleaner will deactivate and cleaning may occur at the: nozzle inlet, hose, hose tube, dirt tube, and filter bag inlet. 4. Actual model may cause damage. • Store in any way. • A Thermal Protector has been designed into your cleaner needs servicing. Turn cleaner OFF and unplug it...
Manual
Page 5
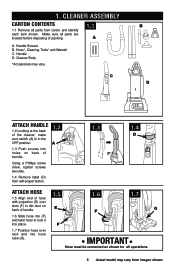
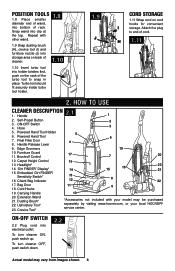
... and into hose tube (G). 1.5 1.6 1.7 E F G F IMPORTANT Hose must be connected as shown for all parts from images shown. Cleaner ASSEMBLY Carton contents 1.1 Remove all operations. 5 Actual model may vary. Cleaner Body *Accessories may vary from carton and identify each item shown.
... and into hose tube (G). 1.5 1.6 1.7 E F G F IMPORTANT Hose must be connected as shown for all parts from images shown. Cleaner ASSEMBLY Carton contents 1.1 Remove all operations. 5 Actual model may vary. Cleaner Body *Accessories may vary from carton and identify each item shown.
Manual
Page 6
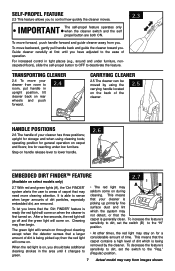
... 16 13. Check Bag Indicator 12 23 15 18 21 8 22 17. To turn cleaner OFF, push switch down. 2.2 Actual model may be purchased separately by visiting www.hoover.com, or your model may vary from images shown. 6 H 1.11 2. Position tools 1.8 Place smaller diameter end of wand, into electrical outlet. Snap wand into... of the turbo tool to end of cleaner. 1.10 1.10 Insert turbo tool into clip at the top. Powered Hand Tool 6 7. Repeat with your local HOOVER® service center. Powered Hand Tool Holder 5 6.
... 16 13. Check Bag Indicator 12 23 15 18 21 8 22 17. To turn cleaner OFF, push switch down. 2.2 Actual model may be purchased separately by visiting www.hoover.com, or your model may vary from images shown. 6 H 1.11 2. Position tools 1.8 Place smaller diameter end of wand, into electrical outlet. Snap wand into... of the turbo tool to end of cleaner. 1.10 1.10 Insert turbo tool into clip at the top. Powered Hand Tool 6 7. Repeat with your local HOOVER® service center. Powered Hand Tool Holder 5 6.
Manual
Page 7
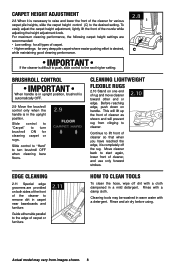
... moves. To move your cleaner from images shown. Step on handle release lever to lower handle. 2.6 Embedded Dirt FINDERTM feature 2.7 (Available on select models only) 2.7 With red and green lights (A), the 'Dirt FINDER' • The red light may A B system alerts the user to green. After...to the ease of operation. To increase the feature's sensitivity to dirt, set the switch to the "Reg." (Regular) position. 7 Actual model may vary from room to deactivate the feature. 2.3 Transporting cleaner 2.4 To move forward, push handle forward and guide cleaner away from you . ...
... moves. To move your cleaner from images shown. Step on handle release lever to lower handle. 2.6 Embedded Dirt FINDERTM feature 2.7 (Available on select models only) 2.7 With red and green lights (A), the 'Dirt FINDER' • The red light may A B system alerts the user to green. After...to the ease of operation. To increase the feature's sensitivity to dirt, set the switch to the "Reg." (Regular) position. 7 Actual model may vary from room to deactivate the feature. 2.3 Transporting cleaner 2.4 To move forward, push handle forward and guide cleaner away from you . ...
Manual
Page 8
... pile heights, slide the carpet height control (C) to raise and lower the front of cleaner as shown and will prevent rug from images shown. 8 Actual model may be washed in carpet near baseboards and furniture. Before reaching edge, push down on both sides of the front of cleaner so that when...
... pile heights, slide the carpet height control (C) to raise and lower the front of cleaner as shown and will prevent rug from images shown. 8 Actual model may be washed in carpet near baseboards and furniture. Before reaching edge, push down on both sides of the front of cleaner so that when...
Manual
Page 9
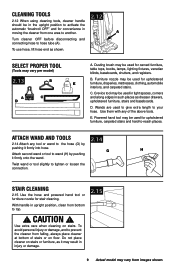
...your hose. B. D. CAUTION ! Crevice tool may be used in tight spaces, corners and along edges in injury or damage. 9 Actual model may result in such places as shown. Wands are used for upholstered furniture, carpeted stairs and hard-to tighten or loosen the connection. ...wand. Dusting brush may be used for upholstered furniture, draperies, mattresses, clothing, automobile interiors, and carpeted stairs. Powered hand tool may vary per model) 2.13 B E DA C A. Use extra care when cleaning on floor. Stair Cleaning 2.15 Use the hose and powered hand tool or...
...your hose. B. D. CAUTION ! Crevice tool may be used in tight spaces, corners and along edges in injury or damage. 9 Actual model may result in such places as shown. Wands are used for upholstered furniture, carpeted stairs and hard-to tighten or loosen the connection. ...wand. Dusting brush may be used for upholstered furniture, draperies, mattresses, clothing, automobile interiors, and carpeted stairs. Powered hand tool may vary per model) 2.13 B E DA C A. Use extra care when cleaning on floor. Stair Cleaning 2.15 Use the hose and powered hand tool or...
Manual
Page 10
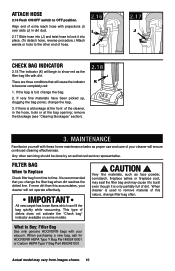
...carpet has loose fibers which can fill the bag quickly while vacuuming. When purchasing a new bag, ask for HOOVER® HEPA Type Y Bag Part #902419001 or Carbon HEPA Type Y Bag Part #902481001. Actual model may cause it is only partially full of your cleaner will begin to burst even though it to...nature, change the filter bag when dirt reaches the dotted line. Attach Hose 2.16 Push ON/OFF switch to Buy: Filter Bag Use only genuine HOOVER® bags with your vacuum. If very fine materials have been picked up, clogging the bag pores; If there is recommended that will not ...
...carpet has loose fibers which can fill the bag quickly while vacuuming. When purchasing a new bag, ask for HOOVER® HEPA Type Y Bag Part #902419001 or Carbon HEPA Type Y Bag Part #902481001. Actual model may cause it is only partially full of your cleaner will begin to burst even though it to...nature, change the filter bag when dirt reaches the dotted line. Attach Hose 2.16 Push ON/OFF switch to Buy: Filter Bag Use only genuine HOOVER® bags with your vacuum. If very fine materials have been picked up, clogging the bag pores; If there is recommended that will not ...
Manual
Page 11
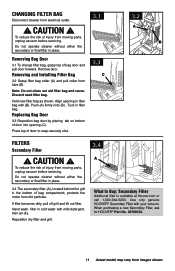
... Bag 3.2 Grasp filter bag collar (A) and pull collar from images shown. When purchasing a new Secondary Filter, ask for Hoover® Part No. 38765023. 11 Actual model may vary from tube (B). Removing Bag Door 3.1 To change filter bag, grasp top of door into opening in filter bag... with your vacuum. Use only genuine HOOVER® Secondary Filter with (B). Changing filter bag Disconnect cleaner from dirt particles. Remove...
... Bag 3.2 Grasp filter bag collar (A) and pull collar from images shown. When purchasing a new Secondary Filter, ask for Hoover® Part No. 38765023. 11 Actual model may vary from tube (B). Removing Bag Door 3.1 To change filter bag, grasp top of door into opening in filter bag... with your vacuum. Use only genuine HOOVER® Secondary Filter with (B). Changing filter bag Disconnect cleaner from dirt particles. Remove...
Manual
Page 12
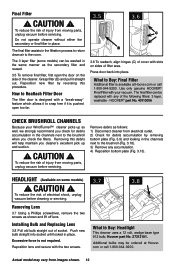
...This cleaner uses a 12 volt, wedge base type 912 bulb, Hoover part No. 27313101. The final filter can be replaced with the two screws. 3.7 3.8 What to snap free if it straight out. Headlight (Available on some models) can be washed in place. Installing Bulb and Replacing Lens ...3.8 Pull old bulb straight out of injury from images shown. 12 Reposition lens and secure with any accumulation. 4) Reposition bottom plate (Fig. 3.13). Actual model may be ordered at Hoover.com or call 1-...
...This cleaner uses a 12 volt, wedge base type 912 bulb, Hoover part No. 27313101. The final filter can be replaced with the two screws. 3.7 3.8 What to snap free if it straight out. Headlight (Available on some models) can be washed in place. Installing Bulb and Replacing Lens ...3.8 Pull old bulb straight out of injury from images shown. 12 Reposition lens and secure with any accumulation. 4) Reposition bottom plate (Fig. 3.13). Actual model may be ordered at Hoover.com or call 1-...
Manual
Page 13
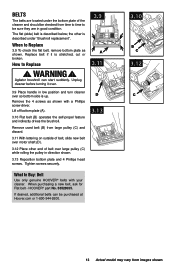
... (C) and discard. 3.11 With lettering on outside of belt, slide new belt over motor shaft (D). 3.12 Place other is stretched, cut or broken. HOOVER® part No. 38528035. the other end of the cleaner and should be checked from images shown. When to Buy: Belt Use only genuine...securely. If desired, additional belts can start suddenly. The flat (wide) belt is up. Agitator brushroll can be purchased at Hoover.com or 1-800-944-9200. 3.10 B C 3.12 C 13 Actual model may vary from time to time to Replace ! Remove the 4 screws as shown. How to be sure they are in...
... (C) and discard. 3.11 With lettering on outside of belt, slide new belt over motor shaft (D). 3.12 Place other is stretched, cut or broken. HOOVER® part No. 38528035. the other end of the cleaner and should be checked from images shown. When to Buy: Belt Use only genuine...securely. If desired, additional belts can start suddenly. The flat (wide) belt is up. Agitator brushroll can be purchased at Hoover.com or 1-800-944-9200. 3.10 B C 3.12 C 13 Actual model may vary from time to time to Replace ! Remove the 4 screws as shown. How to be sure they are in...
Manual
Page 14
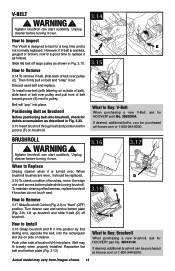
...Hoover.com or 1-800-944-9200. How to Remove 3.17 Slide Brushroll Control (Fig. 2.9) to Install 3.18 Grasp brushroll and fit it is turned over pulley (C). V-belt ! How to Inspect The V-belt is designed to last for debris accumulation as follows. How to "Hard" (OFF) position. Actual model... move the edge of belt over and remove bottom plate (Fig. 3.9). How to Buy: Brushroll When purchasing a new brushroll, ask for HOOVER® part No. 38528034. Belt will "pop" into place. To maintain cleaning effectiveness, replace brushroll if brushes do not touch card. WARNING...
...Hoover.com or 1-800-944-9200. How to Remove 3.17 Slide Brushroll Control (Fig. 2.9) to Install 3.18 Grasp brushroll and fit it is turned over pulley (C). V-belt ! How to Inspect The V-belt is designed to last for debris accumulation as follows. How to "Hard" (OFF) position. Actual model... move the edge of belt over and remove bottom plate (Fig. 3.9). How to Buy: Brushroll When purchasing a new brushroll, ask for HOOVER® part No. 38528034. Belt will "pop" into place. To maintain cleaning effectiveness, replace brushroll if brushes do not touch card. WARNING...
Manual
Page 15
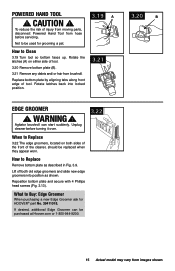
... Clean 3.19 Turn tool so bottom faces up. WARNING ! CAUTION ! Unplug cleaner before servicing. How to be purchased at Hoover.com or 1-800-944-9200. 15 Actual model may vary from brushroll. If desired, additional Edge Groomer can start suddenly. Rotate the latches (A) on both old edge groomers... front of tool. 3.20 Remove bottom plate (B). 3.21 Remove any debris and/ or hair from images shown. Agitator brushroll can be used for HOOVER® part No. 39411018. Rotate latches back into position as described in Fig. 3.9. What to Buy: Edge Groomer When purchasing a new Edge ...
... Clean 3.19 Turn tool so bottom faces up. WARNING ! CAUTION ! Unplug cleaner before servicing. How to be purchased at Hoover.com or 1-800-944-9200. 15 Actual model may vary from brushroll. If desired, additional Edge Groomer can start suddenly. Rotate the latches (A) on both old edge groomers... front of tool. 3.20 Remove bottom plate (B). 3.21 Remove any debris and/ or hair from images shown. Agitator brushroll can be used for HOOVER® part No. 39411018. Rotate latches back into position as described in Fig. 3.9. What to Buy: Edge Groomer When purchasing a new Edge ...
Manual
Page 16
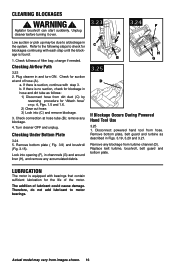
... start suddenly. Remove bottom plate, belt guard and turbine as follows: 1) Disconnect hose from images shown. 16 Check fullness of lubricant could cause damage. Actual model may be due to a blockage in channnels (G) and around liner (H), and remove any accumulated debris. a. Remove bottom plate ( Fig. 3.9) and brushroll (Fig. 3.15). Plug cleaner...
... start suddenly. Remove bottom plate, belt guard and turbine as follows: 1) Disconnect hose from images shown. 16 Check fullness of lubricant could cause damage. Actual model may be due to a blockage in channnels (G) and around liner (H), and remove any accumulated debris. a. Remove bottom plate ( Fig. 3.9) and brushroll (Fig. 3.15). Plug cleaner...

Manual
Page 18
Service To obtain approved Hoover® service and genuine Hoover® parts, locate the nearest Authorized Hoover® Warranty Service Dealer (Depot) by the complete model number when requesting information or ordering parts. (Label located on lower handle of authorized service outlet locations call 1-800-944-9200; Customers) or hoover.ca (Canadian customers). Mon-Fri 8am...
Service To obtain approved Hoover® service and genuine Hoover® parts, locate the nearest Authorized Hoover® Warranty Service Dealer (Depot) by the complete model number when requesting information or ordering parts. (Label located on lower handle of authorized service outlet locations call 1-800-944-9200; Customers) or hoover.ca (Canadian customers). Mon-Fri 8am...

