

Manual
Page 2
Thank you for its intended use without dirt cup or filters in use with your HOOVER product. Model Serial number Hint: Attach your cleaner. SERIAL NUMBER Contents Getting Started 3 How to run appliance over cord.... Blockages 11-12 Important Safeguards 2 Maintenance Authorized Service 11 Cleaning Filters 7-8 Emptying Dirt Cup 7 Lubrication 10 Replacing Agitator Brush Roll ......10 Replacing Belt 9-10 Replacing Headlight 8 Thermal Protector 10 Warranty 12 © 2004 The Hoover Company www.hoover.com 2 Important Safeguards When using an electrical appliance, always follow...
Thank you for its intended use without dirt cup or filters in use with your HOOVER product. Model Serial number Hint: Attach your cleaner. SERIAL NUMBER Contents Getting Started 3 How to run appliance over cord.... Blockages 11-12 Important Safeguards 2 Maintenance Authorized Service 11 Cleaning Filters 7-8 Emptying Dirt Cup 7 Lubrication 10 Replacing Agitator Brush Roll ......10 Replacing Belt 9-10 Replacing Headlight 8 Thermal Protector 10 Warranty 12 © 2004 The Hoover Company www.hoover.com 2 Important Safeguards When using an electrical appliance, always follow...

Manual
Page 4
...to tighten the connector. 4 2-3 B ON-OFF-HUSH™ switch Plug cord into electrical outlet. Furniture nozzle 17. Dirt cup latch 5. Pre-filter 20. Push the switch forward for 9. 2. Dirt cup (Twin Chamber) rotates to middle position. To turn cleaner OFF, push switch to the left... for a temporary boost. HEPA filter (inside wand 6. ON-OFF-HUSH™ switch: located on bottom of cleaner body 17 headlight. 12. Put Power Boost Switch in the ...
...to tighten the connector. 4 2-3 B ON-OFF-HUSH™ switch Plug cord into electrical outlet. Furniture nozzle 17. Dirt cup latch 5. Pre-filter 20. Push the switch forward for 9. 2. Dirt cup (Twin Chamber) rotates to middle position. To turn cleaner OFF, push switch to the left... for a temporary boost. HEPA filter (inside wand 6. ON-OFF-HUSH™ switch: located on bottom of cleaner body 17 headlight. 12. Put Power Boost Switch in the ...

Manual
Page 7
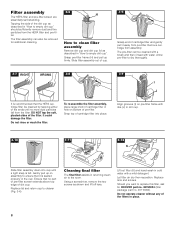
... the cleaner is in place. Maintenance Familiarize yourself with a damp cloth. When to empty It is not necessary to remove the HEPA cartridge filter to empty the dirt cup. CAUTION: Very fine materials, such as proper use and care of the dirt cup. When using . 3. ...will collect fine particles that the dirt cup be emptied before using the cleaner for this type of suction. Press latch down. The HEPA cartridge filter will ensure continued cleaning effectiveness. G Replace dirt cup lid. Disconnect cleaner from electrical outlet. Press dirt cup latch (F) and remove dirt cup...
... the cleaner is in place. Maintenance Familiarize yourself with a damp cloth. When to empty It is not necessary to remove the HEPA cartridge filter to empty the dirt cup. CAUTION: Very fine materials, such as proper use and care of the dirt cup. When using . 3. ...will collect fine particles that the dirt cup be emptied before using the cleaner for this type of suction. Press latch down. The HEPA cartridge filter will ensure continued cleaning effectiveness. G Replace dirt cup lid. Disconnect cleaner from electrical outlet. Press dirt cup latch (F) and remove dirt cup...
Manual
Page 8
...-filter can also be removed for HOOVER part no. 38765024 (filter package part no. 40110004). It could damage the filter. To re-assemble the filter assembly, place large knob of pre-filter. Lift out filter (K) and hand wash in hole on bottom of cartridge filter in cold water with a mild detergent. Allow pre-filter to...cleaned by tapping either of the dirt cup as shown and lift off lens. DO NOT tap the soft, pleated sides of cartridge filter and gently pull it is recommended that no more dust particles fall from assembly. Align grooves (I J It is seated properly in dirt...
...-filter can also be removed for HOOVER part no. 38765024 (filter package part no. 40110004). It could damage the filter. To re-assemble the filter assembly, place large knob of pre-filter. Lift out filter (K) and hand wash in hole on bottom of cartridge filter in cold water with a mild detergent. Allow pre-filter to...cleaned by tapping either of the dirt cup as shown and lift off lens. DO NOT tap the soft, pleated sides of cartridge filter and gently pull it is recommended that no more dust particles fall from assembly. Align grooves (I J It is seated properly in dirt...

Manual
Page 11
... Ensure that dirt cup lid is properly positioned • Filter assembly not installed properly • Ensure that the filter assembly is for comparison with this cleaner OR - • checking the Service section of The Hoover Company on-line at www.hoover.com OR - • calling 1-800-944-9200 for... an automated referral of Hoover uprights only and not for comparing ...
... Ensure that dirt cup lid is properly positioned • Filter assembly not installed properly • Ensure that the filter assembly is for comparison with this cleaner OR - • checking the Service section of The Hoover Company on-line at www.hoover.com OR - • calling 1-800-944-9200 for... an automated referral of Hoover uprights only and not for comparing ...

Manual
Page 12
... in and turn ON. Military Exchange. Hoover Authorized Warranty Service Dealers (Depots) For an automated referral of parts only. however, if you mail your appliance to place this appliance in duct (A). 3. Check fullness of purchase. empty cup and clean filters if needed , or if there are... a blockage in Canada or from date of dirt cup and filter assembly; Turn cleaner OFF and unplug. 7. This warranty does not apply if the appliance is warranted in normal household use, in accordance with step 6. Hoover Factory Service Centers 2. While this warranty or the availability of ...
... in and turn ON. Military Exchange. Hoover Authorized Warranty Service Dealers (Depots) For an automated referral of parts only. however, if you mail your appliance to place this appliance in duct (A). 3. Check fullness of purchase. empty cup and clean filters if needed , or if there are... a blockage in Canada or from date of dirt cup and filter assembly; Turn cleaner OFF and unplug. 7. This warranty does not apply if the appliance is warranted in normal household use, in accordance with step 6. Hoover Factory Service Centers 2. While this warranty or the availability of ...


