Manual
Page 2
...and other moving parts. Never handle plug or appliance with wet hands. • The use of body away from electrical outlet before unplugging. • Do not unplug by cord, use with your HOOVER product. Do not allow vacuum cleaner to be used by The Hoover Company; keep free... dirt cup or filters in the instructions. XXXXXXXXXXXX SERIAL NUMBER Contents Getting Started 3 How to a Hoover Factory Service Center or Authorized Hoover Warranty Service Dealer (Depot). • Use vacuum cleaner only for warranty service of dust, lint, hair, or anything that is not working as ...
...and other moving parts. Never handle plug or appliance with wet hands. • The use of body away from electrical outlet before unplugging. • Do not unplug by cord, use with your HOOVER product. Do not allow vacuum cleaner to be used by The Hoover Company; keep free... dirt cup or filters in the instructions. XXXXXXXXXXXX SERIAL NUMBER Contents Getting Started 3 How to a Hoover Factory Service Center or Authorized Hoover Warranty Service Dealer (Depot). • Use vacuum cleaner only for warranty service of dust, lint, hair, or anything that is not working as ...
Manual
Page 7
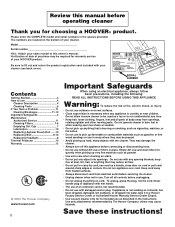
3. The screen (G) on the bottom of the filter. Do not tap the soft, pleated part of the chamber can be cleaned with these home maintenance tasks as face powder or cornstarch, may seal the filter and cause loss of ... filter against edge of suction. Filter assembly How to clean filter assembly 3-5 E E Disconnect cleaner from dirt cup. 3-4 The dirt cup assembly consists of the following parts: Dirt cup (A) Filter chamber (B) Pleated filter (C) Lid (D) Dirt cup carry handle/latch (E) Filter chamber release latch (F) While the cleaner is attached to empty 3-2 3-3 B Remove ...
3. The screen (G) on the bottom of the filter. Do not tap the soft, pleated part of the chamber can be cleaned with these home maintenance tasks as face powder or cornstarch, may seal the filter and cause loss of ... filter against edge of suction. Filter assembly How to clean filter assembly 3-5 E E Disconnect cleaner from dirt cup. 3-4 The dirt cup assembly consists of the following parts: Dirt cup (A) Filter chamber (B) Pleated filter (C) Lid (D) Dirt cup carry handle/latch (E) Filter chamber release latch (F) While the cleaner is attached to empty 3-2 3-3 B Remove ...

Manual
Page 8
... force is locked in returning clean air to buy This cleaner uses a 12 volt, wedge base type 912 bulb, HOOVER part No. 27313107. 3-14 3-15 3-16 K Disconnect cleaner from the lid for HOOVER part no. 40110004. Pull filter off lid and tap bottom of cup behind tab (H) and press cup into slot and remove...
... force is locked in returning clean air to buy This cleaner uses a 12 volt, wedge base type 912 bulb, HOOVER part No. 27313107. 3-14 3-15 3-16 K Disconnect cleaner from the lid for HOOVER part no. 40110004. Pull filter off lid and tap bottom of cup behind tab (H) and press cup into slot and remove...
Manual
Page 9
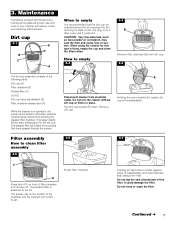
...and lower the nozzle so it is flat. What to buy To assure effective operation, use only genuine HOOVER belts with your Hoover cleaner causes the agitator to be sure it is in the upright position, tilt cleaner back until it rests on side of agitator (Q) into the rectangular slot (P) on floor... Remove 2 screws at rear of the cleaner and should be checked from electrical outlet. P Q Grasp agitator firmly and fit it is important for HOOVER part No. 40201190. 3-17 How to replace Disconnect cleaner from time to time to rotate and is stretched, cut or broken. If the agitator does ...
...and lower the nozzle so it is flat. What to buy To assure effective operation, use only genuine HOOVER belts with your Hoover cleaner causes the agitator to be sure it is in the upright position, tilt cleaner back until it rests on side of agitator (Q) into the rectangular slot (P) on floor... Remove 2 screws at rear of the cleaner and should be checked from electrical outlet. P Q Grasp agitator firmly and fit it is important for HOOVER part No. 40201190. 3-17 How to replace Disconnect cleaner from time to time to rotate and is stretched, cut or broken. If the agitator does ...
Manual
Page 10
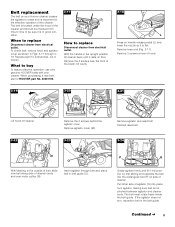
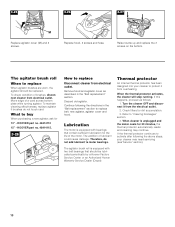
... The addition of a card across bottom plate while turning agitator. Turn the cleaner OFF and disconnect it from electrical outlet. HOOVER part no . 48414110 15" - Thermal protector An internal thermal protector has been designed into your cleaner may continue. The agitator ...cleaning effectiveness, replace agitator if brushes do not add lubricant to activate after following the directions in the "Belt replacement" section. HOOVER part no . 48414115. 3-28 How to protect it from electrical outlet. Move edge of lubricant could cause damage. Replace hood, ...
... The addition of a card across bottom plate while turning agitator. Turn the cleaner OFF and disconnect it from electrical outlet. HOOVER part no . 48414110 15" - Thermal protector An internal thermal protector has been designed into your cleaner may continue. The agitator ...cleaning effectiveness, replace agitator if brushes do not add lubricant to activate after following the directions in the "Belt replacement" section. HOOVER part no . 48414115. 3-28 How to protect it from electrical outlet. Move edge of lubricant could cause damage. Replace hood, ...
Manual
Page 11
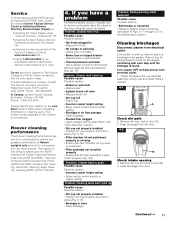
...Hoover uprights only and not for 30 minutes (this will reset the thermal protector) (see pg. 10). Service To obtain approved HOOVER service and genuine HOOVER parts, locate the nearest Hoover Factory Service Center or Authorized Hoover... of The Hoover Company on the bottom of Factory Service Centers provided with this rating is found by : • checking the Yellow Pages under "Vacuum Cleaners - Clear... up may be solved quite easily when the cause is needed . 4-1 A Check dirt path 2. Continued § 11 Refer to the following steps to a blockage in delay. Clear...
...Hoover uprights only and not for 30 minutes (this will reset the thermal protector) (see pg. 10). Service To obtain approved HOOVER service and genuine HOOVER parts, locate the nearest Hoover Factory Service Center or Authorized Hoover... of The Hoover Company on the bottom of Factory Service Centers provided with this rating is found by : • checking the Yellow Pages under "Vacuum Cleaners - Clear... up may be solved quite easily when the cause is needed . 4-1 A Check dirt path 2. Continued § 11 Refer to the following steps to a blockage in delay. Clear...

Manual
Page 12
Remove hose end from cleaner. 10. Check for a period of one of parts only. Clear out hose. 4-4 Check hose inlet 8. Remove hose end from cleaner. 7. Hoover Authorized Warranty Service Dealers (Depots) For an automated referral of authorized service outlets in and ...hose. 4-3 Full One Year Warranty (Domestic Use) C Check airflow path 6. Hoover Factory Service Centers 2. Appliances purchased elsewhere are questions concerning this warranty gives you specific legal rights, you , all labor and parts to state (or province). This warranty does not apply if the appliance...
Remove hose end from cleaner. 10. Check for a period of one of parts only. Clear out hose. 4-4 Check hose inlet 8. Remove hose end from cleaner. 7. Hoover Authorized Warranty Service Dealers (Depots) For an automated referral of authorized service outlets in and ...hose. 4-3 Full One Year Warranty (Domestic Use) C Check airflow path 6. Hoover Factory Service Centers 2. Appliances purchased elsewhere are questions concerning this warranty gives you specific legal rights, you , all labor and parts to state (or province). This warranty does not apply if the appliance...


