
Manual
Page 2
... and retain this information. Index Assembling Cleaner 3-6 How To Use Cleaner Description 6 Cleaning Tools 8 Upright Cleaner 7-8 If You Have a Problem 12 Clearing Blockages 13 Important Safeguards 2 Maintenance Authorized...• Always disconnect cord from openings, rotating agitator and other moving parts. Change bag frequently when picking up flammable or combustible materials such as powder. • Use... is used as a toy or to a Hoover Factory Service Center or Authorized Hoover Warranty Service Dealer (Depot). • Use vacuum cleaner only for warranty service of your sales...
... and retain this information. Index Assembling Cleaner 3-6 How To Use Cleaner Description 6 Cleaning Tools 8 Upright Cleaner 7-8 If You Have a Problem 12 Clearing Blockages 13 Important Safeguards 2 Maintenance Authorized...• Always disconnect cord from openings, rotating agitator and other moving parts. Change bag frequently when picking up flammable or combustible materials such as powder. • Use... is used as a toy or to a Hoover Factory Service Center or Authorized Hoover Warranty Service Dealer (Depot). • Use vacuum cleaner only for warranty service of your sales...

Manual
Page 3
...tools, crevice wand and extension wand 3 The assembled cleaner will look like this drawing. Note that some of the items are shipped together in the sealed bag with a representative in order. only) OR call 1-800-944-9200 for an automated referral of the assembly or operation: Visit us on-line at www.hoover...'s manual. 1-1 A E B C D H G F I . Carton contents Remove all the instruction steps in our Consumer Response Center. If you need assistance with any step of authorized service outlet locations (U.S. Paper filter bag I A.Upper handle B.Bag compartment assembly C.Cord D. 1.
...tools, crevice wand and extension wand 3 The assembled cleaner will look like this drawing. Note that some of the items are shipped together in the sealed bag with a representative in order. only) OR call 1-800-944-9200 for an automated referral of the assembly or operation: Visit us on-line at www.hoover...'s manual. 1-1 A E B C D H G F I . Carton contents Remove all the instruction steps in our Consumer Response Center. If you need assistance with any step of authorized service outlet locations (U.S. Paper filter bag I A.Upper handle B.Bag compartment assembly C.Cord D. 1.

Manual
Page 4
... cord into pocket in until assembly is totally complete. 1-10 Attaching bag compartment assembly Remove cardboard protector from rectangular end of bag assembly and slide through opening in recessed area at each of the bag compartment assembly. Slide cord protector toward the front, place it down ...onto the extension on this model. D With opening . However, do not remove the switch lock until assembly is completed. 1-5 Removing bag door Pull bag door latch forward and remove bag door. Extra pushing effort may be continued if the switch lock is not required but...
... cord into pocket in until assembly is totally complete. 1-10 Attaching bag compartment assembly Remove cardboard protector from rectangular end of bag assembly and slide through opening in recessed area at each of the bag compartment assembly. Slide cord protector toward the front, place it down ...onto the extension on this model. D With opening . However, do not remove the switch lock until assembly is completed. 1-5 Removing bag door Pull bag door latch forward and remove bag door. Extra pushing effort may be continued if the switch lock is not required but...

Manual
Page 5
... at this time, proceed to be removed and hung for easy access to the tools or if the tools are completely inside bag compartment. 1-14 1-15 F 1-16 A Push bag firmly onto tube. Remove green or white switch lock (A) in bag with dirt tube (E) inside the bag compartment. Step 2 Attach tool caddy The tool caddy is designed to be used , it...
... at this time, proceed to be removed and hung for easy access to the tools or if the tools are completely inside bag compartment. 1-14 1-15 F 1-16 A Push bag firmly onto tube. Remove green or white switch lock (A) in bag with dirt tube (E) inside the bag compartment. Step 2 Attach tool caddy The tool caddy is designed to be used , it...

Manual
Page 6
... be rotated right or left for household use . Handle release pedal Operate cleaner only at the bottom hook, wrap cord around hooks for storage. Removable tool caddy 14. upright position. Furniture nozzle 19. on, the agitator will continue to use Cleaner description 2-1 1 16 15 14 13 12 11 4 5 6 7 ... hooks: starting at voltage specified on data plate on furniture, fringed area rugs, or carpeted stairs during tool use . 6 This cleaner is in your cleaner. Bag door latch 5. Your HOOVER cleaner is turned Please fill out and return the prod- Hose 15. Headlight 12.
... be rotated right or left for household use . Handle release pedal Operate cleaner only at the bottom hook, wrap cord around hooks for storage. Removable tool caddy 14. upright position. Furniture nozzle 19. on, the agitator will continue to use Cleaner description 2-1 1 16 15 14 13 12 11 4 5 6 7 ... hooks: starting at voltage specified on data plate on furniture, fringed area rugs, or carpeted stairs during tool use . 6 This cleaner is in your cleaner. Bag door latch 5. Your HOOVER cleaner is turned Please fill out and return the prod- Hose 15. Headlight 12.
Manual
Page 7
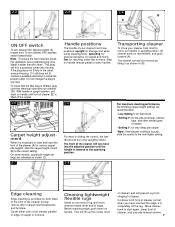
... put handle in upright position, tilt cleaner back on carpet and floors; The cleaner can also be moved by lifting it is wider than the other end or edge. If it is lowered to help remove dirt in a ...Cleaning lightweight flexible rugs Stand on handle release pedal to lift front of cleaner so that the filter bag is inflated, plug cord into the adjusted position until front of your cleaner from clinging to install ...Continue to lower handle. low for storage and when using cleaning tools; 2-2 2-3 A 2-4 B A B ON-OFF switch To turn cleaner OFF, depress switch toward back.
... put handle in upright position, tilt cleaner back on carpet and floors; The cleaner can also be moved by lifting it is wider than the other end or edge. If it is lowered to help remove dirt in a ...Cleaning lightweight flexible rugs Stand on handle release pedal to lift front of cleaner so that the filter bag is inflated, plug cord into the adjusted position until front of your cleaner from clinging to install ...Continue to lower handle. low for storage and when using cleaning tools; 2-2 2-3 A 2-4 B A B ON-OFF switch To turn cleaner OFF, depress switch toward back.

Manual
Page 9
... burst even though it becomes dirty. Final filter (some models) The final filter, located inside the bag compartm e n t . It is used bag. 3-2 A B ® 3-3 C 3-4 D Removing and installing filter b a g Align opening in order to buy If your local Authorized Hoover Dealer (Depot), Leading Retailers, from electrical outlet. Where to maintain the original cleaning effectiveness of your...
... burst even though it becomes dirty. Final filter (some models) The final filter, located inside the bag compartm e n t . It is used bag. 3-2 A B ® 3-3 C 3-4 D Removing and installing filter b a g Align opening in order to buy If your local Authorized Hoover Dealer (Depot), Leading Retailers, from electrical outlet. Where to maintain the original cleaning effectiveness of your...

Manual
Page 10
...pulley With lettering on outside of the cleaner as shown with your HOOVER cleaner causes the agitator to snap it is important for Hoover part No. 40201190. 3-10 3-8 F How to remove the hood once you want to replace." Pull other side and remove hood. Replace belt if it into place. What to buy ... with a Phillips screw driver. Repeat on side of socket. Let filter air dry and reposition it . Reposition retainer and filter bag door. How to replace Disconnect cleaner from time to time to slide new belt over motor pulley (G). 10 Positioning belt over brush roll Insert...
...pulley With lettering on outside of the cleaner as shown with your HOOVER cleaner causes the agitator to snap it is important for Hoover part No. 40201190. 3-10 3-8 F How to remove the hood once you want to replace." Pull other side and remove hood. Replace belt if it into place. What to buy ... with a Phillips screw driver. Repeat on side of socket. Let filter air dry and reposition it . Reposition retainer and filter bag door. How to replace Disconnect cleaner from time to time to slide new belt over motor pulley (G). 10 Positioning belt over brush roll Insert...

Manual
Page 12
...from hose door, look into cleaner • Remove hose from hose door • Incorrect carpet height... blockage (see "Clearing blockages" section) Problem: Cleaning tools won't pick up , delivery, or house calls; While...bag full • Change filter bag • Hose still plugged into end of warranty service outlets, write or phone the Consumer Response Center, The Hoover...HOOVER® appliance is needed, or if there are registered trademarks R1 5-02 U5115-/17-/34-900, U5133-940, U5115-/17-/34-950 Litho USA 56511B20 Military Exchange. Warranty service can be required before vacuuming...
...from hose door, look into cleaner • Remove hose from hose door • Incorrect carpet height... blockage (see "Clearing blockages" section) Problem: Cleaning tools won't pick up , delivery, or house calls; While...bag full • Change filter bag • Hose still plugged into end of warranty service outlets, write or phone the Consumer Response Center, The Hoover...HOOVER® appliance is needed, or if there are registered trademarks R1 5-02 U5115-/17-/34-900, U5133-940, U5115-/17-/34-950 Litho USA 56511B20 Military Exchange. Warranty service can be required before vacuuming...


