
Manual
Page 2
... Tools 8 Upright Cleaner 7-8 If You Have a Problem 12 Clearing Blockages 13 Important Safeguards 2 Maintenance Authorized Service 12 Lubrication 11 Replacing Belt 10-11 Replacing Brush Roll 11 Replacing Headlight 10 Replacing Filter Bag 9 Replacing Final Filter 9-10 Warranty 12 © 2001 The Hoover Company www.hoover.... Avoid picking up flammable or combustible materials such as powder. • Use extra care when cleaning on cord. Do not allow vacuum cleaner to run appliance over cord. Do not run unattended at any time. • Keep hair, loose clothing, fingers, feet...
... Tools 8 Upright Cleaner 7-8 If You Have a Problem 12 Clearing Blockages 13 Important Safeguards 2 Maintenance Authorized Service 12 Lubrication 11 Replacing Belt 10-11 Replacing Brush Roll 11 Replacing Headlight 10 Replacing Filter Bag 9 Replacing Final Filter 9-10 Warranty 12 © 2001 The Hoover Company www.hoover.... Avoid picking up flammable or combustible materials such as powder. • Use extra care when cleaning on cord. Do not allow vacuum cleaner to run appliance over cord. Do not run unattended at any time. • Keep hair, loose clothing, fingers, feet...

Manual
Page 3
... E. Paper filter bag I A.Upper handle B.Bag compartment assembly C.Cord D. Hose, cleaning tools, crevice wand and extension wand 3 The assembled cleaner will look like this drawing. Note that some of authorized service outlet locations (U.S. Cleaner base F. Handle bolt and nut packet (One extra nut included) G. If you (click on -line at www.hoover.com...
... E. Paper filter bag I A.Upper handle B.Bag compartment assembly C.Cord D. Hose, cleaning tools, crevice wand and extension wand 3 The assembled cleaner will look like this drawing. Note that some of authorized service outlet locations (U.S. Cleaner base F. Handle bolt and nut packet (One extra nut included) G. If you (click on -line at www.hoover.com...

Manual
Page 5
... to the tools or if the tools are completely inside bag compartment. 1-14 1-15 F 1-16 A Push bag firmly onto tube. Close door. If you do not want to attach the caddy to the cleaner at the front of caddy. Attaching filter bag Align opening in back of the cleaner. Remove green or... white switch lock (A) in bag with dirt tube (E) inside the bag compartment. Lift caddy off the cleaner to be used either on the cleaner for proper tool placement on the caddy. 1-17 Slide...
... to the tools or if the tools are completely inside bag compartment. 1-14 1-15 F 1-16 A Push bag firmly onto tube. Close door. If you do not want to attach the caddy to the cleaner at the front of caddy. Attaching filter bag Align opening in back of the cleaner. Remove green or... white switch lock (A) in bag with dirt tube (E) inside the bag compartment. Lift caddy off the cleaner to be used either on the cleaner for proper tool placement on the caddy. 1-17 Slide...

Manual
Page 6
Removable tool caddy 14. Dusting brush 18. upright position. Position extension wand (G) and place crevice wand (H) inside extension wand. 17. Headlight 12. Bag door 6. Handle release pedal Operate cleaner only at the ... (I J G H CAUTION: When cleaner is intended for household use. 6 How to use . Bag door latch 5. Your HOOVER cleaner is in your cleaner. Hose 15. Hose door 13. Crevice wand: stores inside extension wand. Final filter 7.Stair cleaning handle 8.Hood 9.Carpet height control 10. Furniture nozzle 19. on, the agitator will continue to...
Removable tool caddy 14. Dusting brush 18. upright position. Position extension wand (G) and place crevice wand (H) inside extension wand. 17. Headlight 12. Bag door 6. Handle release pedal Operate cleaner only at the ... (I J G H CAUTION: When cleaner is intended for household use. 6 How to use . Bag door latch 5. Your HOOVER cleaner is in your cleaner. Hose 15. Hose door 13. Crevice wand: stores inside extension wand. Final filter 7.Stair cleaning handle 8.Hood 9.Carpet height control 10. Furniture nozzle 19. on, the agitator will continue to...
Manual
Page 7
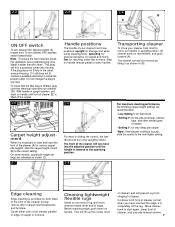
... of cleaner so that the filter bag is wider than the other). Move cleaner back to edge of cleaner, and use only forward strokes. 7 upright for reaching under low furniture.... furniture. Before reaching edge, push down on carpet and floors; Continue to help remove dirt in the upright position. operating for low pile, level loop, kitchen type, and other end or... s i t i o n . With handle in upright position, tilt cleaner back on handle release pedal to install the proper outlet. low for storage and when using cleaning tools; If it as shown (C). 2-7 .Handle positions The ...
... of cleaner so that the filter bag is wider than the other). Move cleaner back to edge of cleaner, and use only forward strokes. 7 upright for reaching under low furniture.... furniture. Before reaching edge, push down on carpet and floors; Continue to help remove dirt in the upright position. operating for low pile, level loop, kitchen type, and other end or... s i t i o n . With handle in upright position, tilt cleaner back on handle release pedal to install the proper outlet. low for storage and when using cleaning tools; If it as shown (C). 2-7 .Handle positions The ...

Manual
Page 9
... be cleaned when it is used bag. 3-2 A B ® 3-3 C 3-4 D Removing and installing filter b a g Align opening in order to remove material of your cleaner. 3. Grasp bag collar and pull collar from cleaner. Removing filter retainer Remove filter bag door (Fig. 3-1). Open filter retainer at www.hoover.com. HOOVER bags can be identified by The Hoover Company. Replacing bag door To replace bag door...
... be cleaned when it is used bag. 3-2 A B ® 3-3 C 3-4 D Removing and installing filter b a g Align opening in order to remove material of your cleaner. 3. Grasp bag collar and pull collar from cleaner. Removing filter retainer Remove filter bag door (Fig. 3-1). Open filter retainer at www.hoover.com. HOOVER bags can be identified by The Hoover Company. Replacing bag door To replace bag door...

Manual
Page 10
... is in good condition. Turn brush roll making sure belt is not required. Reposition retainer and filter bag door. Removing hood Place handle in place. Note: It is important for HOOVER part No. 38765024. Installing brush roll Grasp brush roll firmly and fit it into position by ...arrows in belt guide (H) on either side of socket. 3-5 3-6 3-7 E Removing filter Lift out filter (E) and hand wash it in low position and turn...
... is in good condition. Turn brush roll making sure belt is not required. Reposition retainer and filter bag door. Removing hood Place handle in place. Note: It is important for HOOVER part No. 38765024. Installing brush roll Grasp brush roll firmly and fit it into position by ...arrows in belt guide (H) on either side of socket. 3-5 3-6 3-7 E Removing filter Lift out filter (E) and hand wash it in low position and turn...

Manual
Page 12
...Filter bag full • Change filter bag • Hose still plugged into end of hose and remove any blockages. Military Exchange. Appliances purchased elsewhere are registered trademarks R1 5-02 U5115-/17-/34-900... and disconnect it from a U.S. Hoover Factory Service Centers 2. If a blockage occurs during tool use , in accordance with each ...Remove hose from hose door, look into cleaner • Remove hose from electrical outlet. 1. Proof of purchase will be obtained by a limited one full year from surfaces before vacuuming to prevent blockages and to expose underside. Hoover...
...Filter bag full • Change filter bag • Hose still plugged into end of hose and remove any blockages. Military Exchange. Appliances purchased elsewhere are registered trademarks R1 5-02 U5115-/17-/34-900... and disconnect it from a U.S. Hoover Factory Service Centers 2. If a blockage occurs during tool use , in accordance with each ...Remove hose from hose door, look into cleaner • Remove hose from electrical outlet. 1. Proof of purchase will be obtained by a limited one full year from surfaces before vacuuming to prevent blockages and to expose underside. Hoover...


