
Manual
Page 3
...following: READ ALL INSTRUCTIONS BEFORE USING APPLIANCE. Do not use with any appliance is necessary when any opening blocked; Do not allow vacuum cleaner to be present. • Do not pull or carry by cord, use cord as a handle, close door on ... 5 Cleaning tools 6 Cleaning stairs 7 Storage 7 Maintenance 7-8 Filter bag 7 Filter 8 Lubrication 8 Clearing blockages 9 If you have a problem 9 Service 10 Warranty 10 Parts & accessories mail reorder form 27 www.hoover.com www.hoover.ca © 2006 The Hoover Company 3 Keep cord away from heated surfaces. • Always disconnect...
...following: READ ALL INSTRUCTIONS BEFORE USING APPLIANCE. Do not use with any appliance is necessary when any opening blocked; Do not allow vacuum cleaner to be present. • Do not pull or carry by cord, use cord as a handle, close door on ... 5 Cleaning tools 6 Cleaning stairs 7 Storage 7 Maintenance 7-8 Filter bag 7 Filter 8 Lubrication 8 Clearing blockages 9 If you have a problem 9 Service 10 Warranty 10 Parts & accessories mail reorder form 27 www.hoover.com www.hoover.ca © 2006 The Hoover Company 3 Keep cord away from heated surfaces. • Always disconnect...

Manual
Page 5
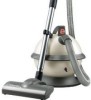
... twist wand to tighten or loosen connection. 11 12 13 14 15 16 10 9 76 5 4 3 2 8 1 2. Twist nozzle slightly to tighten. Bag lid 3. Bag lid latch (on underside of the cleaner. Crevice tool 7. Wand grip 13. Telescoping extension wand: used with slots in opening (B) in...desired length by pushing forward on the wand grip. This cleaner is intended for household use Cleaner description 2-1 Use the following to identify the parts and features of cleaner) 4. Turbine nozzle 2. Dusting brush 8. ON/OFF switch 16. Twist counterclockwise to desired length. Hose 12. Adjust...
... twist wand to tighten or loosen connection. 11 12 13 14 15 16 10 9 76 5 4 3 2 8 1 2. Twist nozzle slightly to tighten. Bag lid 3. Bag lid latch (on underside of the cleaner. Crevice tool 7. Wand grip 13. Telescoping extension wand: used with slots in opening (B) in...desired length by pushing forward on the wand grip. This cleaner is intended for household use Cleaner description 2-1 Use the following to identify the parts and features of cleaner) 4. Turbine nozzle 2. Dusting brush 8. ON/OFF switch 16. Twist counterclockwise to desired length. Hose 12. Adjust...

Manual
Page 7
... full of this nature, change the bag often. Ask for HOOVER part number 4010806S for you. 2-8 Storing the cleaner Unplug the cord and wrap it around base and insert hook on hand grip into bag holder. ¡ (Cont'd) 7 Unlatch and open bag lid. Position tools on you go.... number of the cleaner. Discard used bag. A B 3-1 Replacing the filter bag Disconnect cleaner from time to buy It is located on bag collar (C). C 3-2 Remove bag from your way up on the back side of your cleaner. Cleaning stairs Simply leave the HOOVER canister cleaner at the back of the carry...
... full of this nature, change the bag often. Ask for HOOVER part number 4010806S for you. 2-8 Storing the cleaner Unplug the cord and wrap it around base and insert hook on hand grip into bag holder. ¡ (Cont'd) 7 Unlatch and open bag lid. Position tools on you go.... number of the cleaner. Discard used bag. A B 3-1 Replacing the filter bag Disconnect cleaner from time to buy It is located on bag collar (C). C 3-2 Remove bag from your way up on the back side of your cleaner. Cleaning stairs Simply leave the HOOVER canister cleaner at the back of the carry...

Manual
Page 8
...electrical outlet. When ordering, be replaced after every 2 bag changes. This filter is completely inside bag compartment. Grasp the center of your local Hoover Sales and Service Center. Close and latch bag lid. Put the filter retainer back into position and ... bag (Figs. 3-2 and 3-3), close bag lid and latch. posable bag in the bag compartment, pro- Therefore, do not add lubricant to replace the filter, remove the disposable bag, following Figs. 3-1 and 3-2. 3-4 Before closing bag lid, make sure bag is washable. Replace with sufficient lubrication for HOOVER part ...
...electrical outlet. When ordering, be replaced after every 2 bag changes. This filter is completely inside bag compartment. Grasp the center of your local Hoover Sales and Service Center. Close and latch bag lid. Put the filter retainer back into position and ... bag (Figs. 3-2 and 3-3), close bag lid and latch. posable bag in the bag compartment, pro- Therefore, do not add lubricant to replace the filter, remove the disposable bag, following Figs. 3-1 and 3-2. 3-4 Before closing bag lid, make sure bag is washable. Replace with sufficient lubrication for HOOVER part ...

Manual
Page 10
... this will be paid one of the following authorized warranty service outlets. Service To obtain approved HOOVER service and genuine HOOVER parts, locate the nearest Hoover Sales and Service Center or Authorized Hoover Warranty Service Dealer (Depot) by the complete model number when requesting information or ordering... and workmanship for a period of two full years from date of your cleaner by : • checking the Yellow Pages under "Vacuum Cleaners - This warranty only applies when the product is used in delay. For an automated referral of purchase will only result in ...
... this will be paid one of the following authorized warranty service outlets. Service To obtain approved HOOVER service and genuine HOOVER parts, locate the nearest Hoover Sales and Service Center or Authorized Hoover Warranty Service Dealer (Depot) by the complete model number when requesting information or ordering... and workmanship for a period of two full years from date of your cleaner by : • checking the Yellow Pages under "Vacuum Cleaners - This warranty only applies when the product is used in delay. For an automated referral of purchase will only result in ...


