Manual
Page 2
... your sales receipt to fill out and return the product registration card included with your HOOVER product. Model Serial number Hint: Attach your outdoor sweeper. Verification of date of purchase may cause hazards. © 2003 The Hoover Company www.hoover.com 2 Save these instructions! When using any equipment, always follow basic precautions, including the following...
... your sales receipt to fill out and return the product registration card included with your HOOVER product. Model Serial number Hint: Attach your outdoor sweeper. Verification of date of purchase may cause hazards. © 2003 The Hoover Company www.hoover.com 2 Save these instructions! When using any equipment, always follow basic precautions, including the following...

Manual
Page 3
Assembly Carton contents 1-1 A. Select upper holes for a shorter handle or lower holes for a longer handle. 1-3 C A D C B Continued 3 Outdoor sweeper B A Assemble handle 1-2 Insert round end of straight lower handle sections (A) into one of upper handle section (B). Press button (C) on the "Service" button to the store. 1. ... the holes (D). If you . Please do not return this product to find the service outlet nearest you need any assistance: Visit our website at www.hoover.com. Click on lower handle section. Top handle section C.
Assembly Carton contents 1-1 A. Select upper holes for a shorter handle or lower holes for a longer handle. 1-3 C A D C B Continued 3 Outdoor sweeper B A Assemble handle 1-2 Insert round end of straight lower handle sections (A) into one of upper handle section (B). Press button (C) on the "Service" button to the store. 1. ... the holes (D). If you . Please do not return this product to find the service outlet nearest you need any assistance: Visit our website at www.hoover.com. Click on lower handle section. Top handle section C.

Manual
Page 4
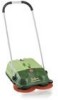
Reattach knobs and twist to use . 6 2 7 1 5 4 3 2 8 4 Handle 2. Dirt bin handle 6. How to tighten. 1-5 F 2. Dirt bin release button 7. Wall guides 8 This outdoor sweeper is not intended for heavy commercial use 2-1 Sweeper description 1. SpinSweep™ brushes 8. Handle knobs 3. Attach handle 1-4 Unscrew handle knobs (E) from each side of sweeper. Height adjustment 5. E Fit holes on handle onto screw posts (F). Dirt bin 4.
Reattach knobs and twist to use . 6 2 7 1 5 4 3 2 8 4 Handle 2. Dirt bin handle 6. How to tighten. 1-5 F 2. Dirt bin release button 7. Wall guides 8 This outdoor sweeper is not intended for heavy commercial use 2-1 Sweeper description 1. SpinSweep™ brushes 8. Handle knobs 3. Attach handle 1-4 Unscrew handle knobs (E) from each side of sweeper. Height adjustment 5. E Fit holes on handle onto screw posts (F). Dirt bin 4.

Manual
Page 5
...that is small in size. For best results, push the outdoor sweeper at a normal walking pace. 2-2 Brush height adjustment Turn the height adjustment control (A) toward "HIGH". 2-3 A Wall guides 2-4 Wall guides are provided on each side of sweeper along walls. It is not intended to walls or edges.... for smooth surfaces and picking up or on lawns. The outdoor sweeper is designed for use outdoor sweeper on steps. Do not use on hard, flat surfaces.
...that is small in size. For best results, push the outdoor sweeper at a normal walking pace. 2-2 Brush height adjustment Turn the height adjustment control (A) toward "HIGH". 2-3 A Wall guides 2-4 Wall guides are provided on each side of sweeper along walls. It is not intended to walls or edges.... for smooth surfaces and picking up or on lawns. The outdoor sweeper is designed for use outdoor sweeper on steps. Do not use on hard, flat surfaces.

Manual
Page 6
...dirt bin, align indent (C) on handle (B) and remove bin. Dirt bin When to empty It is recommended that the dirt bin be installed by your outdoor sweeper will ensure continued cleaning ability. Empty bin in place. 3-2 C A B D The brushes Clean brushes with these home maintenance tasks, as proper use .... If needed, clean the bin and exterior of sweeper. New brushes can be emptied after every use and care of your local Hoover Service Center. 6 Do not use high pressure water spray to empty Slide dirt bin release (A) ...
...dirt bin, align indent (C) on handle (B) and remove bin. Dirt bin When to empty It is recommended that the dirt bin be installed by your outdoor sweeper will ensure continued cleaning ability. Empty bin in place. 3-2 C A B D The brushes Clean brushes with these home maintenance tasks, as proper use .... If needed, clean the bin and exterior of sweeper. New brushes can be emptied after every use and care of your local Hoover Service Center. 6 Do not use high pressure water spray to empty Slide dirt bin release (A) ...

Manual
Page 7
... • Surface is rough or uneven. • Turn the height adjustment knob toward a higher setting. Problem: Sweeper difficult to back of dirt bin. • Tip the outdoor sweeper back to allow debris to move to push. Possible cause Possible solution • Surface is uneven. • Turn... the height adjustment knob toward the brushes and past the "stoppers" (E). E E E Store the outdoor sweeper either standing upright or hanging. Problem: Sweeper does not pick up . • Overlap the sweeping path to more effectively clean the area. •...
... • Surface is rough or uneven. • Turn the height adjustment knob toward a higher setting. Problem: Sweeper difficult to back of dirt bin. • Tip the outdoor sweeper back to allow debris to move to push. Possible cause Possible solution • Surface is uneven. • Turn... the height adjustment knob toward the brushes and past the "stoppers" (E). E E E Store the outdoor sweeper either standing upright or hanging. Problem: Sweeper does not pick up . • Overlap the sweeping path to more effectively clean the area. •...

