Manual
Page 3
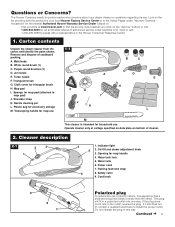
...cleaner is wider than the other). Telescoping handle for your steam cleaner or questions regarding its use 1-1 A F G I . Opening for mop pad (attached to mop pad) J. Safety valve 9. Carton contents Unpack the steam cleaner from the carton and identify the parts shown. Cleaner description 2-1 1 2 3...? A. Turbo nozzle F. Indicator light 5 2. Look on the list provided with a representative in any concerns about your local Hoover Factory Service Center or in the Yellow Pages under "Vacuum Cleaners - Main body B. Shoulder strap K. Operate cleaner only at www...
...cleaner is wider than the other). Telescoping handle for your steam cleaner or questions regarding its use 1-1 A F G I . Opening for mop pad (attached to mop pad) J. Safety valve 9. Carton contents Unpack the steam cleaner from the carton and identify the parts shown. Cleaner description 2-1 1 2 3...? A. Turbo nozzle F. Indicator light 5 2. Look on the list provided with a representative in any concerns about your local Hoover Factory Service Center or in the Yellow Pages under "Vacuum Cleaners - Main body B. Shoulder strap K. Operate cleaner only at www...
Manual
Page 6
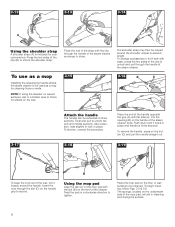
... cleaner body. To shorten, reverse the procedure. The sponge, located on the wax. Adjust to unlock the shoulder strap. Press the two sides of the mop pad, will aid in place and handle is included for effects on the underneath side of the clip (B) to desired length. Twist the... handle of the steam cleaner. 3-16 B A C Place the end of the cleaner. Push down until it loosely around the shoulder. B Using the mop pad Align the tab (A) on the mop pad with the slot (B) on the front of the handle opposite the grip (A) with the clip through the slot (D) on waxed surfaces, test in...
... cleaner body. To shorten, reverse the procedure. The sponge, located on the wax. Adjust to unlock the shoulder strap. Press the two sides of the mop pad, will aid in place and handle is included for effects on the underneath side of the clip (B) to desired length. Twist the... handle of the steam cleaner. 3-16 B A C Place the end of the cleaner. Push down until it loosely around the shoulder. B Using the mop pad Align the tab (A) on the mop pad with the slot (B) on the front of the handle opposite the grip (A) with the clip through the slot (D) on waxed surfaces, test in...
Manual
Page 7
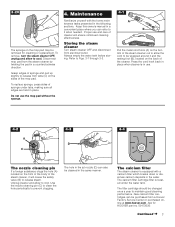
3-20 C The sponge on the mop pad may be removed for HOOVER part no. 59173030. Do not use . 4-2 4-3 4-4 A D C B The nozzle cleaning pin If a foreign substance clogs the hole (A) located on the sides of the mop pad. Proper use and care of sponge under the water tank. Use the nozzle cleaning pin (C) to clean the hole periodically...
3-20 C The sponge on the mop pad may be removed for HOOVER part no. 59173030. Do not use . 4-2 4-3 4-4 A D C B The nozzle cleaning pin If a foreign substance clogs the hole (A) located on the sides of the mop pad. Proper use and care of sponge under the water tank. Use the nozzle cleaning pin (C) to clean the hole periodically...
