Product Manual
Page 3
...Cleaner Assembly...6 How To Assemble...6 General Operation...7 Clean Water/Solution Tank 7 On-Off Switch...7 Dirty Water Tank 8 Maintenance...9 Tanks...9 Belt/Brushes...10 Troubleshooting...11 Service...11 Cleaning Products...12 Warranty...13 If you for choosing a HOOVER® product. Fri 8am- 7pm EST. ...Model 1-800-944-9200 MFG. CODE Hint: Attach your HOOVER® product. Be sure to register by phone....
...Cleaner Assembly...6 How To Assemble...6 General Operation...7 Clean Water/Solution Tank 7 On-Off Switch...7 Dirty Water Tank 8 Maintenance...9 Tanks...9 Belt/Brushes...10 Troubleshooting...11 Service...11 Cleaning Products...12 Warranty...13 If you for choosing a HOOVER® product. Fri 8am- 7pm EST. ...Model 1-800-944-9200 MFG. CODE Hint: Attach your HOOVER® product. Be sure to register by phone....
Product Manual
Page 6
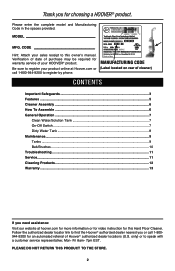
... from falling, always place cleaner at voltage specified on data plate on lower back of stairs or on carpet moistened by cleaning process. • Use only HOOVER® cleaning products intended for use with wet hands. • Do not put any openings. • Use only as gasoline, ... not in use without tanks in areas where they may reduce air flow. • Keep hair, loose clothing, fingers, and all controls before cleaning or servicing. • Use indoors only. • Do Not immerse. IMPORTANT SAFETY INSTRUCTIONS SAVE THESE INSTRUCTIONS When using an electrical appliance, basic ...
... from falling, always place cleaner at voltage specified on data plate on lower back of stairs or on carpet moistened by cleaning process. • Use only HOOVER® cleaning products intended for use with wet hands. • Do not put any openings. • Use only as gasoline, ... not in use without tanks in areas where they may reduce air flow. • Keep hair, loose clothing, fingers, and all controls before cleaning or servicing. • Use indoors only. • Do Not immerse. IMPORTANT SAFETY INSTRUCTIONS SAVE THESE INSTRUCTIONS When using an electrical appliance, basic ...
Product Manual
Page 10
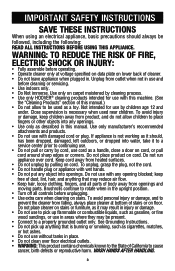
FEATURES 1 2 10 3 4 5 11 6 7 8 12 8 FRONT 9 BACK FEATURES 1. Solution Trigger 3. Dirty Water Tank 8. Cord Storage Hooks (rotate) 12. Carry Handle 4. Clean Water/Solution Tank Release Latch 5. ON/OFF Pedal 9. Clean Water/Solution Tank 6. Cord Clip 11. Nozzle 10. Handle Release Pedal 5 Handle Grip 2. Dirty Water Tank Release Latch 7.
FEATURES 1 2 10 3 4 5 11 6 7 8 12 8 FRONT 9 BACK FEATURES 1. Solution Trigger 3. Dirty Water Tank 8. Cord Storage Hooks (rotate) 12. Carry Handle 4. Clean Water/Solution Tank Release Latch 5. ON/OFF Pedal 9. Clean Water/Solution Tank 6. Cord Clip 11. Nozzle 10. Handle Release Pedal 5 Handle Grip 2. Dirty Water Tank Release Latch 7.
Product Manual
Page 11
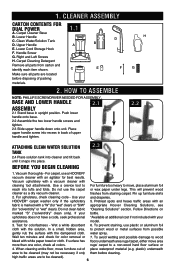
...metal surfaces from possible gently rub the surface with a "W" (for "wet" clean) or "S/W" appropriate Hoover Cleaning Solutions, see (for colorfastness - D F 2. finishes from carton and identify each item shown. HOOVER® carpet washer only if the upholstery 5. Pretreat spots and heavy traffic ...with an fabric is marked with the dampened cloth. To prevent staining, use a HOOVER® vacuum cleaner with white paper towel or cloth. Upper Handle A B E. H G 2.2 Attaching clean water solution tank 2.4 Place solution tank into cleaner and tilt back until it ...
...metal surfaces from possible gently rub the surface with a "W" (for "wet" clean) or "S/W" appropriate Hoover Cleaning Solutions, see (for colorfastness - D F 2. finishes from carton and identify each item shown. HOOVER® carpet washer only if the upholstery 5. Pretreat spots and heavy traffic ...with an fabric is marked with the dampened cloth. To prevent staining, use a HOOVER® vacuum cleaner with white paper towel or cloth. Upper Handle A B E. H G 2.2 Attaching clean water solution tank 2.4 Place solution tank into cleaner and tilt back until it ...
Product Manual
Page 14
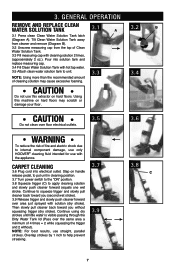
... cap from the top of fire and electric shock due to internal component damage, use only HOOVER® cleaning fluid intended for use with hot tap water. 3.5 Attach clean water solution tank to squeeze trigger and slowly pull cleaner back toward you (second wet stroke)....water is visible passing through the Dirty Water Tank lid (Pass over floor electrical outlets. general operation remove and replace clean water solution tank 3.1 A 3.2 B 3.1 Press clean Clean Water Solution Tank latch (Diagram A). NOTE: Using more than the recommended amount of 4 times = 2 while squeezing ...
... cap from the top of fire and electric shock due to internal component damage, use only HOOVER® cleaning fluid intended for use with hot tap water. 3.5 Attach clean water solution tank to squeeze trigger and slowly pull cleaner back toward you (second wet stroke)....water is visible passing through the Dirty Water Tank lid (Pass over floor electrical outlets. general operation remove and replace clean water solution tank 3.1 A 3.2 B 3.1 Press clean Clean Water Solution Tank latch (Diagram A). NOTE: Using more than the recommended amount of 4 times = 2 while squeezing ...
Product Manual
Page 15
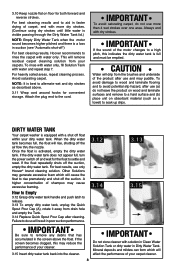
...: It is a loss in Dirty Water Tank. If the dirty water tank does not appear full, turn the power switch off ") For best cleaning results, Hoover recommends to aid in poor suction performance. 3.12 3.14 3.13 3.15 IMPORTANT Be sure to settle and reset. IMPORTANT To avoid saturating carpet, ...do not use only Hoover® brand cleaning solution. When the dirty water tank becomes full, the float will result in faster drying of the product after use and may reduce the...
...: It is a loss in Dirty Water Tank. If the dirty water tank does not appear full, turn the power switch off ") For best cleaning results, Hoover recommends to aid in poor suction performance. 3.12 3.14 3.13 3.15 IMPORTANT Be sure to settle and reset. IMPORTANT To avoid saturating carpet, ...do not use only Hoover® brand cleaning solution. When the dirty water tank becomes full, the float will result in faster drying of the product after use and may reduce the...

Product Manual
Page 18
...tasks as proper use and care of your unit functioning properly and to loosen debris. IMPORTANT Be sure to no suction will ensure continued cleaning effectiveness. If the screen becomes clogged, this may accumulate inside of personal injury - Any other servicing should be done by an authorized ...misplaced, poor to remove any odors from building up, it is securely in the screen above the float. MAINTENANCE Familiarize yourself with clean water and swirl around to prevent any debris that the quick spout pour cap is important that has accumulated in place. In order ...
...tasks as proper use and care of your unit functioning properly and to loosen debris. IMPORTANT Be sure to no suction will ensure continued cleaning effectiveness. If the screen becomes clogged, this may accumulate inside of personal injury - Any other servicing should be done by an authorized ...misplaced, poor to remove any odors from building up, it is securely in the screen above the float. MAINTENANCE Familiarize yourself with clean water and swirl around to prevent any debris that the quick spout pour cap is important that has accumulated in place. In order ...
Product Manual
Page 22
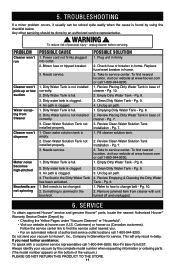
...belt - To find nearest location, visit our website at hoover.com (U.S. Review Placing Dirty Water Tank in delay. Review Clean Water Solution Tank Installation - Review Emptying & Cleaning the Dirty Water Tank - Customers) or hoover.ca (Canadian customers). If you . • For an...Replace fuse/reset breaker in the Dirty Water Tank has been activated. 1. Clean Dirty Water Tank - Service To obtain approved Hoover® service and genuine Hoover® parts, locate the nearest Authorized Hoover® Warranty Service Dealer (Depot) by using the checklist below. Power...
...belt - To find nearest location, visit our website at hoover.com (U.S. Review Placing Dirty Water Tank in delay. Review Clean Water Solution Tank Installation - Review Emptying & Cleaning the Dirty Water Tank - Customers) or hoover.ca (Canadian customers). If you . • For an...Replace fuse/reset breaker in the Dirty Water Tank has been activated. 1. Clean Dirty Water Tank - Service To obtain approved Hoover® service and genuine Hoover® parts, locate the nearest Authorized Hoover® Warranty Service Dealer (Depot) by using the checklist below. Power...
Product Manual
Page 23
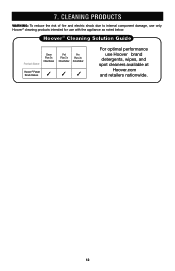
7.CLCELAENANINIGNGSOPLRUOTDIOUNCTSS WARNING: To reduce the risk of fire and electric shock due to internal component damage, use only Hoover® cleaning products intended for use with the appliance as noted below. ® Hoover Cleaning Solution Guide Product Name Clean Plus 2x 32oz/64oz Pet Pro Plus 2x Plus 2x 32oz/64oz 32oz/64oz Hoover® Power Scrub Deluxe ✓ ✓ ✓ For optimal performance use HooverÆ brand detergents, wipes, and spot cleaners available at Hoover.com and retailers nationwide. 12
7.CLCELAENANINIGNGSOPLRUOTDIOUNCTSS WARNING: To reduce the risk of fire and electric shock due to internal component damage, use only Hoover® cleaning products intended for use with the appliance as noted below. ® Hoover Cleaning Solution Guide Product Name Clean Plus 2x 32oz/64oz Pet Pro Plus 2x Plus 2x 32oz/64oz 32oz/64oz Hoover® Power Scrub Deluxe ✓ ✓ ✓ For optimal performance use HooverÆ brand detergents, wipes, and spot cleaners available at Hoover.com and retailers nationwide. 12


