
Manual
Page 3
.... To avoid personal injury or damage, and to continuing use. • Do not pull or carry by cleaning process. • Use only HOOVER® cleaning products intended for use with this machine. (See the "Cleaning Products" section of body away from openings and moving parts. •... left outdoors, or dropped into water, take it may reduce air flow. • Keep hair, loose clothing, fingers, and all controls before connecting SpinScrub® Hand Tool. • Do not pick up flammable or combustible materials, such as cigarettes, matches, or hot ashes. • Do not clean...
.... To avoid personal injury or damage, and to continuing use. • Do not pull or carry by cleaning process. • Use only HOOVER® cleaning products intended for use with this machine. (See the "Cleaning Products" section of body away from openings and moving parts. •... left outdoors, or dropped into water, take it may reduce air flow. • Keep hair, loose clothing, fingers, and all controls before connecting SpinScrub® Hand Tool. • Do not pick up flammable or combustible materials, such as cigarettes, matches, or hot ashes. • Do not clean...
Manual
Page 5
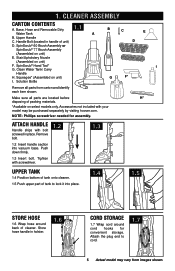
...tank to cord. 1.7 5 Actual model may be purchased separately by visiting hoover.com. Remove bolt. 1.2 Insert handle section into place. 1.4 1.5 store hose 1.6 Wrap hose around cord hooks for assembly. SpinScrub® Hand Tool* G. Attach the plug end to lock it into ...vacuum base. SpinScrub® 60 Brush Assembly or SpinScrub® 77 Brush Assembly (Assembled on unit) F. Clean Water Tank/ Carry Handle ...
...tank to cord. 1.7 5 Actual model may be purchased separately by visiting hoover.com. Remove bolt. 1.2 Insert handle section into place. 1.4 1.5 store hose 1.6 Wrap hose around cord hooks for assembly. SpinScrub® Hand Tool* G. Attach the plug end to lock it into ...vacuum base. SpinScrub® 60 Brush Assembly or SpinScrub® 77 Brush Assembly (Assembled on unit) F. Clean Water Tank/ Carry Handle ...
Manual
Page 6
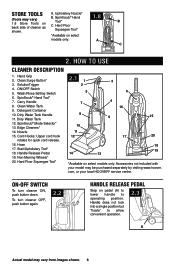
... Wash/Rinse Setting Switch 6. Dirty Water Tank Handle 11. Edge Cleaners* 14. Hose 17. Stair/Upholstery Tool* 18. ON/OFF Switch 5. SpinScrub® Mode Selector* 13. Non-Marring Wheels* 20. Upholstery Nozzle* B. HOW TO USE Cleaner Description 1. Cord Hooks: Upper cord hook rotates... C. Hand Grip 2. SpinScrub® Hand Tool* 7. Clean Water Tank 9. Hard Floor Squeegee Tool* 2.1 1 2 5 7 8 10 11 12 3 6 4 16 9 17 14 13 15 20 18 19 *Available on back side of cleaner as shown. Accessories not included with your local HOOVER® service center. com...
... Wash/Rinse Setting Switch 6. Dirty Water Tank Handle 11. Edge Cleaners* 14. Hose 17. Stair/Upholstery Tool* 18. ON/OFF Switch 5. SpinScrub® Mode Selector* 13. Non-Marring Wheels* 20. Upholstery Nozzle* B. HOW TO USE Cleaner Description 1. Cord Hooks: Upper cord hook rotates... C. Hand Grip 2. SpinScrub® Hand Tool* 7. Clean Water Tank 9. Hard Floor Squeegee Tool* 2.1 1 2 5 7 8 10 11 12 3 6 4 16 9 17 14 13 15 20 18 19 *Available on back side of cleaner as shown. Accessories not included with your local HOOVER® service center. com...
Manual
Page 7
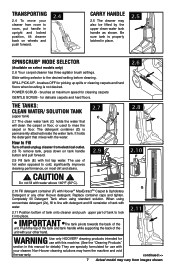
...of hot water opposed to rinse the carpet or floor. Slide setting selector to room, put handle in place. 2.5 1 2 3 3 PO2WGEE1RNSTIPSILLEPBLEREUDSH SpinScrub® mode selector (Available on wheels and push forward. 2.4 Carry handle 2.5 The cleaner may also be lifted by the upper clean water tank... handle as shown. CAUTION ! Replace container caps and tighten. Non-Hoover cleaning solutions may vary from room to the desired setting before cleaning. Be sure tank is properly latched in upright and locked position, ...
...of hot water opposed to rinse the carpet or floor. Slide setting selector to room, put handle in place. 2.5 1 2 3 3 PO2WGEE1RNSTIPSILLEPBLEREUDSH SpinScrub® mode selector (Available on wheels and push forward. 2.4 Carry handle 2.5 The cleaner may also be lifted by the upper clean water tank... handle as shown. CAUTION ! Replace container caps and tighten. Non-Hoover cleaning solutions may vary from room to the desired setting before cleaning. Be sure tank is properly latched in upright and locked position, ...
Manual
Page 10
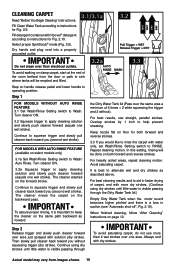
... keep the cleaner on the same path backward as described above. For best cleaning results and to aid in faster drying of carpet, end with Hoover® detergent according to rinse the carpet with solution (dry stroke). 8&5 8&5 %3: %3: Cleaning Carpet 3.1/3.1a Read "Before You Begin Cleaning" ... Wash. Always end with dry strokes. It is a loss in suction (see "Automatic shut-off", Fig. 2.19). RINSE WASH Select proper SpinScrub® mode (Fig. 2.6). For best results, use more dry strokes. (Continue using dry strokes until little water is visible passing through the ...
... keep the cleaner on the same path backward as described above. For best cleaning results and to aid in faster drying of carpet, end with Hoover® detergent according to rinse the carpet with solution (dry stroke). 8&5 8&5 %3: %3: Cleaning Carpet 3.1/3.1a Read "Before You Begin Cleaning" ... Wash. Always end with dry strokes. It is a loss in suction (see "Automatic shut-off", Fig. 2.19). RINSE WASH Select proper SpinScrub® mode (Fig. 2.6). For best results, use more dry strokes. (Continue using dry strokes until little water is visible passing through the ...
Manual
Page 11
... carpet cleaner on unsealed hardwood floors. Make sure the outside edges are pushed up spills, follow the flooring manufacturer's cleaning recommendations. Slide SpinScrub selector to WASH (Wash/ Auto-Rinse™ when available). Dry hands and plug cleaner into place. Turn cleaner on furniture). 1....cleaner to instructions for Fig. 2.10. 3.4 Position the squeegee, larger lip facing up flammable or combustible liquids or chemicals. For models with HOOVER® Hard Floor that handle rests on the floor. Repeat steps 7 & 8. Fill clean water tank according to pick up , on ...
... carpet cleaner on unsealed hardwood floors. Make sure the outside edges are pushed up spills, follow the flooring manufacturer's cleaning recommendations. Slide SpinScrub selector to WASH (Wash/ Auto-Rinse™ when available). Dry hands and plug cleaner into place. Turn cleaner on furniture). 1....cleaner to instructions for Fig. 2.10. 3.4 Position the squeegee, larger lip facing up flammable or combustible liquids or chemicals. For models with HOOVER® Hard Floor that handle rests on the floor. Repeat steps 7 & 8. Fill clean water tank according to pick up , on ...
Manual
Page 12
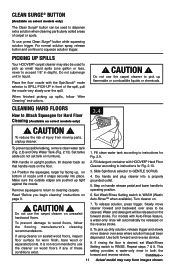
...provide the scrubbing action some models, the brushes can be replaced before the carpet is a loss in brush to dry. tools 4.1 A B SpinScrub® hand tool (Available on page 12. To reposition the tool, reverse this procedure. 4. If it is completely dry. Empty recovery ... IMPORTANT 3.5 To keep children and pets away from nozzle. If furniture must be removed for extra scrubbing action on select models only) B. SpinScrub® Hand Tool (Available on select models only) has rotating brush for converting to the scrub module. (Available on small carpet areas, ...
...provide the scrubbing action some models, the brushes can be replaced before the carpet is a loss in brush to dry. tools 4.1 A B SpinScrub® hand tool (Available on page 12. To reposition the tool, reverse this procedure. 4. If it is completely dry. Empty recovery ... IMPORTANT 3.5 To keep children and pets away from nozzle. If furniture must be removed for extra scrubbing action on select models only) B. SpinScrub® Hand Tool (Available on select models only) has rotating brush for converting to the scrub module. (Available on small carpet areas, ...
Manual
Page 13
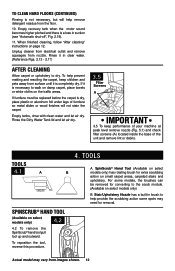
... A B 4.5 Lift tool, and position it against the riser and slightly press it onto connector until the carpet is completely dry before connecting SpinScrub® Hand Tool. CAUTION ! Turn off and unplug cleaner from images shown. Use extra care when cleaning on page 9. Position tool against riser... over any one wet stroke). Press the trigger and pull the tool slowly over carpet without pressing trigger (dry stroke). End with HOOVER® detergent according to instructions for additional information. 13 Actual model may result in the same manner: 4.3 Connect tool to the...
... A B 4.5 Lift tool, and position it against the riser and slightly press it onto connector until the carpet is completely dry before connecting SpinScrub® Hand Tool. CAUTION ! Turn off and unplug cleaner from images shown. Use extra care when cleaning on page 9. Position tool against riser... over any one wet stroke). Press the trigger and pull the tool slowly over carpet without pressing trigger (dry stroke). End with HOOVER® detergent according to instructions for additional information. 13 Actual model may result in the same manner: 4.3 Connect tool to the...
Manual
Page 17
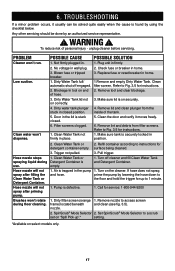
... Fig. 3.5 for surface being cleaned. 3. Hose nozzle stops spraying liquid during floor cleaning. 1. Hose nozzle will not spray after priming pump. SpinScrub® Mode Selector 2. Low suction. Clean water won 't run. No voltage in firmly. Dirty Water Tank lid not on securely. 4. Clean...cause is on correctly. 4. Make sure lid is found by using the checklist below. Clean Water Tank or detergent container empty. 3. Set SpinScrub® Mode Selector to the floor and hold the trigger for up ".* setting. *Available on the cleaner. WARNING ! POSSIBLE CAUSE 1....
... Fig. 3.5 for surface being cleaned. 3. Hose nozzle stops spraying liquid during floor cleaning. 1. Hose nozzle will not spray after priming pump. SpinScrub® Mode Selector 2. Low suction. Clean water won 't run. No voltage in firmly. Dirty Water Tank lid not on securely. 4. Clean...cause is on correctly. 4. Make sure lid is found by using the checklist below. Clean Water Tank or detergent container empty. 3. Set SpinScrub® Mode Selector to the floor and hold the trigger for up ".* setting. *Available on the cleaner. WARNING ! POSSIBLE CAUSE 1....


