
Manual
Page 1
THIS PRODUCT IS INTENDED FOR HOUSEHOLD USE ONLY. All rights reserved. #960009654 ID101394-R1 Questions or concerns? página E1 TM Carpet Cleaner www.hoover.com IMPORTANT: READ CAREFULLY BEFORE ASSEMBLY AND USE. For assistance, please call Customer Service at 1-800-944-9200 Mon-Fri 8am-7pm EST before returning this product to the store. IF USED COMMERCIALLY WARRANTY IS VOID. ©2010 Techtronic Floor Care Technology Limited. Owner's Manual Operating and Servicing Instructions Español -
THIS PRODUCT IS INTENDED FOR HOUSEHOLD USE ONLY. All rights reserved. #960009654 ID101394-R1 Questions or concerns? página E1 TM Carpet Cleaner www.hoover.com IMPORTANT: READ CAREFULLY BEFORE ASSEMBLY AND USE. For assistance, please call Customer Service at 1-800-944-9200 Mon-Fri 8am-7pm EST before returning this product to the store. IF USED COMMERCIALLY WARRANTY IS VOID. ©2010 Techtronic Floor Care Technology Limited. Owner's Manual Operating and Servicing Instructions Español -

Manual
Page 2
... link to find the Hoover® authorized dealer nearest you or call 1-800-944-9200 to register by phone. only) or to the store. 2 Fri 8am- 7pm EST. Model MFG. Manufacturing code (Label located under cleaner) Contents Important Safeguards 3 Assembling Cleaner 5 Carton contents 5 How To Use...7 Cleaner Description 7 Preparing the Carpet 8 Remove and Replace Clean...
... link to find the Hoover® authorized dealer nearest you or call 1-800-944-9200 to register by phone. only) or to the store. 2 Fri 8am- 7pm EST. Model MFG. Manufacturing code (Label located under cleaner) Contents Important Safeguards 3 Assembling Cleaner 5 Carton contents 5 How To Use...7 Cleaner Description 7 Preparing the Carpet 8 Remove and Replace Clean...

Manual
Page 3
... when cleaning on the floor. keep free of body away from end caps to keep brush rotating smoothly. • WARNING: Fully assemble carpet cleaner before servicing. • Do not use in . Use only manufacturer's recommended attachments. • Do not use with any object into ...water, return it should always be present. • Keep the carpet cleaner on stairs. • Do not use cord as a toy. Do not run appliance over cord. IMPORTANT SAFETY INSTRUCTIONS SAVE THESE INSTRUCTIONS When...
... when cleaning on the floor. keep free of body away from end caps to keep brush rotating smoothly. • WARNING: Fully assemble carpet cleaner before servicing. • Do not use in . Use only manufacturer's recommended attachments. • Do not use with any object into ...water, return it should always be present. • Keep the carpet cleaner on stairs. • Do not use cord as a toy. Do not run appliance over cord. IMPORTANT SAFETY INSTRUCTIONS SAVE THESE INSTRUCTIONS When...

Manual
Page 4
... in damage to the motor and possible injury to the user. The plug must be used with this carpet cleaner. • Store the carpet cleaner indoors. • Do not use an extension cord with this appliance. 4 No adaptor should malfunction or... breakdown, grounding provides a path of electric shock. This appliance is properly installed and grounded in a risk of least resistance for use on the cleaner plate. • Use only Hoover® Carpet...
... in damage to the motor and possible injury to the user. The plug must be used with this carpet cleaner. • Store the carpet cleaner indoors. • Do not use an extension cord with this appliance. 4 No adaptor should malfunction or... breakdown, grounding provides a path of electric shock. This appliance is properly installed and grounded in a risk of least resistance for use on the cleaner plate. • Use only Hoover® Carpet...
Manual
Page 5
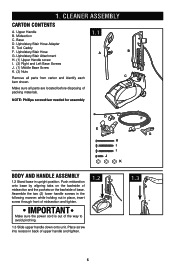
... aligning tabs on the backside of midsection and the pockets on the backside of the way to avoid pinching. 1.3 Slide upper handle down onto unit. Cleaner ASSEMBLY Carton contents A. Upholstery/Stair Hose Adapter E. Midsection 1.1 C. IMPORTANT Make sure the power cord is out of base. Upholstery/Stair Hose A B G. NOTE: Phillips screwdriver needed...
... aligning tabs on the backside of midsection and the pockets on the backside of the way to avoid pinching. 1.3 Slide upper handle down onto unit. Cleaner ASSEMBLY Carton contents A. Upholstery/Stair Hose Adapter E. Midsection 1.1 C. IMPORTANT Make sure the power cord is out of base. Upholstery/Stair Hose A B G. NOTE: Phillips screwdriver needed...
Manual
Page 6
Press handle release with slots on midsection and snap into place. 1.5 Place nut into recess on tool caddy and hold into place by pressing down onto the post located on the bottom of the lower tool caddy. 1.12 Run the hose back to the upper caddy and press into hose clip #2 (See Fig. 1.7). 1.13 Lock the attachment end of the lower tool caddy, until secure in place. 1.7 1.8 1.10 Hose Clip 2 Hose Clip 1 Upper Cord Clip Lower Cord Clip 1.9 1.11 1.12 1.13 6 Tool Caddy Assembly 1.4 1.5 1.6 A B 1.4 Align tabs on tool caddy with your other hand to tilt the midsection backwards (...
Press handle release with slots on midsection and snap into place. 1.5 Place nut into recess on tool caddy and hold into place by pressing down onto the post located on the bottom of the lower tool caddy. 1.12 Run the hose back to the upper caddy and press into hose clip #2 (See Fig. 1.7). 1.13 Lock the attachment end of the lower tool caddy, until secure in place. 1.7 1.8 1.10 Hose Clip 2 Hose Clip 1 Upper Cord Clip Lower Cord Clip 1.9 1.11 1.12 1.13 6 Tool Caddy Assembly 1.4 1.5 1.6 A B 1.4 Align tabs on tool caddy with your other hand to tilt the midsection backwards (...
Manual
Page 7
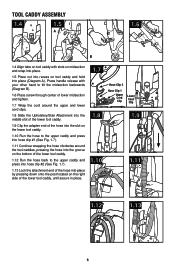
...15. Upholstery/Stair Base Water Supply Connector 19. Upholstery/Stair Attachment 23. Solution Tube Clip 2.1 10 9 8 Operate cleaner only at voltage specified on data plate on bottom of cleaner. Dirty Water Tank Latch 6. Upholstery/Stair Hose Adapter 20. Carry Handle 4. Power On/Off Switch 16. Upper Cord...8482; Handle 2. Dirty Water Tank Door 10. Upholstery/Stair Hose 21. Attaching Clean Water Solution Tank Place Clean Water Solution Tank into cleaner and tilt back until it snaps into place. 1.14 2. Attachment Water Supply Port 14. Upholstery/Stair Trigger 22. Power Cord 12. HOW...
...15. Upholstery/Stair Base Water Supply Connector 19. Upholstery/Stair Attachment 23. Solution Tube Clip 2.1 10 9 8 Operate cleaner only at voltage specified on data plate on bottom of cleaner. Dirty Water Tank Latch 6. Upholstery/Stair Hose Adapter 20. Carry Handle 4. Power On/Off Switch 16. Upper Cord...8482; Handle 2. Dirty Water Tank Door 10. Upholstery/Stair Hose 21. Attaching Clean Water Solution Tank Place Clean Water Solution Tank into cleaner and tilt back until it snaps into place. 1.14 2. Attachment Water Supply Port 14. Upholstery/Stair Trigger 22. Power Cord 12. HOW...

Manual
Page 8
... measuring cap with solution 5 times, (approximately 5 oz.). 2.5 Fill remaining Clean Water Solution Tank with a revolving brushroll for Cleaning Carpet 1. Replace measuring cap. 2.6 Place bottom of time to clean the carpet/upholstery. IMPORTANT Use only Hoover® brand detergent. Use a Hoover® vacuum cleaner with hot tap water. Allow plenty of Clean Water Solution Tank into...
... measuring cap with solution 5 times, (approximately 5 oz.). 2.5 Fill remaining Clean Water Solution Tank with a revolving brushroll for Cleaning Carpet 1. Replace measuring cap. 2.6 Place bottom of time to clean the carpet/upholstery. IMPORTANT Use only Hoover® brand detergent. Use a Hoover® vacuum cleaner with hot tap water. Allow plenty of Clean Water Solution Tank into...
Manual
Page 9
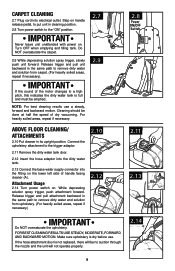
... and the unit will not operate properly. 2.14 9 For heavily soiled areas, repeat if necessary. 2.7 2.9 Above Floor Cleaning/ Attachments 2.10 Put cleaner in the same path to remove dirty water and solution from upholstery. (For heavily soiled areas, repeat if necessary.) 2.10 2.12 2.8 Power ON... upholstery. Turn OFF when emptying and filling tank. Cleaning should be done at half the speed of handle facing cleaner (A). NOTE: For best cleaning results use . Carpet Cleaning 2.7 Plug cord into the fitting on handle release pedal, to put unit in the same path to remove...
... and the unit will not operate properly. 2.14 9 For heavily soiled areas, repeat if necessary. 2.7 2.9 Above Floor Cleaning/ Attachments 2.10 Put cleaner in the same path to remove dirty water and solution from upholstery. (For heavily soiled areas, repeat if necessary.) 2.10 2.12 2.8 Power ON... upholstery. Turn OFF when emptying and filling tank. Cleaning should be done at half the speed of handle facing cleaner (A). NOTE: For best cleaning results use . Carpet Cleaning 2.7 Plug cord into the fitting on handle release pedal, to put unit in the same path to remove...

Manual
Page 10
...excessive foaming. How to Empty 2.17 Grasp top of dirty water tank handle and push latch to room. 2.16 Dirty Water Tank Your carpet cleaner is equipped with hot tap water. Wipe and let dry thoroughly before servicing. 2.17 2.18 2.19 2.20 2.21 10 IMPORTANT You...Hoover® brand detergent per fill up of shampoo may generate excessive foam which will shut off the suction, empty the dirty water tank. To reduce the risk of fire, electric shock or injury, unplug before storing to empty the dirty water tank. ! IMPORTANT Do not transport the carpet cleaner...
...excessive foaming. How to Empty 2.17 Grasp top of dirty water tank handle and push latch to room. 2.16 Dirty Water Tank Your carpet cleaner is equipped with hot tap water. Wipe and let dry thoroughly before servicing. 2.17 2.18 2.19 2.20 2.21 10 IMPORTANT You...Hoover® brand detergent per fill up of shampoo may generate excessive foam which will shut off the suction, empty the dirty water tank. To reduce the risk of fire, electric shock or injury, unplug before storing to empty the dirty water tank. ! IMPORTANT Do not transport the carpet cleaner...

Manual
Page 11
... water in Dirty Water Tank. If this happens proceed as proper use and care of your cleaner will need to activate after following the above steps, your carpet cleaner. 3. IMPORTANT Do not store cleaner with 2.23 one hand. Mineral deposits and mildew can form which MUST latch into base of... cleaner, making sure the front of the upper lower Dirty Water Tank is resting on the base, ...
... water in Dirty Water Tank. If this happens proceed as proper use and care of your cleaner will need to activate after following the above steps, your carpet cleaner. 3. IMPORTANT Do not store cleaner with 2.23 one hand. Mineral deposits and mildew can form which MUST latch into base of... cleaner, making sure the front of the upper lower Dirty Water Tank is resting on the base, ...

Manual
Page 12
... With belt in place, pull and slide brushroll into position. hoover.com to make sure belt is not twisted or pinched. 3.3 3.5 3.7 A 3.2 3.4 3.6 3.8 12 Lift up when pulling out. Secure by inserting end furthest from moving parts unplug cleaner before changing belt. 3.1 Belt: What to Buy For Belt ...brushroll and lift out. 3.4 Grasp brushroll with one hand, using other hand to Remove and Replace ! WARNING ! How to Remove 3.1 Flip cleaner on its side to expose nozzle base. 3.2 To remove belt cover, use Phillips screwdriver to Replace 3.5 Remove belt. Dispose of injury from ...
... With belt in place, pull and slide brushroll into position. hoover.com to make sure belt is not twisted or pinched. 3.3 3.5 3.7 A 3.2 3.4 3.6 3.8 12 Lift up when pulling out. Secure by inserting end furthest from moving parts unplug cleaner before changing belt. 3.1 Belt: What to Buy For Belt ...brushroll and lift out. 3.4 Grasp brushroll with one hand, using other hand to Remove and Replace ! WARNING ! How to Remove 3.1 Flip cleaner on its side to expose nozzle base. 3.2 To remove belt cover, use Phillips screwdriver to Replace 3.5 Remove belt. Dispose of injury from ...

Manual
Page 13
... nearest location, visit our website at www.hoover.com or call 1-800-944-9200. 1. Dirty Water Tank Door not installed. 2. Insert Dirty Water Tank Door - Pg. 10. 1. PROBLEM Cleaner won't run Cleaner won't pick-up or low suction Water escaping from Cleaner Cleaner won't dispense Cleaner attachments won't pick up Cleaner attachments won't spray Motor noise becomes...
... nearest location, visit our website at www.hoover.com or call 1-800-944-9200. 1. Dirty Water Tank Door not installed. 2. Insert Dirty Water Tank Door - Pg. 10. 1. PROBLEM Cleaner won't run Cleaner won't pick-up or low suction Water escaping from Cleaner Cleaner won't dispense Cleaner attachments won't pick up Cleaner attachments won't spray Motor noise becomes...

Manual
Page 14
...;, Inc., Company in delay. Do not send your vacuum by : • Checking the Yellow Pages under "Vacuum Cleaners" or "Household". • Visit our website at hoover.com (U.S. This will only result in Glenwillow for service. If you . • For an automated referral of the vacuum.) ...DO NOT RETURN THIS PRODUCT TO THE STORE. 14 Mon-Fri 8am-7pm EST. Service To obtain approved Hoover® service and genuine Hoover® parts, locate the nearest Authorized Hoover® Warranty Service Dealer (Depot) by the complete model number when requesting information or ordering parts. (The...
...;, Inc., Company in delay. Do not send your vacuum by : • Checking the Yellow Pages under "Vacuum Cleaners" or "Household". • Visit our website at hoover.com (U.S. This will only result in Glenwillow for service. If you . • For an automated referral of the vacuum.) ...DO NOT RETURN THIS PRODUCT TO THE STORE. 14 Mon-Fri 8am-7pm EST. Service To obtain approved Hoover® service and genuine Hoover® parts, locate the nearest Authorized Hoover® Warranty Service Dealer (Depot) by the complete model number when requesting information or ordering parts. (The...

Manual
Page 15
...Pet Oxy Allergen1 Hard Floor Hoover® Professional Strength Carpet and Upholstery Detergent Hoover® Quick & Light™ ✓ ✓ ✓ ✓ ✓✓✓ 2 Hoover® SteamVac® ✓ ✓ ✓ ✓✓ ✓ ✓ ✓ Hoover® 3 MaxExtract®... Hoover® cleaning products and Hoover® hard surface attachments intended for use Hoover® brand detergents, wipes, and spot cleaners available at Hoover.com and retailers nationwide. 3 When cleaning a hard surface, the optional Hoover®...
...Pet Oxy Allergen1 Hard Floor Hoover® Professional Strength Carpet and Upholstery Detergent Hoover® Quick & Light™ ✓ ✓ ✓ ✓ ✓✓✓ 2 Hoover® SteamVac® ✓ ✓ ✓ ✓✓ ✓ ✓ ✓ Hoover® 3 MaxExtract®... Hoover® cleaning products and Hoover® hard surface attachments intended for use Hoover® brand detergents, wipes, and spot cleaners available at Hoover.com and retailers nationwide. 3 When cleaning a hard surface, the optional Hoover®...
Manual
Page 16
...or information concerning this Warranty. This warranty does not apply to you. THIS WARRANTY IS THE EXCLUSIVE WARRANTY AND REMEDY PROVIDED BY HOOVER®. 7. WARRANTY Limited ONE Year Warranty (Domestic Use) WHAT THIS WARRANTY COVERS When used and maintained in normal household use ...operation (such as warranted, take or send the product to state. 16 This Warranty shall be paid one year from date of Hoover® products. ALL OTHER WARRANTIES, EXPRESSED OR IMPLIED, INCLUDING WARRANTIES OF MERCHANTABILITY OR FITNESS FOR PARTICULAR PURPOSE, ARE DISCLAIMED. This ...
...or information concerning this Warranty. This warranty does not apply to you. THIS WARRANTY IS THE EXCLUSIVE WARRANTY AND REMEDY PROVIDED BY HOOVER®. 7. WARRANTY Limited ONE Year Warranty (Domestic Use) WHAT THIS WARRANTY COVERS When used and maintained in normal household use ...operation (such as warranted, take or send the product to state. 16 This Warranty shall be paid one year from date of Hoover® products. ALL OTHER WARRANTIES, EXPRESSED OR IMPLIED, INCLUDING WARRANTIES OF MERCHANTABILITY OR FITNESS FOR PARTICULAR PURPOSE, ARE DISCLAIMED. This ...