
Product Manual
Page 3
Your Guide: Safety Instructions 1 How to assemble your FloorMate® Edge 3 Getting started with your FloorMate® Edge 5 Using your FloorMate® Edge 6 Keeping your FloorMate® Edge running properly 11 Troubleshooting 14 Warranty 15
Your Guide: Safety Instructions 1 How to assemble your FloorMate® Edge 3 Getting started with your FloorMate® Edge 5 Using your FloorMate® Edge 6 Keeping your FloorMate® Edge running properly 11 Troubleshooting 14 Warranty 15
Product Manual
Page 6
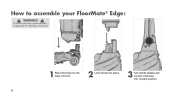
To reduce the risk of personal injury Unplug before cleaning or servicing. 1 Place the body into 'locked' position. 3 How to assemble your FloorMate® Edge: ! It'll click. 2 Lock handle into place. 3 Turn handle release dial counter-clockwise into the base. WARNING !
To reduce the risk of personal injury Unplug before cleaning or servicing. 1 Place the body into 'locked' position. 3 How to assemble your FloorMate® Edge: ! It'll click. 2 Lock handle into place. 3 Turn handle release dial counter-clockwise into the base. WARNING !
Product Manual
Page 7
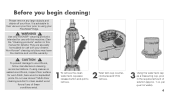
...this manual for details.) They are specially formulated for worn finish, bare wood or separated joints. per quart of solution (approx. 1 oz. Non-Hoover® cleaning solutions may harm the machine and void the warranty. ! If using your floor. CAUTION ! WARNING ! To prevent damage to using cleaner... on sealed wood floors, inspect floor surface for use Hoover® Multi-Floor cleaning solution to clean sealed wood floors if any large objects and debris off your FloorMate® Edge. !
...this manual for details.) They are specially formulated for worn finish, bare wood or separated joints. per quart of solution (approx. 1 oz. Non-Hoover® cleaning solutions may harm the machine and void the warranty. ! If using your floor. CAUTION ! WARNING ! To prevent damage to using cleaner... on sealed wood floors, inspect floor surface for use Hoover® Multi-Floor cleaning solution to clean sealed wood floors if any large objects and debris off your FloorMate® Edge. !
Product Manual
Page 8
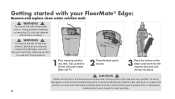
... laminate surfaces and move to a hard surface and (b) place unit on absorbent material (such as a towel) to soak up tank to fill line with your FloorMate® Edge: Remove and replace clean water solution tank: ! Do not use with this appliance. 1 Pour cleaning solution into place. ! Top up drips. ...of personal Injury-Unplug before cleaning or servicing. To reduce the risk of fire and electric shock due to internal component damage, use only Hoover® hard floor cleaning solution for use cleaner without tank in place. ! Water will drip from the brushes and underside of the ...
... laminate surfaces and move to a hard surface and (b) place unit on absorbent material (such as a towel) to soak up tank to fill line with your FloorMate® Edge: Remove and replace clean water solution tank: ! Do not use with this appliance. 1 Pour cleaning solution into place. ! Top up drips. ...of personal Injury-Unplug before cleaning or servicing. To reduce the risk of fire and electric shock due to internal component damage, use only Hoover® hard floor cleaning solution for use cleaner without tank in place. ! Water will drip from the brushes and underside of the ...
Product Manual
Page 9
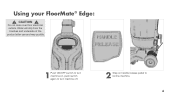
Using your FloorMate® Edge: ! Water will drip from the brushes and underside of the product after use and may puddle. 1 Push ON/OFF switch to turn machine on, push switch again to turn machine off. 2 Step on handle release pedal to recline machine. 6 Do not clean over floor electrical outlets. CAUTION !
Using your FloorMate® Edge: ! Water will drip from the brushes and underside of the product after use and may puddle. 1 Push ON/OFF switch to turn machine on, push switch again to turn machine off. 2 Step on handle release pedal to recline machine. 6 Do not clean over floor electrical outlets. CAUTION !
Product Manual
Page 10
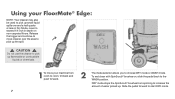
Slide the pedal forward to the WASH position. Release the trigger and continue to move your FloorMate® Edge: NOTE: Your cleaner may also be used to pick up the spill. ! CAUTION ! To wet clean with SpinScrub® brushes on non-carpeted ...
Slide the pedal forward to the WASH position. Release the trigger and continue to move your FloorMate® Edge: NOTE: Your cleaner may also be used to pick up the spill. ! CAUTION ! To wet clean with SpinScrub® brushes on non-carpeted ...
Product Manual
Page 11
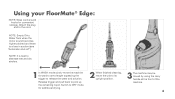
... and dry strokes. 1 In WASH mode slowly move the machine forward to arms length squeezing the trigger to pick up the remaining liquid. Using your FloorMate® Edge: NOTE: Wrap cord around hooks for additional drying. 2 When finished cleaning, return the unit to the cord. Switch to DRY mode for convenient...
... and dry strokes. 1 In WASH mode slowly move the machine forward to arms length squeezing the trigger to pick up the remaining liquid. Using your FloorMate® Edge: NOTE: Wrap cord around hooks for additional drying. 2 When finished cleaning, return the unit to the cord. Switch to DRY mode for convenient...
Product Manual
Page 12
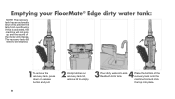
Reattach lid to prevent the tank from overflowing. If this is activated, the machine will not pick up and the sound of the recovery tank onto the machine first and click the top into sink. The recovery tank will change. Place the bottom of the motor will need to be emptied. 1To remove the recovery tank, press down on release button and pull. 2 Unclip latches on recovery tank lid, remove lid to empty. 3 4 Pour dirty water into place. 9 Emptying your FloorMate® Edge dirty water tank: NOTE: The recovery tank has an automatic shut off to tank.
Reattach lid to prevent the tank from overflowing. If this is activated, the machine will not pick up and the sound of the recovery tank onto the machine first and click the top into sink. The recovery tank will change. Place the bottom of the motor will need to be emptied. 1To remove the recovery tank, press down on release button and pull. 2 Unclip latches on recovery tank lid, remove lid to empty. 3 4 Pour dirty water into place. 9 Emptying your FloorMate® Edge dirty water tank: NOTE: The recovery tank has an automatic shut off to tank.
Product Manual
Page 13
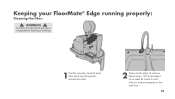
Keeping your FloorMate® Edge running properly: Cleaning the filter: ! To reduce the risk of personal injury Unplug before cleaning or servicing. 1Pull the recovery tank lid open after each use and gently remove the filter. 2 Rinse under water to remove debris (max. 100°F) and leave for at least 24 hours or until fully dry before replacing in the machine. 10 WARNING !
Keeping your FloorMate® Edge running properly: Cleaning the filter: ! To reduce the risk of personal injury Unplug before cleaning or servicing. 1Pull the recovery tank lid open after each use and gently remove the filter. 2 Rinse under water to remove debris (max. 100°F) and leave for at least 24 hours or until fully dry before replacing in the machine. 10 WARNING !
Product Manual
Page 14
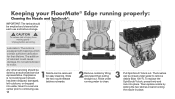
... , the two nozzle release has been dropped, damaged, latches outwards. left outdoors, or dropped into place. Do not add lubricant to motor. CAUTION ! Keeping your FloorMate® Edge running water to clean. 3 Pull SpinScrub® block out.
... , the two nozzle release has been dropped, damaged, latches outwards. left outdoors, or dropped into place. Do not add lubricant to motor. CAUTION ! Keeping your FloorMate® Edge running water to clean. 3 Pull SpinScrub® block out.
Product Manual
Page 15
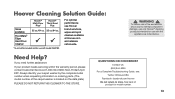
... performance use with model FH40190. Contact Us: (800) 944-9200 For a Complete Troubleshooting Guide, see: Twitter: @HooverUSA Facebook: facebook.com/hoover Do not return to internal component damage, use only Hoover® cleaning products intended for use Hoover brand solutions, wipes and... the warranty period, please contact Customer Service at Hoover.com and retailers nationwide. ! Need Help? QUESTIONS OR CONCERNS? Hoover Cleaning Solution Guide: Sizes available FloorMate® Edge Hard Floor Cleaner Hoover® Multi-Floor Plus* Hoover® Tile & Grout Plus 32 oz./64 ...
... performance use with model FH40190. Contact Us: (800) 944-9200 For a Complete Troubleshooting Guide, see: Twitter: @HooverUSA Facebook: facebook.com/hoover Do not return to internal component damage, use only Hoover® cleaning products intended for use Hoover brand solutions, wipes and... the warranty period, please contact Customer Service at Hoover.com and retailers nationwide. ! Need Help? QUESTIONS OR CONCERNS? Hoover Cleaning Solution Guide: Sizes available FloorMate® Edge Hard Floor Cleaner Hoover® Multi-Floor Plus* Hoover® Tile & Grout Plus 32 oz./64 ...

