Manual
Page 1
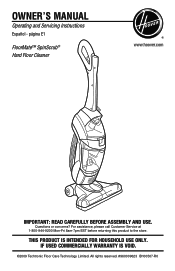
THIS PRODUCT IS INTENDED FOR HOUSEHOLD USE ONLY. For assistance, please call Customer Service at 1-800-944-9200 Mon-Fri 8am-7pm EST before returning this product to the store. All rights reserved. #960009623 ID100507-R0 Owner's Manual Operating and Servicing Instructions Español - Questions or concerns? IF USED COMMERCIALLY WARRANTY IS VOID. ©2009 Techtronic Floor Care Technology Limited. página E1 FloorMate™ SpinScrub® Hard Floor Cleaner www.hoover.com IMPORTANT: READ CAREFULLY BEFORE ASSEMBLY AND USE.
THIS PRODUCT IS INTENDED FOR HOUSEHOLD USE ONLY. For assistance, please call Customer Service at 1-800-944-9200 Mon-Fri 8am-7pm EST before returning this product to the store. All rights reserved. #960009623 ID100507-R0 Owner's Manual Operating and Servicing Instructions Español - Questions or concerns? IF USED COMMERCIALLY WARRANTY IS VOID. ©2009 Techtronic Floor Care Technology Limited. página E1 FloorMate™ SpinScrub® Hard Floor Cleaner www.hoover.com IMPORTANT: READ CAREFULLY BEFORE ASSEMBLY AND USE.
Manual
Page 2
... Handle...6 How to Fold Handle 6 How To Use...6 Cleaner Description 6 ON/OFF Switch...6 Handle Release Pedal 6 Transporting...7 Mode Selector Dial 7 The Tanks ...8 Filters...9 How To Clean...10 Recommended Cleaning Sequence 10 Cleaning Floors 10 Picking Up Spills 10 Maintenance...11 Nozzle...11 Brushes......this owner's manual. Mon- Model MFG. Thank you or call 1-800-263-6376 to find the Hoover® authorized dealer nearest you for warranty service of Hoover® authorized dealer locations (U.S. Please enter the complete model and Manufacturing Code in the spaces provided....
... Handle...6 How to Fold Handle 6 How To Use...6 Cleaner Description 6 ON/OFF Switch...6 Handle Release Pedal 6 Transporting...7 Mode Selector Dial 7 The Tanks ...8 Filters...9 How To Clean...10 Recommended Cleaning Sequence 10 Cleaning Floors 10 Picking Up Spills 10 Maintenance...11 Nozzle...11 Brushes......this owner's manual. Mon- Model MFG. Thank you or call 1-800-263-6376 to find the Hoover® authorized dealer nearest you for warranty service of Hoover® authorized dealer locations (U.S. Please enter the complete model and Manufacturing Code in the spaces provided....
Manual
Page 3
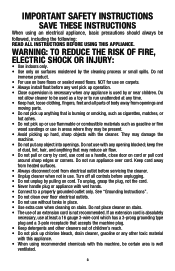
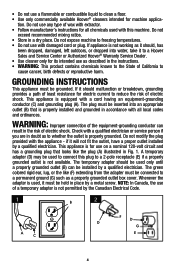
... parts. • Do not pick up anything that accepts the machine plug. • Keep detergents and other cleaners out of body away from electrical outlet before servicing the cleaner. • Unplug cleaner when not in place. • Use extra care when cleaning on surfaces moistened by or near children. To ... air flow. • Do not pull or carry by pulling on bare floors or sealed wood floors. Turn off all parts of children's reach. • Do not pick up hard, sharp objects with the cleaner. Do not place cleaner on stairs. • The use on cord or pull cord around sharp ...
... parts. • Do not pick up anything that accepts the machine plug. • Keep detergents and other cleaners out of body away from electrical outlet before servicing the cleaner. • Unplug cleaner when not in place. • Use extra care when cleaning on surfaces moistened by or near children. To ... air flow. • Do not pull or carry by pulling on bare floors or sealed wood floors. Turn off all parts of children's reach. • Do not pick up hard, sharp objects with the cleaner. Do not place cleaner on stairs. • The use on cord or pull cord around sharp ...
Manual
Page 4
... place by a qualified electrician. Do not use as it to a Hoover Sales and Service Center or Authorized Hoover® Warranty Service Dealer. • Use cleaner only for its intended use any type of California to clean a floor. • Use only commercially available Hoover® cleaners intended for all local codes and ordinances. Do not expose machine...
... place by a qualified electrician. Do not use as it to a Hoover Sales and Service Center or Authorized Hoover® Warranty Service Dealer. • Use cleaner only for its intended use any type of California to clean a floor. • Use only commercially available Hoover® cleaners intended for all local codes and ordinances. Do not expose machine...
Manual
Page 5
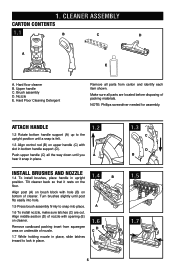
... a snap is felt. 1.3 Align control rod (B) on upper handle (C) with hole (B) on cleaner. Remove cardboard packing insert from carton and identify each item shown. Hard floor cleaner B. Nozzle E. A 1.6 To install nozzle, make sure latches (C) are located before disposing of cleaner. Tilt cleaner back so that it snap in place. 1.2 A Install brushes and nozzle 1.4 To install...
... a snap is felt. 1.3 Align control rod (B) on upper handle (C) with hole (B) on cleaner. Remove cardboard packing insert from carton and identify each item shown. Hard floor cleaner B. Nozzle E. A 1.6 To install nozzle, make sure latches (C) are located before disposing of cleaner. Tilt cleaner back so that it snap in place. 1.2 A Install brushes and nozzle 1.4 To install...
Manual
Page 7
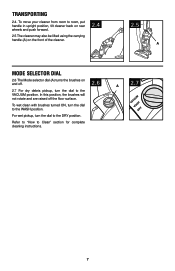
...For dry debris pickup, turn the dial to room, put handle in upright position, tilt cleaner back on rear wheels and push forward. 2.5 The cleaner may also be lifted using the carrying handle (A) on the front of the cleaner. 2.4 2.5 A Mode selector dial 2.6 The Mode selector dial (A) turns the brushes on... and off the floor surface. Refer to "How to the WASH position. For wet pickup...
...For dry debris pickup, turn the dial to room, put handle in upright position, tilt cleaner back on rear wheels and push forward. 2.5 The cleaner may also be lifted using the carrying handle (A) on the front of the cleaner. 2.4 2.5 A Mode selector dial 2.6 The Mode selector dial (A) turns the brushes on... and off the floor surface. Refer to "How to the WASH position. For wet pickup...
Manual
Page 8
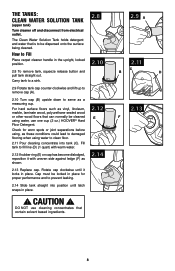
... ledge (F) as a measuring cup. DO NOT use one cup (2 oz.) HOOVER® Hard Floor Detergent. The Tanks: Clean Water Solution Tank (upper tank) Turn cleaner off and disconnect from electrical outlet. For hard surface floors such as these conditions could lead to Fill Place carpet cleaner handle in place. 2.8 2.10 2.12 E 2.14 ! Rotate cap clockwise...
... ledge (F) as a measuring cup. DO NOT use one cup (2 oz.) HOOVER® Hard Floor Detergent. The Tanks: Clean Water Solution Tank (upper tank) Turn cleaner off and disconnect from electrical outlet. For hard surface floors such as these conditions could lead to Fill Place carpet cleaner handle in place. 2.8 2.10 2.12 E 2.14 ! Rotate cap clockwise...
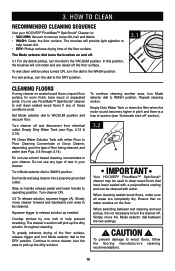
Manual
Page 10
... upon the type of suction (see "Automatic shut-off" section). 3.2 A IMPORTANT Your HOOVER® FloorMate™ SpinScrub® cleaner may be cleaned with either Floor to WASH position. Dry hands and plug cleaner into a properly grounded outlet. Turn cleaner ON. 3.2 To release solution, squeeze trigger (A). Squeeze trigger to pick up the dirty solution throughout cleaning...
... upon the type of suction (see "Automatic shut-off" section). 3.2 A IMPORTANT Your HOOVER® FloorMate™ SpinScrub® cleaner may be cleaned with either Floor to WASH position. Dry hands and plug cleaner into a properly grounded outlet. Turn cleaner ON. 3.2 To release solution, squeeze trigger (A). Squeeze trigger to pick up the dirty solution throughout cleaning...
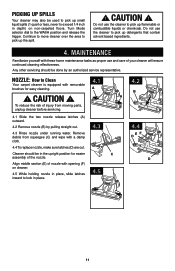
Manual
Page 11
...outward. 4.2 Remove nozzle (B) by an authorized service representative. Do not use the cleaner to pick up detergents that contain solvent based ingredients. 4. Do not use the cleaner to pick up flammable or combustible liquids or chemicals. Any other servicing should be ...used to the WASH position and release the trigger. Turn Mode selector dial to pick up the spill. ! Align middle section (E) of injury from squeegee (C) and wipe with opening (F) on non-carpeted floors...
...outward. 4.2 Remove nozzle (B) by an authorized service representative. Do not use the cleaner to pick up detergents that contain solvent based ingredients. 4. Do not use the cleaner to pick up flammable or combustible liquids or chemicals. Any other servicing should be ...used to the WASH position and release the trigger. Turn Mode selector dial to pick up the spill. ! Align middle section (E) of injury from squeegee (C) and wipe with opening (F) on non-carpeted floors...
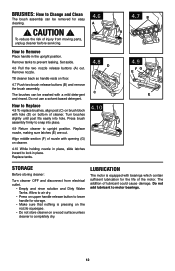
Manual
Page 12
...on upper handle release button to lower handle for storage. • Make sure that nothing is equipped with hole (D) on a wood surface unless cleaner is completely dry. Do not add lubricant to prevent leaking. Set aside. 4.6 Pull the two nozzle release buttons (A) out. The brushes can ...be washed with opening (G) on floor. 4.7 Push two brush release buttons (B) and remove the brush assembly. Align middle section (F) of nozzle with a mild detergent and rinsed. The ...
...on upper handle release button to lower handle for storage. • Make sure that nothing is equipped with hole (D) on a wood surface unless cleaner is completely dry. Do not add lubricant to prevent leaking. Set aside. 4.6 Pull the two nozzle release buttons (A) out. The brushes can ...be washed with opening (G) on floor. 4.7 Push two brush release buttons (B) and remove the brush assembly. Align middle section (F) of nozzle with a mild detergent and rinsed. The ...

Manual
Page 15
...Hoover® cleaning products and Hoover® hard surface attachments intended for use Hoover® brand detergents, wipes, and spot cleaners available at Hoover.com and retailers nationwide. 15 P 3 When cleaning a hard surface, the optional Hoover...Anti-Allergen1 Hard Floor Strength Hoover® Quick & Light™ PPP P PP Hoover® SteamVac® P P P P 2 PP P Hoover® 3 P P P P P P P SteamVac® Dual V® Hoover® SteamVac® Dual V® P P P P P P P All Terrain Hoover Platinum Collection® P P P P PP Hoover® FloorMate&#...
...Hoover® cleaning products and Hoover® hard surface attachments intended for use Hoover® brand detergents, wipes, and spot cleaners available at Hoover.com and retailers nationwide. 15 P 3 When cleaning a hard surface, the optional Hoover...Anti-Allergen1 Hard Floor Strength Hoover® Quick & Light™ PPP P PP Hoover® SteamVac® P P P P 2 PP P Hoover® 3 P P P P P P P SteamVac® Dual V® Hoover® SteamVac® Dual V® P P P P P P P All Terrain Hoover Platinum Collection® P P P P PP Hoover® FloorMate&#...


