Product Manual
Page 4
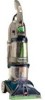
Do not use with the carpet cleaner. Keep children and pets away from carpets until a properly grounded ...lug, or the like the plug (A) illustrated in . • DO NOT USE THIS EXTRACTOR ON HARD FLOORS UNLESS YOU HAVE THE PROPER HARD FLOOR ATTACHMENT. Do not expose machine to a 2-pole receptacle (E) if a properly grounded outlet is properly grounded....until they are completely dry. • Store in accordance with all parts of dust, lint, hair, and anything that looks like (F) extending from openings and moving parts. • Use indoors only. • Do not put any opening...
Do not use with the carpet cleaner. Keep children and pets away from carpets until a properly grounded ...lug, or the like the plug (A) illustrated in . • DO NOT USE THIS EXTRACTOR ON HARD FLOORS UNLESS YOU HAVE THE PROPER HARD FLOOR ATTACHMENT. Do not expose machine to a 2-pole receptacle (E) if a properly grounded outlet is properly grounded....until they are completely dry. • Store in accordance with all parts of dust, lint, hair, and anything that looks like (F) extending from openings and moving parts. • Use indoors only. • Do not put any opening...

Product Manual
Page 5
... model may be in bag with hose) D. Cleaner ASSEMBLY Carton contents 1.1 Carpet Upholstery Cleaner Bare floor cleaner PreCleaner G C H D F I . SpinScrub® Brush Assembly Remove all parts are located before disposing of packing materials. Accessories not included with screwdriver. 1.2 1.3 Cord Protector -V2 1.4 1.5 5 Actual model may be purchased separately by visiting hoover.com. Handle Bolts and Nuts (Three nuts...
... model may be in bag with hose) D. Cleaner ASSEMBLY Carton contents 1.1 Carpet Upholstery Cleaner Bare floor cleaner PreCleaner G C H D F I . SpinScrub® Brush Assembly Remove all parts are located before disposing of packing materials. Accessories not included with screwdriver. 1.2 1.3 Cord Protector -V2 1.4 1.5 5 Actual model may be purchased separately by visiting hoover.com. Handle Bolts and Nuts (Three nuts...

Product Manual
Page 13
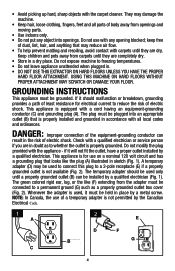
... tool cover is pushed open too far. tools A. Insert short hose end, matching tabs on select models only) B. For some spots may vary from moving parts, unplug cleaner. 4.1 A How to snap free if it to Attach 4.1 Open hose connection port (A). SpinScrub® hand tool (Available on sides of injury from images shown...
... tool cover is pushed open too far. tools A. Insert short hose end, matching tabs on select models only) B. For some spots may vary from moving parts, unplug cleaner. 4.1 A How to snap free if it to Attach 4.1 Open hose connection port (A). SpinScrub® hand tool (Available on sides of injury from images shown...
Product Manual
Page 14
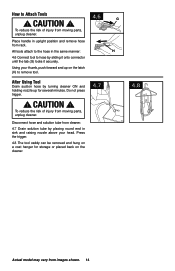
...coat hanger for several minutes. Using your head. Disconnect hose and solution tube from cleaner. 4.7 Drain solution tube by placing round end in upright position and remove hose from moving parts, unplug cleaner. To reduce the risk of injury from rack. How to remove tool. Press... the trigger. 4.8 The tool caddy can be removed and hung on the cleaner. 4.7 4.8 Actual model may vary from moving parts, unplug cleaner. CAUTION ! 4.6 G To...
...coat hanger for several minutes. Using your head. Disconnect hose and solution tube from cleaner. 4.7 Drain solution tube by placing round end in upright position and remove hose from moving parts, unplug cleaner. To reduce the risk of injury from rack. How to remove tool. Press... the trigger. 4.8 The tool caddy can be removed and hung on the cleaner. 4.7 4.8 Actual model may vary from moving parts, unplug cleaner. CAUTION ! 4.6 G To...
Product Manual
Page 17
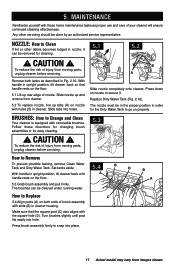
... effectiveness. Press down on the floor. 5.3 Grab brush assembly and pull firmly. Follow these home maintenance tasks as described in cleaner housing. Press brush assembly firmly to go on both tanks as proper use and care of injury from moving parts, unplug cleaner before servicing. 5.3 How to .... 17 Actual model may vary from cleaner. 5.2 To replace nozzle, line up tabs (A) on the floor. 5.1 Lift up and remove from images shown. B A Slide nozzle completely onto cleaner. Any other debris becomes lodged in upright position, tilt cleaner back so that the square post (C)...
... effectiveness. Press down on the floor. 5.3 Grab brush assembly and pull firmly. Follow these home maintenance tasks as described in cleaner housing. Press brush assembly firmly to go on both tanks as proper use and care of injury from moving parts, unplug cleaner before servicing. 5.3 How to .... 17 Actual model may vary from cleaner. 5.2 To replace nozzle, line up tabs (A) on the floor. 5.1 Lift up and remove from images shown. B A Slide nozzle completely onto cleaner. Any other debris becomes lodged in upright position, tilt cleaner back so that the square post (C)...

Product Manual
Page 20
...;, Inc., Company in delay. Do not send your vacuum by : • Checking the Yellow Pages under "Vacuum Cleaners" or "Household". • Visit our website at hoover.com (U.S. If you . • For an automated referral of the vacuum.) PLEASE DO NOT RETURN THIS PRODUCT TO ...20 Mon-Fri 8am-7pm EST. Service To obtain approved Hoover® service and genuine Hoover® parts, locate the nearest Authorized Hoover® Warranty Service Dealer (Depot) by the complete model number when requesting information or ordering parts. (The model number appears on the bottom of authorized ...
...;, Inc., Company in delay. Do not send your vacuum by : • Checking the Yellow Pages under "Vacuum Cleaners" or "Household". • Visit our website at hoover.com (U.S. If you . • For an automated referral of the vacuum.) PLEASE DO NOT RETURN THIS PRODUCT TO ...20 Mon-Fri 8am-7pm EST. Service To obtain approved Hoover® service and genuine Hoover® parts, locate the nearest Authorized Hoover® Warranty Service Dealer (Depot) by the complete model number when requesting information or ordering parts. (The model number appears on the bottom of authorized ...
Product Manual
Page 21
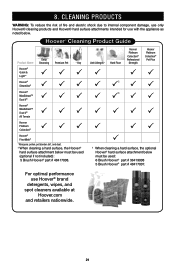
... be used : 6 Brush Hoover® part # 36419008 5 Brush Hoover® part # 48417007. ClLeEaAnNiInNG pPrRoOdDuUCtTsS WARNING: To reduce the risk of fire and electric shock due to internal component damage, use only Hoover® cleaning products and Hoover® hard surface attachments intended for use Hoover® brand detergents, wipes, and spot cleaners available at Hoover.com and retailers nationwide...
... be used : 6 Brush Hoover® part # 36419008 5 Brush Hoover® part # 48417007. ClLeEaAnNiInNG pPrRoOdDuUCtTsS WARNING: To reduce the risk of fire and electric shock due to internal component damage, use only Hoover® cleaning products and Hoover® hard surface attachments intended for use Hoover® brand detergents, wipes, and spot cleaners available at Hoover.com and retailers nationwide...
Product Manual
Page 22
... in products purchased in normal household use outside a U.S. However, if you . The Warranty Period will provide labor and parts, at www.hoover.com. IN NO EVENT WILL HOOVER® BE LIABLE FOR ANY SPECIAL, INDIRECT, INCIDENTAL OR CONSEQUENTIAL DAMAGES OF ANY KIND OR NATURE TO OWNER OR ANY...Warranty Service Dealer along with the Owner's Manual, your product to misuse, acts of God, nature, vandalism or other acts beyond the control of Hoover®, owner's acts or omissions, use and in material and workmanship for warranty service, cost of Canada. This Warranty shall be assigned. 9....
... in products purchased in normal household use outside a U.S. However, if you . The Warranty Period will provide labor and parts, at www.hoover.com. IN NO EVENT WILL HOOVER® BE LIABLE FOR ANY SPECIAL, INDIRECT, INCIDENTAL OR CONSEQUENTIAL DAMAGES OF ANY KIND OR NATURE TO OWNER OR ANY...Warranty Service Dealer along with the Owner's Manual, your product to misuse, acts of God, nature, vandalism or other acts beyond the control of Hoover®, owner's acts or omissions, use and in material and workmanship for warranty service, cost of Canada. This Warranty shall be assigned. 9....


