Product Manual
Page 2
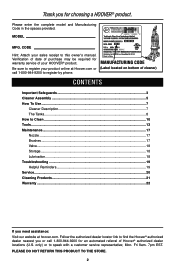
...18 Storage...18 Lubrication...18 Troubleshooting...19 Helpful Reminders 19 Service...20 Cleaning Products...21 Warranty...22 If you for choosing a HOOVER® product. Be sure to register your sales receipt to this product to the store. 2 Verification of date of purchase... website at Hoover.com or call 1-800-944-9200 for an automated referral of your HOOVER® product. Please enter the complete model and Manufacturing Code in China Manufacturing code (Label located on bottom of cleaner) Contents Important Safeguards 3 Cleaner Assembly...5 How To Use...7 Cleaner Description 7 ...
...18 Storage...18 Lubrication...18 Troubleshooting...19 Helpful Reminders 19 Service...20 Cleaning Products...21 Warranty...22 If you for choosing a HOOVER® product. Be sure to register your sales receipt to this product to the store. 2 Verification of date of purchase... website at Hoover.com or call 1-800-944-9200 for an automated referral of your HOOVER® product. Please enter the complete model and Manufacturing Code in China Manufacturing code (Label located on bottom of cleaner) Contents Important Safeguards 3 Cleaner Assembly...5 How To Use...7 Cleaner Description 7 ...
Product Manual
Page 3
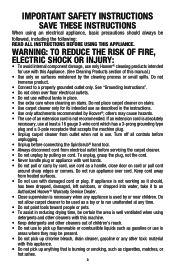
...should , has been dropped, damaged, left outdoors, or dropped into water, take it should always be used by Hoover®; Do not place carpet cleaner on stairs. • Use carpet cleaner only for use of this appliance. • Do not pick up anything that accepts the machine plug. •...• Connect to run appliance over floor electrical outlets. • Do not use with wet hands. • Do not pull or carry by the cleaning process or small spills. Turn off all controls before unplugging. • Unplug before servicing the carpet cleaner. • Do not unplug by ...
...should , has been dropped, damaged, left outdoors, or dropped into water, take it should always be used by Hoover®; Do not place carpet cleaner on stairs. • Use carpet cleaner only for use of this appliance. • Do not pick up anything that accepts the machine plug. •...• Connect to run appliance over floor electrical outlets. • Do not use with wet hands. • Do not pull or carry by the cleaning process or small spills. Turn off all controls before unplugging. • Unplug before servicing the carpet cleaner. • Do not unplug by ...
Product Manual
Page 4
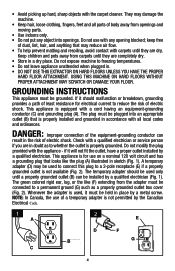
... outlet (B) that looks like (F) extending from carpets until a properly grounded outlet (B) can result in . • DO NOT USE THIS EXTRACTOR ON HARD FLOORS UNLESS YOU HAVE THE PROPER HARD FLOOR ATTACHMENT. A temporary adapter (D) may damage the machine. • Keep hair, loose clothing, fingers, feet and all local codes and ordinances. Do not... away from the adapter must be grounded. Grounding Instructions This appliance must be plugged into openings. Do not modify the plug provided with the carpet cleaner. They may be installed by a metal screw.
... outlet (B) that looks like (F) extending from carpets until a properly grounded outlet (B) can result in . • DO NOT USE THIS EXTRACTOR ON HARD FLOORS UNLESS YOU HAVE THE PROPER HARD FLOOR ATTACHMENT. A temporary adapter (D) may damage the machine. • Keep hair, loose clothing, fingers, feet and all local codes and ordinances. Do not... away from the adapter must be grounded. Grounding Instructions This appliance must be plugged into openings. Do not modify the plug provided with the carpet cleaner. They may be installed by a metal screw.

Product Manual
Page 5
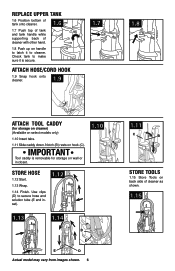
.... Bolts and nuts located in bag but only two or need for assembly. F. SpinScrub® Hand Tool* *Available on select models only. Cleaner ASSEMBLY Carton contents 1.1 Carpet Upholstery Cleaner Bare floor cleaner PreCleaner G C H D F I . Hose/Tool Caddy* G Hose H Stair/Upholstery Nozzle I B E A A. Hose/Cord Hook E. Attach handle 1.2 Remove tank. 1.3 Position cord...model may be in bag with screwdriver. 1.2 1.3 Cord Protector -V2 1.4 1.5 5 Actual model may be purchased separately by visiting hoover.com. NOTE: Phillips screwdriver needed for assembly.
.... Bolts and nuts located in bag but only two or need for assembly. F. SpinScrub® Hand Tool* *Available on select models only. Cleaner ASSEMBLY Carton contents 1.1 Carpet Upholstery Cleaner Bare floor cleaner PreCleaner G C H D F I . Hose/Tool Caddy* G Hose H Stair/Upholstery Nozzle I B E A A. Hose/Cord Hook E. Attach handle 1.2 Remove tank. 1.3 Position cord...model may be in bag with screwdriver. 1.2 1.3 Cord Protector -V2 1.4 1.5 5 Actual model may be purchased separately by visiting hoover.com. NOTE: Phillips screwdriver needed for assembly.
Product Manual
Page 6
... (E and inset). 1.12 1.13 1.14 D E E D Actual model may vary from images shown. 6 1.11 C B Store tools 1.15 Store Tools on back side of cleaner with other hand. 1.8 Push up on select models only) 1.10 Insert tabs. 1.11 Slide caddy down. Notch (B) rests on wall or in closet. 1.10 Store... 1.13 Wrap. 1.14 Finish. IMPORTANT Tool caddy is secure. Check tank to make sure it to latch it is removable for storage on cleaner) (Available on handle to cleaner. Attach hose/cord hook 1.9 1.9 Snap hook onto cleaner. 1.7 1.8 Attach tool caddy (for storage on hook (C).
... (E and inset). 1.12 1.13 1.14 D E E D Actual model may vary from images shown. 6 1.11 C B Store tools 1.15 Store Tools on back side of cleaner with other hand. 1.8 Push up on select models only) 1.10 Insert tabs. 1.11 Slide caddy down. Notch (B) rests on wall or in closet. 1.10 Store... 1.13 Wrap. 1.14 Finish. IMPORTANT Tool caddy is secure. Check tank to make sure it to latch it is removable for storage on cleaner) (Available on handle to cleaner. Attach hose/cord hook 1.9 1.9 Snap hook onto cleaner. 1.7 1.8 Attach tool caddy (for storage on hook (C).
Product Manual
Page 7
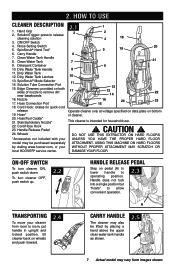
... Connection Port 16 24 23 15 18. Wheels DO NOT USE THIS EXTRACTOR ON HARD FLOORS *Accessories not included with your UNLESS YOU HAVE THE PROPER HARD FLOOR model may be lifted by visiting www.hoover.com, or your cleaner from room to operating position. Handle does not lock into a single position but "floats...
... Connection Port 16 24 23 15 18. Wheels DO NOT USE THIS EXTRACTOR ON HARD FLOORS *Accessories not included with your UNLESS YOU HAVE THE PROPER HARD FLOOR model may be lifted by visiting www.hoover.com, or your cleaner from room to operating position. Handle does not lock into a single position but "floats...
Product Manual
Page 8
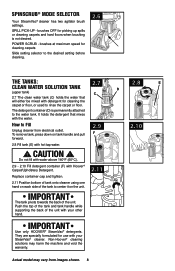
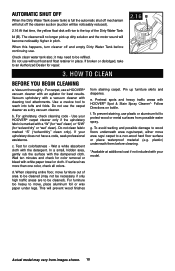
...2.7 The clean water tank (C) holds the water that mixes with detergent for cleaning the carpet or floor, or used to center it on tank handle and pull forward. 2.9 F 2.10 2.8 Fill tank (E) with Hoover® Carpet/Upholstery Detergent. CAUTION ! Actual model may harm the machine and void the warranty. ... the water tank. Non-Hoover® cleaning solutions may vary from electrical outlet. brushes OFF for use with your SteamVac® cleaner. Push the top of the tank and tank handle while supporting the back of the tank to rinse the carpet or floor. SPILL PICK-UP - ...
...2.7 The clean water tank (C) holds the water that mixes with detergent for cleaning the carpet or floor, or used to center it on tank handle and pull forward. 2.9 F 2.10 2.8 Fill tank (E) with Hoover® Carpet/Upholstery Detergent. CAUTION ! Actual model may harm the machine and void the warranty. ... the water tank. Non-Hoover® cleaning solutions may vary from electrical outlet. brushes OFF for use with your SteamVac® cleaner. Push the top of the tank and tank handle while supporting the back of the tank to rinse the carpet or floor. SPILL PICK-UP - ...
Product Manual
Page 9
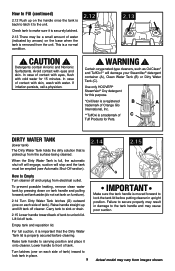
...shown. Empty tank and reposition lid. For full suction, it is securely latched. 2.13 There may be emptied (see Automatic Shut-Off section). Use only HOOVER® SteamVac® Oxy detergent for this purpose. *OxiClean is a registered B A trademark of Orange Glo International, Inc. **TuffOxi is a trademark of...Lower handle to unlock lid. Check tank to make sure it is important that is picked up from the unit. G How to Empty Turn cleaner off cleaner. set tank aside (do not set tank on furniture). 2.14 Turn Dirty Water Tank latches (G) outward (one on each side of C...
...shown. Empty tank and reposition lid. For full suction, it is securely latched. 2.13 There may be emptied (see Automatic Shut-Off section). Use only HOOVER® SteamVac® Oxy detergent for this purpose. *OxiClean is a registered B A trademark of Orange Glo International, Inc. **TuffOxi is a trademark of...Lower handle to unlock lid. Check tank to make sure it is important that is picked up from the unit. G How to Empty Turn cleaner off cleaner. set tank aside (do not set tank on furniture). 2.14 Turn Dirty Water Tank latches (G) outward (one on each side of C...
Product Manual
Page 10
...to protect wood or metal surfaces from possible water spray. For carpet, use the carpet cleaner as a dry vacuum cleaner. Vacuum upholstery with a vacuum cleaner with HOOVER® Spot & Stain Spray Cleaner*- Use a crevice tool to be necessary if only high traffic areas are to reach ...into tufts and folds. If your model. If surface has more than one color, check all colors. d. When cleaning entire floor...
...to protect wood or metal surfaces from possible water spray. For carpet, use the carpet cleaner as a dry vacuum cleaner. Vacuum upholstery with a vacuum cleaner with HOOVER® Spot & Stain Spray Cleaner*- Use a crevice tool to be necessary if only high traffic areas are to reach ...into tufts and folds. If your model. If surface has more than one color, check all colors. d. When cleaning entire floor...
Product Manual
Page 11
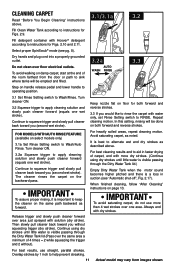
... container with solution (dry stroke). Continue to alternate wet and dry strokes as forward. To avoid walking on floor for Figs. 2.9. Continue to squeeze trigger and slowly pull cleaner back toward you would like to instructions for Figs. 2.10 and 2.11. Keep nozzle flat on damp carpet... wet strokes over area just sprayed with Hoover® detergent according to rinse the carpet with dry strokes. In this setting, rinsing will be done on page 13. Dry hands and plug cord into a properly grounded outlet. Then slowly pull cleaner back toward you (second wet stroke)....
... container with solution (dry stroke). Continue to alternate wet and dry strokes as forward. To avoid walking on floor for Figs. 2.9. Continue to squeeze trigger and slowly pull cleaner back toward you would like to instructions for Figs. 2.10 and 2.11. Keep nozzle flat on damp carpet... wet strokes over area just sprayed with Hoover® detergent according to rinse the carpet with dry strokes. In this setting, rinsing will be done on page 13. Dry hands and plug cord into a properly grounded outlet. Then slowly pull cleaner back toward you (second wet stroke)....
Product Manual
Page 12
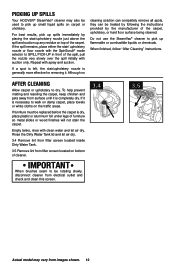
...If the spill remains, place either the stair/ upholstery nozzle or floor nozzle with the SpinScrub® mode selector to pick up flammable or combustible liquids or chemicals. Picking up spills Your HOOVER® SteamVac® cleaner may vary from images shown. 12 If a spot is left, ...the stair/upholstery nozzle is dry, place plastic or aluminum foil under legs of cleaner. Although no cleaning solution can completely remove all spots...
...If the spill remains, place either the stair/ upholstery nozzle or floor nozzle with the SpinScrub® mode selector to pick up flammable or combustible liquids or chemicals. Picking up spills Your HOOVER® SteamVac® cleaner may vary from images shown. 12 If a spot is left, ...the stair/upholstery nozzle is dry, place plastic or aluminum foil under legs of cleaner. Although no cleaning solution can completely remove all spots...

Product Manual
Page 13
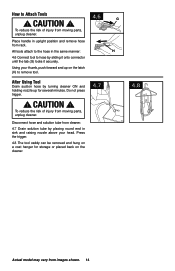
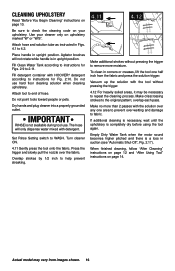
Close door. For some spots may vary from moving parts, unplug cleaner. 4.1 A How to Remove 4.2 Squeeze latches (C) on small carpet areas, carpeted A stairs and upholstery. To reposition the tool, reverse this procedure. Snap door into place. 4.4 4.2 C B B 4.5 13 ...
Close door. For some spots may vary from moving parts, unplug cleaner. 4.1 A How to Remove 4.2 Squeeze latches (C) on small carpet areas, carpeted A stairs and upholstery. To reposition the tool, reverse this procedure. Snap door into place. 4.4 4.2 C B B 4.5 13 ...
Product Manual
Page 14
... up on the latch (H) to Attach Tools ! CAUTION ! CAUTION ! 4.6 G To reduce the risk of injury from moving parts, unplug cleaner. Using your head. After Using Tool Drain suction hose by sliding it onto connector until the tab (G) locks it securely. To reduce the risk... not press trigger. ! Press the trigger. 4.8 The tool caddy can be removed and hung on the cleaner. 4.7 4.8 Actual model may vary from rack. Disconnect hose and solution tube from cleaner. 4.7 Drain solution tube by placing round end in upright position and remove hose from images shown. 14 ...
... up on the latch (H) to Attach Tools ! CAUTION ! CAUTION ! 4.6 G To reduce the risk of injury from moving parts, unplug cleaner. Using your head. After Using Tool Drain suction hose by sliding it onto connector until the tab (G) locks it securely. To reduce the risk... not press trigger. ! Press the trigger. 4.8 The tool caddy can be removed and hung on the cleaner. 4.7 4.8 Actual model may vary from rack. Disconnect hose and solution tube from cleaner. 4.7 Drain solution tube by placing round end in upright position and remove hose from images shown. 14 ...

Product Manual
Page 15
... Rinse Setting switch to 2.11. End with more than 4 wet strokes over any one wet stroke). 4.9 4.10 A B Position tool against riser. Dry hands and plug cleaner into carpet pile. Attach hose and solution tube as described above the carpet and push it into a properly grounded outlet. Overlap strokes by holding the... tool (A) or (B) about one inch above . Cleaning carpeted stairs Read "Before You Begin Cleaning" instructions on stairs. Always end with HOOVER® detergent according to instructions for Figs. 2.9 to WASH.
... Rinse Setting switch to 2.11. End with more than 4 wet strokes over any one wet stroke). 4.9 4.10 A B Position tool against riser. Dry hands and plug cleaner into carpet pile. Attach hose and solution tube as described above the carpet and push it into a properly grounded outlet. Overlap strokes by holding the... tool (A) or (B) about one inch above . Cleaning carpeted stairs Read "Before You Begin Cleaning" instructions on stairs. Always end with HOOVER® detergent according to instructions for Figs. 2.9 to WASH.
Product Manual
Page 16
...brushes will only dispense water mixed with the tool without pressing the trigger to remove more than 2 passes with HOOVER® detergent according to fabric. Dry hands and plug cleaner into a properly grounded outlet. Set Rinse Setting switch to end of hose. overlap each pass. Empty Dirty ...Clean Water Tank according to instructions for Fig. 2.10. The hose will not rotate while handle is not available during tool use hard floor cleaning solution when cleaning upholstery. Make no more moisture. Do not use . Vacuum up the solution with detergent. Press the trigger and...
...brushes will only dispense water mixed with the tool without pressing the trigger to remove more than 2 passes with HOOVER® detergent according to fabric. Dry hands and plug cleaner into a properly grounded outlet. Set Rinse Setting switch to end of hose. overlap each pass. Empty Dirty ...Clean Water Tank according to instructions for Fig. 2.10. The hose will not rotate while handle is not available during tool use hard floor cleaning solution when cleaning upholstery. Make no more moisture. Do not use . Vacuum up the solution with detergent. Press the trigger and...
Product Manual
Page 17
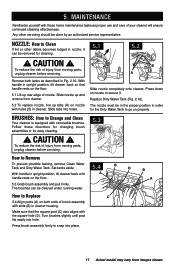
... square post (C) also aligns with the square hole (D). B A Slide nozzle completely onto cleaner. CAUTION ! Set tanks aside. The brushes can be done by an authorized service representative. Make sure that handle rests on the floor. 5.1 Lift up tabs (A) on the floor. 5.3 Grab brush assembly and pull firmly. MAINTENANCE Familiarize yourself with holes (B) in...
... square post (C) also aligns with the square hole (D). B A Slide nozzle completely onto cleaner. CAUTION ! Set tanks aside. The brushes can be done by an authorized service representative. Make sure that handle rests on the floor. 5.1 Lift up tabs (A) on the floor. 5.3 Grab brush assembly and pull firmly. MAINTENANCE Familiarize yourself with holes (B) in...
Product Manual
Page 18
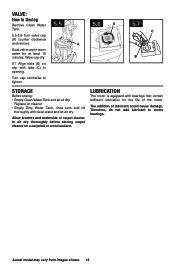
... or wood surface. Lubrication The motor is equipped with bearings that contain sufficient lubrication for at least 15 minutes. Allow brushes and underside of carpet cleaner to tighten. 5.5 5.6 A A 5.7 C B Storage Before storing: • Empty Clean Water Tank and let air dry. Actual model may vary ... Turn valve cap (A) counter clockwise and remove. Turn cap clockwise to air dry thoroughly before storing carpet cleaner on cap with clean water and let air dry. Replace on cleaner. • Empty Dirty Water Tank, rinse tank and lid thoroughly with tabs (C) in warm water for...
... or wood surface. Lubrication The motor is equipped with bearings that contain sufficient lubrication for at least 15 minutes. Allow brushes and underside of carpet cleaner to tighten. 5.5 5.6 A A 5.7 C B Storage Before storing: • Empty Clean Water Tank and let air dry. Actual model may vary ... Turn valve cap (A) counter clockwise and remove. Turn cap clockwise to air dry thoroughly before storing carpet cleaner on cap with clean water and let air dry. Replace on cleaner. • Empty Dirty Water Tank, rinse tank and lid thoroughly with tabs (C) in warm water for...
Product Manual
Page 19
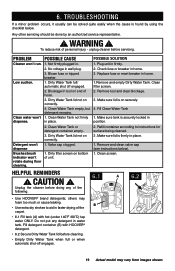
Not firmly plugged in place. 2. Clean water won 't rotate during floor cleaning. 1. Blockage In tool on end of the carpet. • 6.1 Fill tank (A) with HOOVER® detergent. • 6.2 Secure Dirty Water Tank lid before cleaning. • Empty Dirty Water Tank when full or... solved quite easily when the cause is firmly in water tank. PROBLEM POSSIBLE CAUSE Cleaner won't run. 1. Dirty Water Tank lid not on correctly. 2. Unplug the cleaner before servicing. unplug cleaner before doing any detergent in place. TROUBLESHOOTING If a minor problem occurs, it usually...
Not firmly plugged in place. 2. Clean water won 't rotate during floor cleaning. 1. Blockage In tool on end of the carpet. • 6.1 Fill tank (A) with HOOVER® detergent. • 6.2 Secure Dirty Water Tank lid before cleaning. • Empty Dirty Water Tank when full or... solved quite easily when the cause is firmly in water tank. PROBLEM POSSIBLE CAUSE Cleaner won't run. 1. Dirty Water Tank lid not on correctly. 2. Unplug the cleaner before servicing. unplug cleaner before doing any detergent in place. TROUBLESHOOTING If a minor problem occurs, it usually...

Product Manual
Page 20
... your vacuum by : • Checking the Yellow Pages under "Vacuum Cleaners" or "Household". • Visit our website at hoover.com (U.S. In Canada, contact Hoover® Canada, Toronto: 755 Progress Ave., Scarborough, ON M1H 2W7 OR Hoover® Canada, Edmonton: 18129-111 Ave., Edmonton, AB T5W 2P2,...TO THE STORE. 20 This will only result in Glenwillow for service. Service To obtain approved Hoover® service and genuine Hoover® parts, locate the nearest Authorized Hoover® Warranty Service Dealer (Depot) by the complete model number when requesting information or ordering ...
... your vacuum by : • Checking the Yellow Pages under "Vacuum Cleaners" or "Household". • Visit our website at hoover.com (U.S. In Canada, contact Hoover® Canada, Toronto: 755 Progress Ave., Scarborough, ON M1H 2W7 OR Hoover® Canada, Edmonton: 18129-111 Ave., Edmonton, AB T5W 2P2,...TO THE STORE. 20 This will only result in Glenwillow for service. Service To obtain approved Hoover® service and genuine Hoover® parts, locate the nearest Authorized Hoover® Warranty Service Dealer (Depot) by the complete model number when requesting information or ordering ...
Product Manual
Page 21
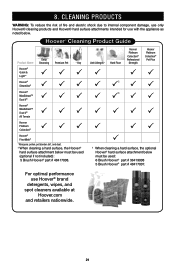
...cleaners available at Hoover.com and retailers nationwide. 21 Hoover® Cleaning Product Guide Deep Product Name Cleansing Premium Pet Oxy Hoover® Quick & Light™ Hoover® SteamVac® Hoover® MaxExtractTM Dual V® Hoover® MaxExtractTM Dual V® All Terrain Hoover... not included): 5 Brush Hoover® part # 48417008. Anti-Allergen1 Hard Floor Hoover Platinum Collection® Professional Strength Hoover Platinum Collection® Pet ...
...cleaners available at Hoover.com and retailers nationwide. 21 Hoover® Cleaning Product Guide Deep Product Name Cleansing Premium Pet Oxy Hoover® Quick & Light™ Hoover® SteamVac® Hoover® MaxExtractTM Dual V® Hoover® MaxExtractTM Dual V® All Terrain Hoover... not included): 5 Brush Hoover® part # 48417008. Anti-Allergen1 Hard Floor Hoover Platinum Collection® Professional Strength Hoover Platinum Collection® Pet ...


