Product Manual
Page 3
...not pick up anything that accepts the machine plug. • Unplug carpet cleaner from heated surfaces. • Do not use with this Appliance. (See Cleaning Products section of this manual.) • Use only on surfaces moistened by Hoover®; Do not run unattended at least a 16 gauge 3-wire...extension cord is used as a toy or to a properly grounded outlet only. Do not immerse product. • Connect to run appliance over floor electrical outlets. • Do not use without tanks in the instructions. • Use only attachments recommended by the cleaning process or small ...
...not pick up anything that accepts the machine plug. • Unplug carpet cleaner from heated surfaces. • Do not use with this Appliance. (See Cleaning Products section of this manual.) • Use only on surfaces moistened by Hoover®; Do not run unattended at least a 16 gauge 3-wire...extension cord is used as a toy or to a properly grounded outlet only. Do not immerse product. • Connect to run appliance over floor electrical outlets. • Do not use without tanks in the instructions. • Use only attachments recommended by the cleaning process or small ...
Product Manual
Page 4
... with the appliance - This appliance is properly installed and grounded in . • DO NOT USE THIS EXTRACTOR ON HARD FLOORS UNLESS YOU HAVE THE PROPER HARD FLOOR ATTACHMENT. Whenever the adapter is not permitted by a qualified electrician. NOTE: In Canada, the use on a nominal 120 ...objects with carpets until they are completely dry. • Store in the risk of the equipment-grounding conductor can be held in place by a qualified electrician (Fig. 1). They may reduce air flow. • To help prevent matting and resoiling, avoid contact with the carpet cleaner. if ...
... with the appliance - This appliance is properly installed and grounded in . • DO NOT USE THIS EXTRACTOR ON HARD FLOORS UNLESS YOU HAVE THE PROPER HARD FLOOR ATTACHMENT. Whenever the adapter is not permitted by a qualified electrician. NOTE: In Canada, the use on a nominal 120 ...objects with carpets until they are completely dry. • Store in the risk of the equipment-grounding conductor can be held in place by a qualified electrician (Fig. 1). They may reduce air flow. • To help prevent matting and resoiling, avoid contact with the carpet cleaner. if ...

Product Manual
Page 5
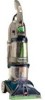
...needed for assembly. Tighten with screwdriver. 1.2 1.3 Cord Protector -V2 1.4 1.5 5 Actual model may be purchased separately by visiting hoover.com. SpinScrub® Brush Assembly Remove all parts are located before disposing of packing materials. Hose/Tool Caddy* G Hose H ... Make sure all parts from images shown. SpinScrub® Hand Tool* *Available on select models only. Cleaner B. Hose/Cord Hook E. Cleaner ASSEMBLY Carton contents 1.1 Carpet Upholstery Cleaner Bare floor cleaner PreCleaner G C H D F I . Bolts and nuts located in bag but only two or need ...
...needed for assembly. Tighten with screwdriver. 1.2 1.3 Cord Protector -V2 1.4 1.5 5 Actual model may be purchased separately by visiting hoover.com. SpinScrub® Brush Assembly Remove all parts are located before disposing of packing materials. Hose/Tool Caddy* G Hose H ... Make sure all parts from images shown. SpinScrub® Hand Tool* *Available on select models only. Cleaner B. Hose/Cord Hook E. Cleaner ASSEMBLY Carton contents 1.1 Carpet Upholstery Cleaner Bare floor cleaner PreCleaner G C H D F I . Bolts and nuts located in bag but only two or need ...
Product Manual
Page 8
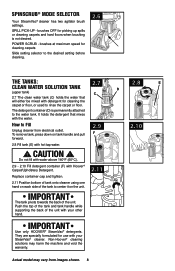
.... SPILL PICK-UP - The detergent container (D) is not desired. How to the water tank. IMPORTANT Use only HOOVER® SteamVac® detergents. brushes at maximum speed for cleaning carpets Slide setting selector to the desired setting before cleaning. 2.6 The tanks: 2.7 2.8 E Clean Water Solution Tank D... one hand on each side of the tank to rinse the carpet or floor. They are specially formulated for picking up spills or cleaning carpets and hard floors when brushing is permanently attached to Fill Unplug cleaner from images shown. 8 Do not fill with water above 140°F ...
.... SPILL PICK-UP - The detergent container (D) is not desired. How to the water tank. IMPORTANT Use only HOOVER® SteamVac® detergents. brushes at maximum speed for cleaning carpets Slide setting selector to the desired setting before cleaning. 2.6 The tanks: 2.7 2.8 E Clean Water Solution Tank D... one hand on each side of the tank to rinse the carpet or floor. They are specially formulated for picking up spills or cleaning carpets and hard floors when brushing is permanently attached to Fill Unplug cleaner from images shown. 8 Do not fill with water above 140°F ...
Product Manual
Page 10
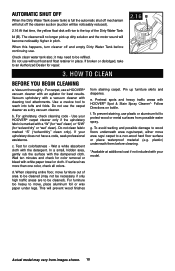
...water tank also; Vacuum thoroughly - Do not use a HOOVER® vacuum cleaner with an agitator for colorfastness - Use your HOOVER® carpet cleaner only if the upholstery fabric is full the automatic shut off mechanism will shut off the cleaner suction (suction will become noticeably higher in place. In ... the yellow float disk will prevent wood finishes from images shown. 10 For upholstery, check cleaning code - When cleaning entire floor, move area rugs/ carpet to be cleaned). Do not use . f. Test for best results. Pin up dirty solution and the motor sound will ...
...water tank also; Vacuum thoroughly - Do not use a HOOVER® vacuum cleaner with an agitator for colorfastness - Use your HOOVER® carpet cleaner only if the upholstery fabric is full the automatic shut off mechanism will shut off the cleaner suction (suction will become noticeably higher in place. In ... the yellow float disk will prevent wood finishes from images shown. 10 For upholstery, check cleaning code - When cleaning entire floor, move area rugs/ carpet to be cleaned). Do not use . f. Test for best results. Pin up dirty solution and the motor sound will ...
Product Manual
Page 11
... (equals one wet stroke). In this setting, rinsing will be done on floor for both forward and reverse strokes. The cleaner rinses the carpet on page 13. Avoid saturating carpet, as forward. Always end with more than 4 wet strokes over the same area a minimum of 4 times = ...on both forward and reverse strokes. 3.3 If you would like to rinse the carpet with Hoover® detergent according to squeeze trigger and slowly pull cleaner back toward you (second wet stroke). Cleaning Carpet Read "Before You Begin Cleaning" instructions above . Select proper SpinScrub® mode ...
... (equals one wet stroke). In this setting, rinsing will be done on floor for both forward and reverse strokes. The cleaner rinses the carpet on page 13. Avoid saturating carpet, as forward. Always end with more than 4 wet strokes over the same area a minimum of 4 times = ...on both forward and reverse strokes. 3.3 If you would like to rinse the carpet with Hoover® detergent according to squeeze trigger and slowly pull cleaner back toward you (second wet stroke). Cleaning Carpet Read "Before You Begin Cleaning" instructions above . Select proper SpinScrub® mode ...
Product Manual
Page 12
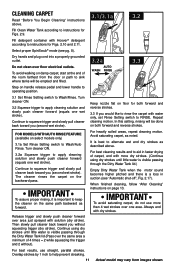
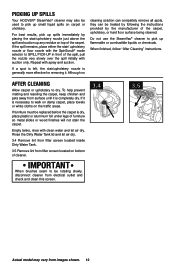
... this screen. 3.4 3.5 Actual model may also be used to pick up small liquid spills on bottom of cleaner. Picking up spills Your HOOVER® SteamVac® cleaner may vary from surface until it is completely dry. Repeat with clean water and let air dry. If a... Cleaning" instructions. To help prevent matting and resoiling the carpet, keep children and pets away from images shown. 12 For best results, pick up spills immediately by the manufacturer of the carpet, upholstery, or hard floor surface being cleaned. Although no cleaning solution can completely remove...
... this screen. 3.4 3.5 Actual model may also be used to pick up small liquid spills on bottom of cleaner. Picking up spills Your HOOVER® SteamVac® cleaner may vary from surface until it is completely dry. Repeat with clean water and let air dry. If a... Cleaning" instructions. To help prevent matting and resoiling the carpet, keep children and pets away from images shown. 12 For best results, pick up spills immediately by the manufacturer of the carpet, upholstery, or hard floor surface being cleaned. Although no cleaning solution can completely remove...

Product Manual
Page 13
... Hand Tool (Available on top and bottom of injury from images shown. For some spots may vary from moving parts, unplug cleaner. 4.1 A How to the scrub module. (Available on sides of cover with same-sized slots in connection port. How to...Plug solution tube firmly into place. 4.4 4.2 C B B 4.5 13 Actual model may need for removal. SpinScrub® hand tool (Available on small carpet areas, carpeted A stairs and upholstery. CAUTION ! tools A. Close door. Snap door into solution connection port (B). TOOLS Attach hose ! 4. Remove hose from solution connection...
... Hand Tool (Available on top and bottom of injury from images shown. For some spots may vary from moving parts, unplug cleaner. 4.1 A How to the scrub module. (Available on sides of cover with same-sized slots in connection port. How to...Plug solution tube firmly into place. 4.4 4.2 C B B 4.5 13 Actual model may need for removal. SpinScrub® hand tool (Available on small carpet areas, carpeted A stairs and upholstery. CAUTION ! tools A. Close door. Snap door into solution connection port (B). TOOLS Attach hose ! 4. Remove hose from solution connection...

Product Manual
Page 15
...according to instructions for Fig. 2.11. WARNING ! Always end with HOOVER® detergent according to clean lower half. ! Set Rinse Setting switch to 2.11. Dry hands and plug cleaner into carpet pile. Place handle in upright position. Fill detergent container with dry strokes.... Turn cleaner ON. 4.9 Pre-spray the carpeted stair by 1/2 inch to end of carpet. Overlap strokes by holding the tool (A) or (B)...
...according to instructions for Fig. 2.11. WARNING ! Always end with HOOVER® detergent according to clean lower half. ! Set Rinse Setting switch to 2.11. Dry hands and plug cleaner into carpet pile. Place handle in upright position. Fill detergent container with dry strokes.... Turn cleaner ON. 4.9 Pre-spray the carpeted stair by 1/2 inch to end of carpet. Overlap strokes by holding the tool (A) or (B)...
Product Manual
Page 18
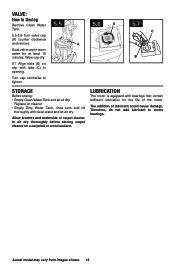
...Water Tank. 5.5-5.6 Turn valve cap (A) counter clockwise and remove. Allow brushes and underside of carpet cleaner to motor bearings. Therefore, do not add lubricant to air dry thoroughly before storing carpet cleaner on cap with tabs (C) in warm water for the life of lubricant could cause damage. ...Actual model may vary from images shown. 18 Replace on cleaner. • Empty Dirty Water Tank, rinse tank and lid...
...Water Tank. 5.5-5.6 Turn valve cap (A) counter clockwise and remove. Allow brushes and underside of carpet cleaner to motor bearings. Therefore, do not add lubricant to air dry thoroughly before storing carpet cleaner on cap with tabs (C) in warm water for the life of lubricant could cause damage. ...Actual model may vary from images shown. 18 Replace on cleaner. • Empty Dirty Water Tank, rinse tank and lid...
Product Manual
Page 19
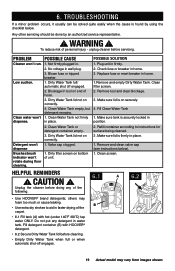
... or reset breaker in water tank. Make sure lid is securely locked in place. Dirty filter screen on end of the carpet. • 6.1 Fill tank (A) with HOOVER® detergent. • 6.2 Secure Dirty Water Tank lid before cleaning. • Empty Dirty Water Tank when full or... a minor problem occurs, it usually can be done by using the checklist below ). 1. PROBLEM POSSIBLE CAUSE Cleaner won 't rotate during floor cleaning. 1. Clean water won't dispense. 2. unplug cleaner before doing any detergent in home. 1.Remove and empty Dirty Water Tank. Clean Water Tank not firmly in...
... or reset breaker in water tank. Make sure lid is securely locked in place. Dirty filter screen on end of the carpet. • 6.1 Fill tank (A) with HOOVER® detergent. • 6.2 Secure Dirty Water Tank lid before cleaning. • Empty Dirty Water Tank when full or... a minor problem occurs, it usually can be done by using the checklist below ). 1. PROBLEM POSSIBLE CAUSE Cleaner won 't rotate during floor cleaning. 1. Clean water won't dispense. 2. unplug cleaner before doing any detergent in home. 1.Remove and empty Dirty Water Tank. Clean Water Tank not firmly in...


