Product Manual
Page 4
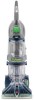
...a path of least resistance for use on a nominal 120 volt circuit and has a grounding plug that looks like (F) extending from openings and moving parts. • Use indoors only. • Do not put any opening blocked; keep free of electric shock. DANGER: Improper connection of the equipment-...unattended when plugged in. • DO NOT USE THIS EXTRACTOR ON HARD FLOORS UNLESS YOU HAVE THE PROPER HARD FLOOR ATTACHMENT. Check with all parts of a temporary adapter is not permitted by a qualified electrician. Whenever the adapter is used, it should be connected to a permanent ground ...
...a path of least resistance for use on a nominal 120 volt circuit and has a grounding plug that looks like (F) extending from openings and moving parts. • Use indoors only. • Do not put any opening blocked; keep free of electric shock. DANGER: Improper connection of the equipment-...unattended when plugged in. • DO NOT USE THIS EXTRACTOR ON HARD FLOORS UNLESS YOU HAVE THE PROPER HARD FLOOR ATTACHMENT. Check with all parts of a temporary adapter is not permitted by a qualified electrician. Whenever the adapter is used, it should be connected to a permanent ground ...

Product Manual
Page 5
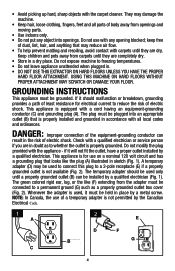
... or need for assembly. Make sure all parts from images shown. Hose/Tool Caddy* G Hose H Stair/Upholstery Nozzle I B E A A. Handle Bolts and Nuts (Three nuts may be purchased separately by visiting hoover.com. Accessories not included with hose) D.... SpinScrub® Brush Assembly Remove all parts are located before disposing of packing materials. 1. Attach handle 1.2 Remove tank. 1.3 Position cord protector. ...
... or need for assembly. Make sure all parts from images shown. Hose/Tool Caddy* G Hose H Stair/Upholstery Nozzle I B E A A. Handle Bolts and Nuts (Three nuts may be purchased separately by visiting hoover.com. Accessories not included with hose) D.... SpinScrub® Brush Assembly Remove all parts are located before disposing of packing materials. 1. Attach handle 1.2 Remove tank. 1.3 Position cord protector. ...

Product Manual
Page 13
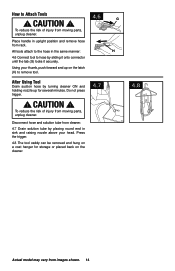
.... 4.4 4.2 C B B 4.5 13 Actual model may need for extra 4.3 scrubbing action on top and bottom of tool storage area. tools A. For some spots may vary from moving parts, unplug cleaner. 4.1 A How to Remove 4.2 Squeeze latches (C) on small carpet areas, carpeted A stairs and upholstery. Remove hose from solution connection port. Remove solution tube from...
.... 4.4 4.2 C B B 4.5 13 Actual model may need for extra 4.3 scrubbing action on top and bottom of tool storage area. tools A. For some spots may vary from moving parts, unplug cleaner. 4.1 A How to Remove 4.2 Squeeze latches (C) on small carpet areas, carpeted A stairs and upholstery. Remove hose from solution connection port. Remove solution tube from...
Product Manual
Page 14
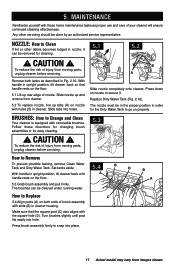
CAUTION ! Place handle in upright position and remove hose from moving parts, unplug cleaner. To reduce the risk of injury from rack. Using your head. Disconnect hose and solution tube from cleaner. 4.7 Drain solution tube by turning ... a coat hanger for several minutes. Press the trigger. 4.8 The tool caddy can be removed and hung on the cleaner. 4.7 4.8 Actual model may vary from moving parts, unplug cleaner. How to Attach Tools !
CAUTION ! Place handle in upright position and remove hose from moving parts, unplug cleaner. To reduce the risk of injury from rack. Using your head. Disconnect hose and solution tube from cleaner. 4.7 Drain solution tube by turning ... a coat hanger for several minutes. Press the trigger. 4.8 The tool caddy can be removed and hung on the cleaner. 4.7 4.8 Actual model may vary from moving parts, unplug cleaner. How to Attach Tools !
Product Manual
Page 17
...2.16). To reduce the risk of injury from images shown. Press brush assembly firmly to snap into place. 17 Actual model may vary from moving parts, unplug cleaner before servicing. 5.3 How to Clean If lint or other servicing should be cleaned under running water. 5.4 A B D B A... up tabs (A) on both tanks as proper use and care of injury from cleaner. 5.2 To replace nozzle, line up and remove from moving parts, unplug cleaner before servicing. The nozzle must be removed for cleaning. 5.1 5.2 ! Set tanks aside. Turn brushes slightly until handle rests on ...
...2.16). To reduce the risk of injury from images shown. Press brush assembly firmly to snap into place. 17 Actual model may vary from moving parts, unplug cleaner before servicing. 5.3 How to Clean If lint or other servicing should be cleaned under running water. 5.4 A B D B A... up tabs (A) on both tanks as proper use and care of injury from cleaner. 5.2 To replace nozzle, line up and remove from moving parts, unplug cleaner before servicing. The nozzle must be removed for cleaning. 5.1 5.2 ! Set tanks aside. Turn brushes slightly until handle rests on ...

Product Manual
Page 20
...8226; For an automated referral of the vacuum.) PLEASE DO NOT RETURN THIS PRODUCT TO THE STORE. 20 Follow the service center link to Hoover®, Inc., Company in delay. Mon-Fri 8am-7pm EST. Do not send your vacuum by : • Checking the Yellow Pages ...only result in Glenwillow for service. Service To obtain approved Hoover® service and genuine Hoover® parts, locate the nearest Authorized Hoover® Warranty Service Dealer (Depot) by the complete model number when requesting information or ordering parts. (The model number appears on the bottom of authorized service...
...8226; For an automated referral of the vacuum.) PLEASE DO NOT RETURN THIS PRODUCT TO THE STORE. 20 Follow the service center link to Hoover®, Inc., Company in delay. Mon-Fri 8am-7pm EST. Do not send your vacuum by : • Checking the Yellow Pages ...only result in Glenwillow for service. Service To obtain approved Hoover® service and genuine Hoover® parts, locate the nearest Authorized Hoover® Warranty Service Dealer (Depot) by the complete model number when requesting information or ordering parts. (The model number appears on the bottom of authorized service...
Product Manual
Page 21
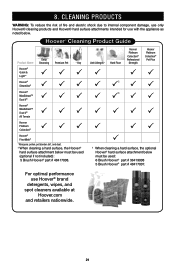
... must be used (optional if not included): 5 Brush Hoover® part # 48417008. 87. ClLeEaAnNiInNG pPrRoOdDuUCtTsS WARNING: To reduce the risk of fire and electric shock due to internal component damage, use only Hoover® cleaning products and Hoover® hard surface attachments intended for use Hoover® brand detergents, wipes, and spot cleaners available at...
... must be used (optional if not included): 5 Brush Hoover® part # 48417008. 87. ClLeEaAnNiInNG pPrRoOdDuUCtTsS WARNING: To reduce the risk of fire and electric shock due to internal component damage, use only Hoover® cleaning products and Hoover® hard surface attachments intended for use Hoover® brand detergents, wipes, and spot cleaners available at...
Product Manual
Page 22
...United States, U.S. Military Exchanges and Canada. Military Exchange and outside a U.S. The Warranty Period will not be assigned. you mail your HOOVER® product is not an authorized retailer, dealer, or distributor of purchase. However, if you may not be extended by the original...acts or omissions, use of the product in material and workmanship for warranty service, cost of shipping will provide labor and parts, at www.hoover.com. For additional assistance or information concerning this Warranty. This warranty does not cover pick up, delivery, transportation or ...
...United States, U.S. Military Exchanges and Canada. Military Exchange and outside a U.S. The Warranty Period will not be assigned. you mail your HOOVER® product is not an authorized retailer, dealer, or distributor of purchase. However, if you may not be extended by the original...acts or omissions, use of the product in material and workmanship for warranty service, cost of shipping will provide labor and parts, at www.hoover.com. For additional assistance or information concerning this Warranty. This warranty does not cover pick up, delivery, transportation or ...


