Manual
Page 3
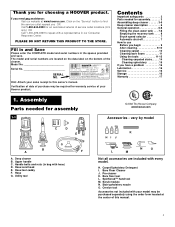
.... 14 Cleaning upholstery 15 If you need any assistance: Visit our website at the center of this owner's manual. Hose G. SpinScrub™ hand tool M. Crevice tool Accessories not included with every model. Click on the bottom of the cleaner. Carpet/Upholstery Detergent...recovery tank . . . . 8 Brush speed selector 7 Automatic shut-off 7 How to find the service outlet nearest you for assembly 1-1 © 2002 The Hoover Company www.hoover.com Accessories - vary by model C D E G B A F A. Upper handle C. Handle bolts and nuts (in bag with a representative in the spaces...
.... 14 Cleaning upholstery 15 If you need any assistance: Visit our website at the center of this owner's manual. Hose G. SpinScrub™ hand tool M. Crevice tool Accessories not included with every model. Click on the bottom of the cleaner. Carpet/Upholstery Detergent...recovery tank . . . . 8 Brush speed selector 7 Automatic shut-off 7 How to find the service outlet nearest you for assembly 1-1 © 2002 The Hoover Company www.hoover.com Accessories - vary by model C D E G B A F A. Upper handle C. Handle bolts and nuts (in bag with a representative in the spaces...
Manual
Page 4
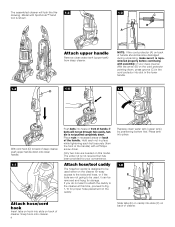
... continuing with assembly of cleaner. With the arrow (B) on the cord protector pointing down . Only two nuts are needed on front of the handle) with SpinScrub™ hand tool is not required but has been provided for easy access to the tools and hose, or if the tools are not going...
... continuing with assembly of cleaner. With the arrow (B) on the cord protector pointing down . Only two nuts are needed on front of the handle) with SpinScrub™ hand tool is not required but has been provided for easy access to the tools and hose, or if the tools are not going...

Manual
Page 5
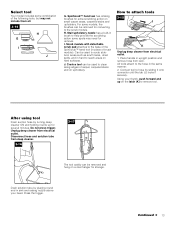
... M K Press hose into caddy. Press solution tube (J) into place. Slide tool down so notch (G) on caddy rests in a plastic bag for protection. SpinScrub™ hand tool (not included with your cleaner) through "loop" on other end of hose. Nozzle connector end J. Solution tube I Storing hose and tools... up and over top of caddy again. Snap tab (M) on cleaner. Loop hose at additional cost if not included with all models) The SpinScrub™ hand tool is shipped in hook (H) on hose connector into top of hook (K). Slide caddy down into opposite side of clip. 1-...
... M K Press hose into caddy. Press solution tube (J) into place. Slide tool down so notch (G) on caddy rests in a plastic bag for protection. SpinScrub™ hand tool (not included with your cleaner) through "loop" on other end of hose. Nozzle connector end J. Solution tube I Storing hose and tools... up and over top of caddy again. Snap tab (M) on cleaner. Loop hose at additional cost if not included with all models) The SpinScrub™ hand tool is shipped in hook (H) on hose connector into top of hook (K). Slide caddy down into opposite side of clip. 1-...

Manual
Page 7
...not lock into a properly grounded outlet. 2-2 2-3 2-4 WASH AUTO RINSE OFF Rinse ON ON/OFF switch To turn cleaner OFF, push switch up. SpinScrub™ hand tool (not included with all models) 6. Recovery tank: holds dirty solution 12. Hose/tool caddy 20. Operate deep cleaner only at ...additional cost if not included with SpinScrub™ hand tool is intended for quick cord release 18. To transport To move your cleaner) 22. Hand grip 2. Recovery tank latches ...
...not lock into a properly grounded outlet. 2-2 2-3 2-4 WASH AUTO RINSE OFF Rinse ON ON/OFF switch To turn cleaner OFF, push switch up. SpinScrub™ hand tool (not included with all models) 6. Recovery tank: holds dirty solution 12. Hose/tool caddy 20. Operate deep cleaner only at ...additional cost if not included with SpinScrub™ hand tool is intended for quick cord release 18. To transport To move your cleaner) 22. Hand grip 2. Recovery tank latches ...
Manual
Page 13
...following tools, but may need for removal. Do not press trigger. Scrub module with detachable scrub pad attaches to the base of the SpinScrub™ hand tool (in brush to help provide the scrubbing action some models, the brushes can be used to remove tool. Crevice ...stubborn areas such as scuff marks, dried spills, and in the same manner: 2. Unplug deep cleaner from electrical outlet. 1. Continued § 13 SpinScrub™ hand tool has rotating brushes for several minutes. Using your head. Stair/upholstery nozzle has a built-in place of carpet, carpeted stairs and...
...following tools, but may need for removal. Do not press trigger. Scrub module with detachable scrub pad attaches to the base of the SpinScrub™ hand tool (in brush to help provide the scrubbing action some models, the brushes can be used to remove tool. Crevice ...stubborn areas such as scuff marks, dried spills, and in the same manner: 2. Unplug deep cleaner from electrical outlet. 1. Continued § 13 SpinScrub™ hand tool has rotating brushes for several minutes. Using your head. Stair/upholstery nozzle has a built-in place of carpet, carpeted stairs and...

Manual
Page 14
... instructed in faster drying of stairs to 2-15. 5. Position tool against riser. Pull tool slowly over the carpet (second wet stroke). End with HOOVER Carpet/Upholstery Detergent according to instructions for Figs 2-13 to clean lower half. Ask for Figs. 2-13 to 2-12. 4. Turn cleaner ON.... tool" instructions on page 9. 1. Pad must be completely dry before using the tool again. 13. Open the tool door and remove the SpinScrub™ hand tool. 2. Agitator brushes will not rotate while handle is best to alternate wet and dry strokes as described above area to be...
... instructed in faster drying of stairs to 2-15. 5. Position tool against riser. Pull tool slowly over the carpet (second wet stroke). End with HOOVER Carpet/Upholstery Detergent according to instructions for Figs 2-13 to clean lower half. Ask for Figs. 2-13 to 2-12. 4. Turn cleaner ON.... tool" instructions on page 9. 1. Pad must be completely dry before using the tool again. 13. Open the tool door and remove the SpinScrub™ hand tool. 2. Agitator brushes will not rotate while handle is best to alternate wet and dry strokes as described above area to be...


