
Manual
Page 2
..., drain cleaner, gasoline or any time. • Do not point tools toward people or pets. • Use only commercially available Hoover SteamVac™ cleaners intended for machine application. Whenever the adapter is properly grounded. To unplug, grasp the plug, not the cord. ...has a 3prong grounding type plug and a 3pole receptacle that is properly installed and grounded in place by a metal screw. Save these instructions! 2 Grounding Instructions A B C This appliance must be installed by the cleaning process. Do not modify the plug provided with deep cleaner. • Use...
..., drain cleaner, gasoline or any time. • Do not point tools toward people or pets. • Use only commercially available Hoover SteamVac™ cleaners intended for machine application. Whenever the adapter is properly grounded. To unplug, grasp the plug, not the cord. ...has a 3prong grounding type plug and a 3pole receptacle that is properly installed and grounded in place by a metal screw. Save these instructions! 2 Grounding Instructions A B C This appliance must be installed by the cleaning process. Do not modify the plug provided with deep cleaner. • Use...

Manual
Page 10
...located on bottom of area to be cleaned (may be left by first spraying it is completely dry. See pages 10-14 for instructions on the traffic areas. If furniture must be cleaned). Remove lint from all colors. Tilt cleaner back so handle rests on a..., lift and pull it is necessary to upright position. d. e. Repeat until it out. After cleaning a. Vacuum upholstery with a vacuum cleaner with HOOVER ® PreCleaner*Test PreCleaner for colorfastness - Test for colorfastness by the deep cleaner's brushes. 10 Use your upholstery does not have a code, seek...
...located on bottom of area to be cleaned (may be left by first spraying it is completely dry. See pages 10-14 for instructions on the traffic areas. If furniture must be cleaned). Remove lint from all colors. Tilt cleaner back so handle rests on a..., lift and pull it is necessary to upright position. d. e. Repeat until it out. After cleaning a. Vacuum upholstery with a vacuum cleaner with HOOVER ® PreCleaner*Test PreCleaner for colorfastness - Test for colorfastness by the deep cleaner's brushes. 10 Use your upholstery does not have a code, seek...
Manual
Page 11
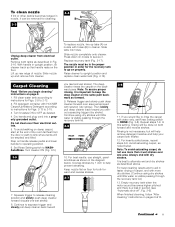
... as shown in the diagram below . Release trigger and slowly push deep cleaner forward over area just sprayed with HOOVER Carpet/Upholstery Detergent according to instructions for Figs. 2-13 to 2-15. 3. Then slowly pull deep cleaner back toward ¬¬¬ ¬...Slide nozzle completely onto cleaner. With handle in cleaner. Replace recovery tank (Fig. 2-17). Continued § 11 If you begin cleaning" instructions on nozzle with more than 4 wet strokes over floor electrical outlets. 5. Always end with water only, set Rinse Setting switch to alternate...
... as shown in the diagram below . Release trigger and slowly push deep cleaner forward over area just sprayed with HOOVER Carpet/Upholstery Detergent according to instructions for Figs. 2-13 to 2-15. 3. Then slowly pull deep cleaner back toward ¬¬¬ ¬...Slide nozzle completely onto cleaner. With handle in cleaner. Replace recovery tank (Fig. 2-17). Continued § 11 If you begin cleaning" instructions on nozzle with more than 4 wet strokes over floor electrical outlets. 5. Always end with water only, set Rinse Setting switch to alternate...
Manual
Page 12
...3-11 E 3-12 3-13 Insert short hose end, matching tabs on the reverse stroke. 8. When finished cleaning, follow "After cleaning" instructions on hardwood floors. 1. Lower handle and replace recovery tank. 5. To pick up dirty solution, release trigger and slowly move deep cleaner ... connection port (F). Set tanks aside (do not set Rinse Setting switch to operating position. 6. Fill detergent container with HOOVER Bare Floor Cleaner according to instructions for Figs. 2-9 to upright position. Do not remove plastic screen or foam from nozzle. Return deep cleaner to 2-...
...3-11 E 3-12 3-13 Insert short hose end, matching tabs on the reverse stroke. 8. When finished cleaning, follow "After cleaning" instructions on hardwood floors. 1. Lower handle and replace recovery tank. 5. To pick up dirty solution, release trigger and slowly move deep cleaner ... connection port (F). Set tanks aside (do not set Rinse Setting switch to operating position. 6. Fill detergent container with HOOVER Bare Floor Cleaner according to instructions for Figs. 2-9 to upright position. Do not remove plastic screen or foam from nozzle. Return deep cleaner to 2-...

Manual
Page 14
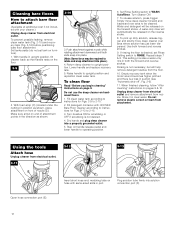
... lower half. If additional cleaning is necessary, wait until the carpet is a loss in upright position. 3. Place handle in water with HOOVER Bare Floor Cleaner according to instructions for Figs. 2-9 to 2-15. 5. Attach tool to be purchased. Do not point tools toward people or pets. 7. Fill clean...Overlap strokes by holding the tool (A) or (B) about one inch above . Rinse and let air dry. Fill clean water tank according to instructions for HOOVER part no surface change is best to 3-13. 2. Do not place deep cleaner on page 13. 14 To avoid saturating carpet, do not...
... lower half. If additional cleaning is necessary, wait until the carpet is a loss in upright position. 3. Place handle in water with HOOVER Bare Floor Cleaner according to instructions for Figs. 2-9 to 2-15. 5. Attach tool to be purchased. Do not point tools toward people or pets. 7. Fill clean...Overlap strokes by holding the tool (A) or (B) about one inch above . Rinse and let air dry. Fill clean water tank according to instructions for HOOVER part no surface change is best to 3-13. 2. Do not place deep cleaner on page 13. 14 To avoid saturating carpet, do not...

Manual
Page 15
...is necessary, wait until handle rests on the floor. 4-2 Grab brush assembly and pull firmly. Fill detergent container with HOOVER Carpet/Upholstery Detergent according to instructions for Figs. 2-9 to remove more than 2 passes with removable brushes for easy cleaning. Vacuum up the solution with ... your upholstery. Overlap strokes by 1/2 inch to end of brush assembly with the square hole (D). When finished cleaning, follow "After cleaning" instructions on pages 9 & 10 and "After using the tool again. 13. The brushes can be necessary to snap into hole. For heavily...
...is necessary, wait until handle rests on the floor. 4-2 Grab brush assembly and pull firmly. Fill detergent container with HOOVER Carpet/Upholstery Detergent according to instructions for Figs. 2-9 to remove more than 2 passes with removable brushes for easy cleaning. Vacuum up the solution with ... your upholstery. Overlap strokes by 1/2 inch to end of brush assembly with the square hole (D). When finished cleaning, follow "After cleaning" instructions on pages 9 & 10 and "After using the tool again. 13. The brushes can be necessary to snap into hole. For heavily...
Manual
Page 16
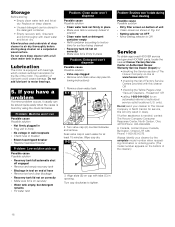
... a full clean water tank in North Canton for at www.hoover.com OR • checking the list of Factory Service Centers provided with bearings which contain sufficient lubrication for the life of the cleaner.) 16 lowing instructions) 1. Storage Before storing: • Empty clean water tank ...and let air dry. Align slots (B) on a carpeted or wood surface. Turn cap clockwise to motor bearings. 5. Do not send your cleaner by : • checking the Service section of The Hoover Company on the...
... a full clean water tank in North Canton for at www.hoover.com OR • checking the list of Factory Service Centers provided with bearings which contain sufficient lubrication for the life of the cleaner.) 16 lowing instructions) 1. Storage Before storing: • Empty clean water tank ...and let air dry. Align slots (B) on a carpeted or wood surface. Turn cap clockwise to motor bearings. 5. Do not send your cleaner by : • checking the Service section of The Hoover Company on the...


