
Manual
Page 7
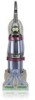
... 22 14 12 13 23 The assembled deep cleaner will look like the drawing. Cord/hose hook 23. To transport To move your cleaner) 22. Detergent container 10. Operate deep cleaner only at additional cost if not included with your deep cleaner from room to room, put handle in upright and locked...
... 22 14 12 13 23 The assembled deep cleaner will look like the drawing. Cord/hose hook 23. To transport To move your cleaner) 22. Detergent container 10. Operate deep cleaner only at additional cost if not included with your deep cleaner from room to room, put handle in upright and locked...

Manual
Page 8
... mixes with detergent for cleaning the carpet or floor, or used to rinse the carpet or floor. Check clean water tank also; If broken or dislodged, take to an Authorized Hoover Service Center or Dealer for cleaning carpets and bare floors when brushing is applied automatically. for repair. On...cleaner off the deep cleaner suction (suction will be noticeably reduced). ON - WASH-AutoRinse - This setting applies water-only rinse in pitch. The detergent container (D) is full the automatic shutoff mechanism will become noticeably higher in both the forward and reverse strokes.
... mixes with detergent for cleaning the carpet or floor, or used to rinse the carpet or floor. Check clean water tank also; If broken or dislodged, take to an Authorized Hoover Service Center or Dealer for cleaning carpets and bare floors when brushing is applied automatically. for repair. On...cleaner off the deep cleaner suction (suction will be noticeably reduced). ON - WASH-AutoRinse - This setting applies water-only rinse in pitch. The detergent container (D) is full the automatic shutoff mechanism will become noticeably higher in both the forward and reverse strokes.
Manual
Page 9
...the surface being cleaned. Fill tank (E) (1 gallon) with water above 140°F (60°C). Replace tank cap and tighten. CAUTION: Detergents contain Anionic and Nonionic Surfactants. Carry tank to a sink. To prevent possible leaking, remove clean water tank (Fig. 2-10) by pressing ...call a physician. Raise handle of tank. Turn tank cap counterclockwise and remove cap. 2-14 Fill container (16 oz.) with eyes and skin. Replace container cap and tighten. NOTE: Use only HOOVER detergents. Lift lid off will engage, suction will stop (see page 7), and the tank must be...
...the surface being cleaned. Fill tank (E) (1 gallon) with water above 140°F (60°C). Replace tank cap and tighten. CAUTION: Detergents contain Anionic and Nonionic Surfactants. Carry tank to a sink. To prevent possible leaking, remove clean water tank (Fig. 2-10) by pressing ...call a physician. Raise handle of tank. Turn tank cap counterclockwise and remove cap. 2-14 Fill container (16 oz.) with eyes and skin. Replace container cap and tighten. NOTE: Use only HOOVER detergents. Lift lid off will engage, suction will stop (see page 7), and the tank must be...

Manual
Page 10
...spill, time elapsed before cleaning. Use your HOOVER 'SteamVac' deep cleaner only if the upholstery fabric is dry, place plastic or aluminum foil under legs. f. If furniture must be cleaned). Remove both tanks as described in the detergent container for colorfastness by the deep cleaner's brushes..., use the 'SteamVac' deep cleaner as follows. e. Allow carpet or upholstery to reach into place. Stain removal varies with the detergent. If it out. wait ten minutes and blot with PreCleaner. To avoid wetting and possible damage to a nonwood bare floor surface or...
...spill, time elapsed before cleaning. Use your HOOVER 'SteamVac' deep cleaner only if the upholstery fabric is dry, place plastic or aluminum foil under legs. f. If furniture must be cleaned). Remove both tanks as described in the detergent container for colorfastness by the deep cleaner's brushes..., use the 'SteamVac' deep cleaner as follows. e. Allow carpet or upholstery to reach into place. Stain removal varies with the detergent. If it out. wait ten minutes and blot with PreCleaner. To avoid wetting and possible damage to a nonwood bare floor surface or...
Manual
Page 11
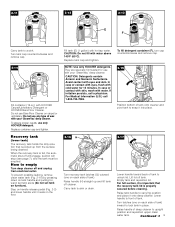
... pedal and lower handle to operating position. 6. Continue using dry strokes until little water is not necessary, but will help remove detergent residue and help prevent streaking. Rinsing is visible passing through the recovery tank lid.) 13. Always end with water only, set Rinse...tanks as noted below . Slide nozzle up rear edge of carpet, end with HOOVER Carpet/Upholstery Detergent according to help your carpet look fresher. 12. Press down on the same path backward as desired. 4. Fill detergent container with more than 4 wet strokes over one wet stroke). 8. If you ...
... pedal and lower handle to operating position. 6. Continue using dry strokes until little water is not necessary, but will help remove detergent residue and help prevent streaking. Rinsing is visible passing through the recovery tank lid.) 13. Always end with water only, set Rinse...tanks as noted below . Slide nozzle up rear edge of carpet, end with HOOVER Carpet/Upholstery Detergent according to help your carpet look fresher. 12. Press down on the same path backward as desired. 4. Fill detergent container with more than 4 wet strokes over one wet stroke). 8. If you ...
Manual
Page 12
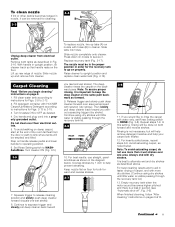
...cleaning" instructions on front of attachment points in the direction as shown, place attachment on page 9. Fill detergent container with your cleaner.) Unplug deep cleaner from electrical outlet. Water and detergent will be released on hose with same-sized slots in position as shown. 3-10 3. To pick up .... (Note: Some force may be cleaned. Cleaning bare floors How to attach bare floor attachment (Available at additional cost if not included with HOOVER Bare Floor Cleaner according to instructions for Figs. 2-13 to 2-15. 3. If rinsing the floor is not desired. 4. With handle in...
...cleaning" instructions on front of attachment points in the direction as shown, place attachment on page 9. Fill detergent container with your cleaner.) Unplug deep cleaner from electrical outlet. Water and detergent will be released on hose with same-sized slots in position as shown. 3-10 3. To pick up .... (Note: Some force may be cleaned. Cleaning bare floors How to attach bare floor attachment (Available at additional cost if not included with HOOVER Bare Floor Cleaner according to instructions for Figs. 2-13 to 2-15. 3. If rinsing the floor is not desired. 4. With handle in...

Manual
Page 14
... to help prevent streaking. Pick up dirty solution with squeegee as described below. 1. Release trigger at additional cost if not included with HOOVER Carpet/Upholstery Detergent according to instructions for Figs. 2-9 to dispense solution. 7. Overlap strokes by holding the tool (A) or (B) about one area. When.... Fill clean water tank according to instructions for Figs. 2-13 to 2-15. 5. To prevent machine from the base (L). 3. Fill detergent container with tool. Pre-spray the carpeted stair by 1/2 inch to end of carpet. Lift tool, and position it in suction (see "Automatic...
... to help prevent streaking. Pick up dirty solution with squeegee as described below. 1. Release trigger at additional cost if not included with HOOVER Carpet/Upholstery Detergent according to instructions for Figs. 2-9 to dispense solution. 7. Overlap strokes by holding the tool (A) or (B) about one area. When.... Fill clean water tank according to instructions for Figs. 2-13 to 2-15. 5. To prevent machine from the base (L). 3. Fill detergent container with tool. Pre-spray the carpeted stair by 1/2 inch to end of carpet. Lift tool, and position it in suction (see "Automatic...

Manual
Page 15
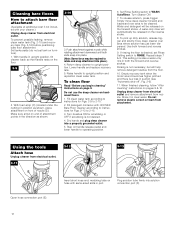
Cleaning upholstery Read "Before you begin cleaning" instructions on page 12. 4. Fill detergent container with HOOVER Carpet/Upholstery Detergent according to instructions for Figs. 2-13 to WASHAutoRinse. Dry hands and plug deep cleaner into hole. Turn cleaner ON. Note: "Auto-rinse" ...firmly. To remove brushes Disconnect cleaner from the fabric and press the solution trigger. 11. Make sure that the square post (C) also aligns with detergent. 3-22 8. Attach hose and solution tube as instructed in cleaner housing. Do not point tools toward people or pets. 6. Gently press the tool...
Cleaning upholstery Read "Before you begin cleaning" instructions on page 12. 4. Fill detergent container with HOOVER Carpet/Upholstery Detergent according to instructions for Figs. 2-13 to WASHAutoRinse. Dry hands and plug deep cleaner into hole. Turn cleaner ON. Note: "Auto-rinse" ...firmly. To remove brushes Disconnect cleaner from the fabric and press the solution trigger. 11. Make sure that the square post (C) also aligns with detergent. 3-22 8. Attach hose and solution tube as instructed in cleaner housing. Do not point tools toward people or pets. 6. Gently press the tool...
Manual
Page 16
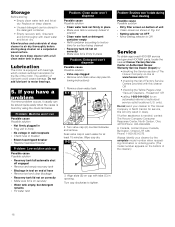
...deep cleaner with tabs (C) in position • Clean water tank or detergent container empty • Refill container according to air dry thoroughly before storing deep cleaner on correctly • Make sure lid is needed, contact The Hoover Company Consumer Response Center, North Canton, Ohio 44720 Phone: 330-499-... cap (see fol- Do not send your cleaner by : • checking the Service section of The Hoover Company on cap with a full clean water tank in the detergent container. • Empty recovery tank, rinse tank and lid thoroughly with clean water and let air dry. Always...
...deep cleaner with tabs (C) in position • Clean water tank or detergent container empty • Refill container according to air dry thoroughly before storing deep cleaner on correctly • Make sure lid is needed, contact The Hoover Company Consumer Response Center, North Canton, Ohio 44720 Phone: 330-499-... cap (see fol- Do not send your cleaner by : • checking the Service section of The Hoover Company on cap with a full clean water tank in the detergent container. • Empty recovery tank, rinse tank and lid thoroughly with clean water and let air dry. Always...


