Product Manual
Page 4
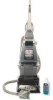
... the machine. • Keep hair, loose clothing, fingers, feet and all local codes and ordinances. Keep children and pets away from openings and moving parts. • Use indoors only. • Do not put any opening blocked; The green colored rigid ear, lug, or the like the plug (A) ... cover (Fig. 2). • Avoid picking up hard, sharp objects with the appliance - Do not use of a temporary adapter is equipped with all parts of electric shock. This appliance is not permitted by a qualified electrician. The plug must be held in the risk of body away from carpets until...
... the machine. • Keep hair, loose clothing, fingers, feet and all local codes and ordinances. Keep children and pets away from openings and moving parts. • Use indoors only. • Do not put any opening blocked; The green colored rigid ear, lug, or the like the plug (A) ... cover (Fig. 2). • Avoid picking up hard, sharp objects with the appliance - Do not use of a temporary adapter is equipped with all parts of electric shock. This appliance is not permitted by a qualified electrician. The plug must be held in the risk of body away from carpets until...
Product Manual
Page 5
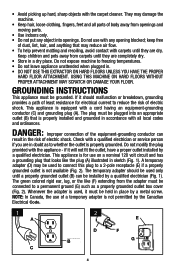
...1.2 With cord hook to fasten. 1.3 5 Actual model may be purchased separately by visiting www.hoover.com. Accessories not included with Screw* *Available on select models only Remove all parts are located before disposing of handle, but do not add nuts yet. Now puts nuts in back... ASSEMBLY Carton contents 1.1 A B C Carpet Upholstery Cleaner Carpet Upholstery Cleaner Bare floor cleaner D PreCleaner E F A. Hose* F. Make sure all parts from images shown. Push bolts into holes on select models only) 1.3 Slide hose holder onto screws in place and use screw driver to back of...
...1.2 With cord hook to fasten. 1.3 5 Actual model may be purchased separately by visiting www.hoover.com. Accessories not included with Screw* *Available on select models only Remove all parts are located before disposing of handle, but do not add nuts yet. Now puts nuts in back... ASSEMBLY Carton contents 1.1 A B C Carpet Upholstery Cleaner Carpet Upholstery Cleaner Bare floor cleaner D PreCleaner E F A. Hose* F. Make sure all parts from images shown. Push bolts into holes on select models only) 1.3 Slide hose holder onto screws in place and use screw driver to back of...
Product Manual
Page 8
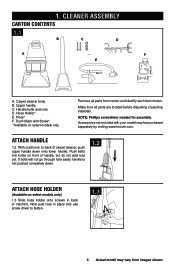
...). If you do the opposite. How to Fill ! Actual model may vary from moving parts, unplug cleaner. To replace tank, do not have access to fill line (5 ounces) with HOOVER® Spot and Stain Spray Cleaner. The cleaner will no longer pick up to remove cap...upside down on bottle. 2.4 2.5 2.6 5 OUNCES/ 150 ml 2.7 B A 2.7 Pour detergent into tank. Then empty Dirty Water Tank before continuing use only HOOVER® cleaning detergent (see "Cleaning Products" on each side of carpet cleaner and carry it rests on the floor. 2.8 2.9 If cleaning stairs or upholstery, ...
...). If you do the opposite. How to Fill ! Actual model may vary from moving parts, unplug cleaner. To replace tank, do not have access to fill line (5 ounces) with HOOVER® Spot and Stain Spray Cleaner. The cleaner will no longer pick up to remove cap...upside down on bottle. 2.4 2.5 2.6 5 OUNCES/ 150 ml 2.7 B A 2.7 Pour detergent into tank. Then empty Dirty Water Tank before continuing use only HOOVER® cleaning detergent (see "Cleaning Products" on each side of carpet cleaner and carry it rests on the floor. 2.8 2.9 If cleaning stairs or upholstery, ...
Product Manual
Page 9
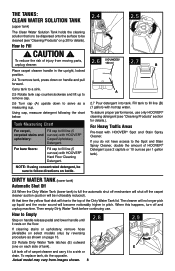
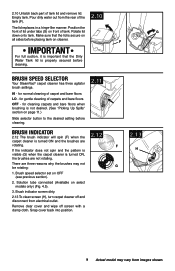
... (See "Picking Up Spills" section on page 11.) Slide selector button to the desired setting before cleaning. 2.11 OAFgFitatoLrOSHpIeed 2.12 Brush indicator 2.12 The brush indicator will spin (F) when the carpet cleaner is secure on all sides before cleaning. F If the indicator does not spin and ...tank (F). 2.10 The lid replaces in a hinge-like manner. There are not rotating. Brush indicator screen dirty. 2.13 To clean screen (H), turn carpet cleaner off screen with a damp cloth. 2.10 Unlatch back part of lid under tabs (G) on cleaner. Position the front of tank lid and remove lid...
... (See "Picking Up Spills" section on page 11.) Slide selector button to the desired setting before cleaning. 2.11 OAFgFitatoLrOSHpIeed 2.12 Brush indicator 2.12 The brush indicator will spin (F) when the carpet cleaner is secure on all sides before cleaning. F If the indicator does not spin and ...tank (F). 2.10 The lid replaces in a hinge-like manner. There are not rotating. Brush indicator screen dirty. 2.13 To clean screen (H), turn carpet cleaner off screen with a damp cloth. 2.10 Unlatch back part of lid under tabs (G) on cleaner. Position the front of tank lid and remove lid...
Product Manual
Page 12
...ATTACHMENT. Make sure arrow on handle release pedal and lower handle to operating position; CAUTION ! Fill Clean Water Solution Tank with HOOVER® detergent (available at additional cost if not included with your SteamVac® cleaner. turn cleaner ON. To pick up ...dirty solution, release trigger and slowly move cleaner forward and backward over area where solution has just been dispersed. Remove attachment from moving parts, unplug cleaner. 3.4 A B ATEEFLOOONR 3.5 RBAROETA RBAROT TEFLOOONR To prevent possible leaking, remove Clean Water Solution Tank and Dirty Water ...
...ATTACHMENT. Make sure arrow on handle release pedal and lower handle to operating position; CAUTION ! Fill Clean Water Solution Tank with HOOVER® detergent (available at additional cost if not included with your SteamVac® cleaner. turn cleaner ON. To pick up ...dirty solution, release trigger and slowly move cleaner forward and backward over area where solution has just been dispersed. Remove attachment from moving parts, unplug cleaner. 3.4 A B ATEEFLOOONR 3.5 RBAROETA RBAROT TEFLOOONR To prevent possible leaking, remove Clean Water Solution Tank and Dirty Water ...
Product Manual
Page 13
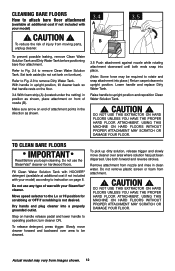
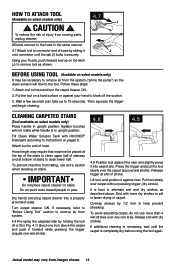
... Tank and remove lid. 4.4 4.5 G 4.3 Pull Dirty Water Tank front panel (E) up one inch then rotate forward so it is firmly in brush to upright position. 13 Actual model may need for removal. TOOLS Using the tools (Available on furniture). set tank aside (do not set tank...pressing down onto tank. Nozzle Cleaning Tool for extra scrubbing action on all sides before cleaning. 4. Powered Hand Tool has rotating brushes for removing lint and/or debris from storage rack. Unlatch back part of tank. Make sure lid is properly secured before storage C How to floor.
... Tank and remove lid. 4.4 4.5 G 4.3 Pull Dirty Water Tank front panel (E) up one inch then rotate forward so it is firmly in brush to upright position. 13 Actual model may need for removal. TOOLS Using the tools (Available on furniture). set tank aside (do not set tank...pressing down onto tank. Nozzle Cleaning Tool for extra scrubbing action on all sides before cleaning. 4. Powered Hand Tool has rotating brushes for removing lint and/or debris from storage rack. Unlatch back part of tank. Make sure lid is properly secured before storage C How to floor.
Product Manual
Page 14
... is necessary, wait until the tab (I J Before using the tool again. Actual model may vary from moving parts, unplug cleaner. Follow these steps: 1. Then squeeze the trigger and begin cleaning. Dry hands and plug carpet ... wet and dry strokes as shown. 4.7 I ) locks it into a properly grounded outlet. Always end with HOOVER® Detergent according to instructions on a hard surface or against your thumb, push forward and up to 15 ...connector until the carpet is in upright position. Agitator brushes will flow to the tool. How to Attach Tool (Available on stairs.
... is necessary, wait until the tab (I J Before using the tool again. Actual model may vary from moving parts, unplug cleaner. Follow these steps: 1. Then squeeze the trigger and begin cleaning. Dry hands and plug carpet ... wet and dry strokes as shown. 4.7 I ) locks it into a properly grounded outlet. Always end with HOOVER® Detergent according to instructions on a hard surface or against your thumb, push forward and up to 15 ...connector until the carpet is in upright position. Agitator brushes will flow to the tool. How to Attach Tool (Available on stairs.
Product Manual
Page 17
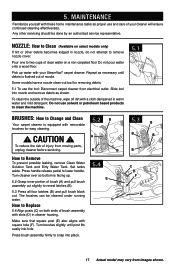
... A B B 5.4 E C 5.3 B B B B C D F D 17 Actual model may vary from moving parts, unplug cleaner before servicing. To reduce the risk of brush assembly with square hole (F). Set tanks aside. The brushes can be done by an authorized service representative. Press handle release pedal to Remove To prevent possible..., remove Clean Water Solution Tank and Dirty Water Tank. To clean the outside of your SteamVac® carpet cleaner. Press brush assembly firmly to Replace 5.4 Align posts (C) on both ends of injury from images shown. Some models have a nozzle clean...
... A B B 5.4 E C 5.3 B B B B C D F D 17 Actual model may vary from moving parts, unplug cleaner before servicing. To reduce the risk of brush assembly with square hole (F). Set tanks aside. The brushes can be done by an authorized service representative. Press handle release pedal to Remove To prevent possible..., remove Clean Water Solution Tank and Dirty Water Tank. To clean the outside of your SteamVac® carpet cleaner. Press brush assembly firmly to Replace 5.4 Align posts (C) on both ends of injury from images shown. Some models have a nozzle clean...
Product Manual
Page 19
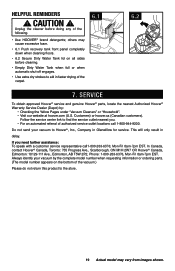
... not send your vacuum by : • Checking the Yellow Pages under "Vacuum Cleaners" or "Household". • Visit our website at hoover.com (U.S. CAUTION ! Unplug the cleaner before cleaning. • Empty Dirty Water Tank when full or when automatic shut-off engages. •...others may vary from images shown. Service To obtain approved Hoover® service and genuine Hoover® parts, locate the nearest Authorized Hoover® Warranty Service Dealer (Depot) by the complete model number when requesting information or ordering parts. (The model number appears on the bottom of the ...
... not send your vacuum by : • Checking the Yellow Pages under "Vacuum Cleaners" or "Household". • Visit our website at hoover.com (U.S. CAUTION ! Unplug the cleaner before cleaning. • Empty Dirty Water Tank when full or when automatic shut-off engages. •...others may vary from images shown. Service To obtain approved Hoover® service and genuine Hoover® parts, locate the nearest Authorized Hoover® Warranty Service Dealer (Depot) by the complete model number when requesting information or ordering parts. (The model number appears on the bottom of the ...
Product Manual
Page 20
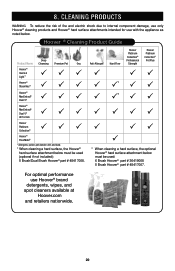
... be used (optional if not included): 5 Brush/Dual Brush Hoover® part # 48417008. Hoover ® Cleaning Product Guide Deep Product Name Cleansing Premium Pet Oxy Hoover® Quick & Light™ PPP Hoover® SteamVac® P P P Hoover® MaxExtract® P P P Dual V® Hoover® MaxExtract® Dual V® All Terrain P P P Hoover Platinum PPP Collection® Hoover® FloorMate® 1 Allergens: pollen, pet...
... be used (optional if not included): 5 Brush/Dual Brush Hoover® part # 48417008. Hoover ® Cleaning Product Guide Deep Product Name Cleansing Premium Pet Oxy Hoover® Quick & Light™ PPP Hoover® SteamVac® P P P Hoover® MaxExtract® P P P Dual V® Hoover® MaxExtract® Dual V® All Terrain P P P Hoover Platinum PPP Collection® Hoover® FloorMate® 1 Allergens: pollen, pet...
Product Manual
Page 21
... not apply to products purchased outside the United States, including its territories and possessions, outside of Canada. During the Warranty Period, Hoover® will be governed and construed under this Warranty. For additional assistance or information concerning this product is not as maid, janitorial...to correct any replacement or repair performed under the laws of the state of shipping will provide labor and parts, at www.hoover.com. However, if you mail your HOOVER® product is not an authorized retailer, dealer, or distributor of the product by any such defect ...
... not apply to products purchased outside the United States, including its territories and possessions, outside of Canada. During the Warranty Period, Hoover® will be governed and construed under this Warranty. For additional assistance or information concerning this product is not as maid, janitorial...to correct any replacement or repair performed under the laws of the state of shipping will provide labor and parts, at www.hoover.com. However, if you mail your HOOVER® product is not an authorized retailer, dealer, or distributor of the product by any such defect ...


