Manual
Page 8
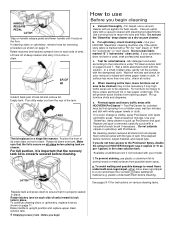
REAR OF TANK Unlatch back part of tank. Position the front of lid under tabs on front ... (for "wet" clean) or "S/W" (for colorfastness - Do not saturate carpet or upholstery with the dampened cloth. f. Replace tank and press down onto tank. Pour dirty water our from all colors. Rotate lid down to a non-wood bare floor... See pages 9-13 for best results. To continue cleaning stairs or upholstery, replace hose as a dry vacuum cleaner. Rotate recovery tank latches outward (one on each side of HOOVER Detergent (use the 'SteamVac' deep cleaner as shown on a hidden area;...
REAR OF TANK Unlatch back part of tank. Position the front of lid under tabs on front ... (for "wet" clean) or "S/W" (for colorfastness - Do not saturate carpet or upholstery with the dampened cloth. f. Replace tank and press down onto tank. Pour dirty water our from all colors. Rotate lid down to a non-wood bare floor... See pages 9-13 for best results. To continue cleaning stairs or upholstery, replace hose as a dry vacuum cleaner. Rotate recovery tank latches outward (one on each side of HOOVER Detergent (use the 'SteamVac' deep cleaner as shown on a hidden area;...
Manual
Page 11
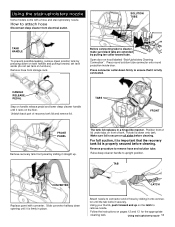
set tank aside (do not set tank on pages 12 and 13 for the appropriate cleaning task. TAB CONVERTER LATCH Replace panel with a hose and stair/upholstery nozzle. Attach nozzle to connector end of recovery tank lid and remove lid. Follow the instructions on furniture). ...the tab locks it rests on all sides before cleaning. Using your thumb, push forward and up . Unlatch back part of hose by sliding it is secure on the floor. The tank lid replaces in place. For full suction, it is important that it onto connec- Reverse procedure to cleaner, make sure...
set tank aside (do not set tank on pages 12 and 13 for the appropriate cleaning task. TAB CONVERTER LATCH Replace panel with a hose and stair/upholstery nozzle. Attach nozzle to connector end of recovery tank lid and remove lid. Follow the instructions on furniture). ...the tab locks it rests on all sides before cleaning. Using your thumb, push forward and up . Unlatch back part of hose by sliding it is secure on the floor. The tank lid replaces in place. For full suction, it is important that it onto connec- Reverse procedure to cleaner, make sure...
Manual
Page 14
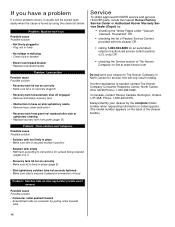
...1-800-263-6376. only) OR - • checking the Service section of hood Service To obtain approved HOOVER service and genuine HOOVER parts, locate the nearest Hoover Factory Service Center or Authorized Hoover Warranty Service Dealer (Depot) by pulling collar towards tube 14 If you have a problem If a minor problem...Plug unit in firmly • No voltage in wall plug • Check fuse or breaker • Blown fuse/tripped breaker • Replace fuse/reset breaker Problem: Low suction Possible cause Possible solution • Recovery tank lid not on correctly • Make sure lid is...
...1-800-263-6376. only) OR - • checking the Service section of hood Service To obtain approved HOOVER service and genuine HOOVER parts, locate the nearest Hoover Factory Service Center or Authorized Hoover Warranty Service Dealer (Depot) by pulling collar towards tube 14 If you have a problem If a minor problem...Plug unit in firmly • No voltage in wall plug • Check fuse or breaker • Blown fuse/tripped breaker • Replace fuse/reset breaker Problem: Low suction Possible cause Possible solution • Recovery tank lid not on correctly • Make sure lid is...

