Manual
Page 1
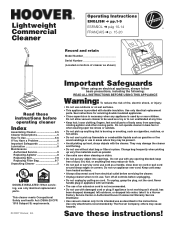
...its intended use outdoors or on wet surfaces. • This appliance is used as a toy or to a Hoover Factory Service Center or Authorized Hoover Commercial Warranty Service Distributor. • Use vacuum cleaner only for servicing double insulated appliances. • Close supervision is ... or dropped into openings. Save these instructions before servicing the cleaner. • Unplug cleaner when not in place. Turn off all parts of body away from electrical outlet before operating cleaner Index Assembling Cleaner 2-5 Cleaner Descriptions 5 How To Use 5-6 If You Have a...
...its intended use outdoors or on wet surfaces. • This appliance is used as a toy or to a Hoover Factory Service Center or Authorized Hoover Commercial Warranty Service Distributor. • Use vacuum cleaner only for servicing double insulated appliances. • Close supervision is ... or dropped into openings. Save these instructions before servicing the cleaner. • Unplug cleaner when not in place. Turn off all parts of body away from electrical outlet before operating cleaner Index Assembling Cleaner 2-5 Cleaner Descriptions 5 How To Use 5-6 If You Have a...
Manual
Page 2
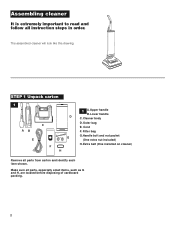
Assembling cleaner It is extremely important to read and follow all parts, especially small items, such as G and H, are located before disposing of cardboard packing. 2 Filter bag G.Handle bolt and nut packet G (One extra nut included) H. Cord FRONT F. Make sure all instruction steps in order. Extra belt (One installed on cleaner) H Remove all parts from carton and identify each item shown. Outer bag E. STEP 1 Unpack carton 1 AB E C F 1 A.Upper handle B.Lower handle D C. The assembled cleaner will look like this drawing. Cleaner body D.
Assembling cleaner It is extremely important to read and follow all parts, especially small items, such as G and H, are located before disposing of cardboard packing. 2 Filter bag G.Handle bolt and nut packet G (One extra nut included) H. Cord FRONT F. Make sure all instruction steps in order. Extra belt (One installed on cleaner) H Remove all parts from carton and identify each item shown. Outer bag E. STEP 1 Unpack carton 1 AB E C F 1 A.Upper handle B.Lower handle D C. The assembled cleaner will look like this drawing. Cleaner body D.
Manual
Page 3
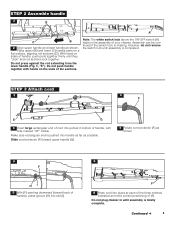
... as shown. 5 F HI 5 With (F) pointing downward (toward back of handle), press groove (H) into slot (I). 6 UP F 6 Press cord into pocket in the assembly of handle, push parts together firmly until they "click" and rod sections lock together. Continued § 3 Do not press against the rod extending from the lower handle (Fig. 3, "E"). Note.... Do not plug cleaner in until assembly is missing. STEP 2 Assemble handle 2 D A C B 2 Align upper handle and lower handle as shown. Place upper (B) and lower (C) handle parts on a flat surface, aligning rod sections (D).
... as shown. 5 F HI 5 With (F) pointing downward (toward back of handle), press groove (H) into slot (I). 6 UP F 6 Press cord into pocket in the assembly of handle, push parts together firmly until they "click" and rod sections lock together. Continued § 3 Do not press against the rod extending from the lower handle (Fig. 3, "E"). Note.... Do not plug cleaner in until assembly is missing. STEP 2 Assemble handle 2 D A C B 2 Align upper handle and lower handle as shown. Place upper (B) and lower (C) handle parts on a flat surface, aligning rod sections (D).
Manual
Page 7
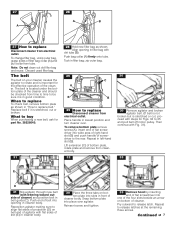
... align flat sides of projection (D) on bottom of cleaner body. Then continue with Fig. 31). 33 E D C 31 Slip agitator through new belt (with steps for part No. 38528040. 31 28 Hold new filter bag as shown in cleaner body. Reposition agitator making sure to 35 and pull belt off motor pulley...
... align flat sides of projection (D) on bottom of cleaner body. Then continue with Fig. 31). 33 E D C 31 Slip agitator through new belt (with steps for part No. 38528040. 31 28 Hold new filter bag as shown in cleaner body. Reposition agitator making sure to 35 and pull belt off motor pulley...

Manual
Page 8
...motor bearings. If you have a problem If a minor problem occurs, it usually can be solved quite easily when the cause is equipped with part No. 48414-155. Therefore, do not touch card. The belt must rotate freely inside the belt guide. Remove hood as shown in wall ...guide. 36 Place hood on hood slightly to make sure all four latches. Extra effort may be lubricated periodically by a Hoover Factory Service Center or an Authorized Hoover Warranty Service Dealer. To maintain cleaning effectiveness, replace agitator if brushes do not add lubricant to buy The agitator may ...
...motor bearings. If you have a problem If a minor problem occurs, it usually can be solved quite easily when the cause is equipped with part No. 48414-155. Therefore, do not touch card. The belt must rotate freely inside the belt guide. Remove hood as shown in wall ...guide. 36 Place hood on hood slightly to make sure all four latches. Extra effort may be lubricated periodically by a Hoover Factory Service Center or an Authorized Hoover Warranty Service Dealer. To maintain cleaning effectiveness, replace agitator if brushes do not add lubricant to buy The agitator may ...
Manual
Page 9
.... The symbol may also be done only by qualified service personnel. OR • Call 1-800-263-6376 to those parts being replaced. In Canada, contact Hoover Canada, Carson Building, 100 Carson Street, Etobicoke, Ontario M8W 3R9, Phone: 1-800-263-6376 Mon-Fri 8AM-7PM ... result in our Consumer Response Center Mon-Fri 8AM-7PM EST. Replacement parts must be added. Service To obtain approved HOOVER service and genuine HOOVER parts, locate the nearest Hoover Factory Service Center or Authorized Hoover Warranty Service Dealer (Depot) by the complete model number when requesting information...
.... The symbol may also be done only by qualified service personnel. OR • Call 1-800-263-6376 to those parts being replaced. In Canada, contact Hoover Canada, Carson Building, 100 Carson Street, Etobicoke, Ontario M8W 3R9, Phone: 1-800-263-6376 Mon-Fri 8AM-7PM ... result in our Consumer Response Center Mon-Fri 8AM-7PM EST. Replacement parts must be added. Service To obtain approved HOOVER service and genuine HOOVER parts, locate the nearest Hoover Factory Service Center or Authorized Hoover Warranty Service Dealer (Depot) by the complete model number when requesting information...


