Manual
Page 1
...with the cleaner. They may damage the cleaner and the bag. • Do not use without dust bag or filters in areas where they may be used by The Hoover Company; Do not run unattended at any opening blocked; ...Safeguards 1 Lubrication 8 Maintenance Authorized Service 9 Replacing Agitator 8 Replacing Belt 7-8 Replacing Filter Bag 6-7 Unpacking Cleaner 2 DOUBLE INSULATED: When servicing, use as a toy or to a Hoover Factory Service Center or Authorized Hoover Commercial Warranty Service Distributor. • Use vacuum cleaner only for servicing double insulated appliances. ...
...with the cleaner. They may damage the cleaner and the bag. • Do not use without dust bag or filters in areas where they may be used by The Hoover Company; Do not run unattended at any opening blocked; ...Safeguards 1 Lubrication 8 Maintenance Authorized Service 9 Replacing Agitator 8 Replacing Belt 7-8 Replacing Filter Bag 6-7 Unpacking Cleaner 2 DOUBLE INSULATED: When servicing, use as a toy or to a Hoover Factory Service Center or Authorized Hoover Commercial Warranty Service Distributor. • Use vacuum cleaner only for servicing double insulated appliances. ...
Manual
Page 2
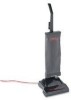
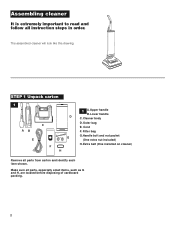
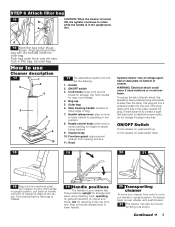
STEP 1 Unpack carton 1 AB E C F 1 A.Upper handle B.Lower handle D C. Make sure all parts from carton and identify each item shown. Filter bag G.Handle bolt and nut packet G (One extra nut included) H. Cleaner body D. Extra belt (One installed on cleaner) H Remove all parts, especially small items, such as G and H, are located before disposing of cardboard packing. 2 Outer bag E. The assembled cleaner will look like this drawing. Cord FRONT F. Assembling cleaner It is extremely important to read and follow all instruction steps in order.
STEP 1 Unpack carton 1 AB E C F 1 A.Upper handle B.Lower handle D C. Make sure all parts from carton and identify each item shown. Filter bag G.Handle bolt and nut packet G (One extra nut included) H. Cleaner body D. Extra belt (One installed on cleaner) H Remove all parts, especially small items, such as G and H, are located before disposing of cardboard packing. 2 Outer bag E. The assembled cleaner will look like this drawing. Cord FRONT F. Assembling cleaner It is extremely important to read and follow all instruction steps in order.
Manual
Page 4
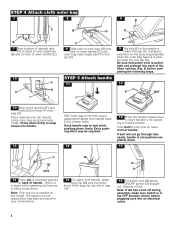
... completing the following steps. 12 K NUT J 10 Note round opening over dirt tube (I B D E C 8 Slide rails on outer bag (B) onto rails on lower handle (C) until outer bag base snaps past the lock tab (D). Press down firmly. Push bolt (K) into an electrical outlet. 4 The extra nut is in position past... tab has come off during assembly, make sure switch is not required but has been provided for your convenience. 14 On upper front handle, grasp bag clip (M) and pull down . 15 L M N O NUT 13 Place nut in the handle is pulled tight and pressed into each of the three ...
... completing the following steps. 12 K NUT J 10 Note round opening over dirt tube (I B D E C 8 Slide rails on outer bag (B) onto rails on lower handle (C) until outer bag base snaps past the lock tab (D). Press down firmly. Push bolt (K) into an electrical outlet. 4 The extra nut is in position past... tab has come off during assembly, make sure switch is not required but has been provided for your convenience. 14 On upper front handle, grasp bag clip (M) and pull down . 15 L M N O NUT 13 Place nut in the handle is pulled tight and pressed into each of the three ...
Manual
Page 5
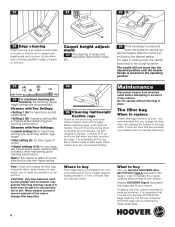
... body 10. ON/OFF Switch To turn cleaner off the carpet. To turn cleaner on lower edge of bag. 7. upright for storage. Align opening in filter bag with handle in upright position, tilt cleaner back on handle until front of cleaner is wider than the other). Furniture guard: helps... prevent cleaner from room to room, put handle in upright position, pull back on rear wheels, and push forward. ...
... body 10. ON/OFF Switch To turn cleaner off the carpet. To turn cleaner on lower edge of bag. 7. upright for storage. Align opening in filter bag with handle in upright position, tilt cleaner back on handle until front of cleaner is wider than the other). Furniture guard: helps... prevent cleaner from room to room, put handle in upright position, pull back on rear wheels, and push forward. ...
Manual
Page 6
... completely off the rug. Before reaching edge, push down on handle. It is recommended that you use only forward strokes. HOOVER bags can be in the upright position. The nozzle will not move cleaner toward other types of carpet. • Higher settings (3-4): for other end or edge...this accumulates, your cleaner. This will prevent rug from electrical outlet before attempting to start again, lower nozzle, and use only genuine HOOVER filter bags made by these trademarks - 6 To assure that your cleaner operates at the nozzle (A). 24 If it is difficult to push, ...
... completely off the rug. Before reaching edge, push down on handle. It is recommended that you use only forward strokes. HOOVER bags can be in the upright position. The nozzle will not move cleaner toward other types of carpet. • Higher settings (3-4): for other end or edge...this accumulates, your cleaner. This will prevent rug from electrical outlet before attempting to start again, lower nozzle, and use only genuine HOOVER filter bags made by these trademarks - 6 To assure that your cleaner operates at the nozzle (A). 24 If it is difficult to push, ...
Manual
Page 7
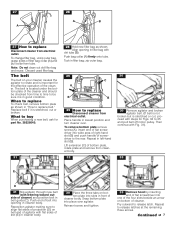
..., cut , proceed with flat sides of cleaner. Replace belt if it is stretched or cut or broken. Tuck in left-hand slot (B). Repeat in filter bag; Then continue with Fig. 31). 33 E D C 31 Slip agitator through new belt (with dirt tube (B). Reposition agitator making sure to release latch. Repeat to ...and should be checked from time to time to be sure it is important for part No. 38528040. 31 28 Hold new filter bag as shown in filter bag with lettering toward out- The belt is located under the bottom plate of flat screwdriver into opening in "How to release latches at...
..., cut , proceed with flat sides of cleaner. Replace belt if it is stretched or cut or broken. Tuck in left-hand slot (B). Repeat in filter bag; Then continue with Fig. 31). 33 E D C 31 Slip agitator through new belt (with dirt tube (B). Reposition agitator making sure to release latch. Repeat to ...and should be checked from time to time to be sure it is important for part No. 38528040. 31 28 Hold new filter bag as shown in filter bag with lettering toward out- The belt is located under the bottom plate of flat screwdriver into opening in "How to release latches at...

Manual
Page 8
..."How to buy The agitator may be replaced. Remove agitator from electrical outlet. The agitator is found by a Hoover Factory Service Center or an Authorized Hoover Warranty Service Dealer. Turn agitator, making sure belt is equipped with part No. 48414-155. Pull up Possible ...cause Possible solution • Broken or worn belt • Replace belt • Brush roll brushes worn • Replace brush roll • Filter bag full • Change filter bag...
..."How to buy The agitator may be replaced. Remove agitator from electrical outlet. The agitator is found by a Hoover Factory Service Center or an Authorized Hoover Warranty Service Dealer. Turn agitator, making sure belt is equipped with part No. 48414-155. Pull up Possible ...cause Possible solution • Broken or worn belt • Replace belt • Brush roll brushes worn • Replace brush roll • Filter bag full • Change filter bag...


