
Product Manual
Page 1
If used commercially the warranty is intended for household use only. IMPORTANT: READ CAREFULLY BEFORE ASSEMBLY AND USE. REPLACEMENT PARTS: Filter: 440012835 Charger: 440010414 ©2018 Techtronic Floor Care Technology Limited. All Rights Reserved. CORDLESS VACUUM USER MANUAL This product is void.
If used commercially the warranty is intended for household use only. IMPORTANT: READ CAREFULLY BEFORE ASSEMBLY AND USE. REPLACEMENT PARTS: Filter: 440012835 Charger: 440010414 ©2018 Techtronic Floor Care Technology Limited. All Rights Reserved. CORDLESS VACUUM USER MANUAL This product is void.

Product Manual
Page 4
...fire or temperature above 130ºC may reduce air flow. • Keep hair, loose clothing, fingers, and all parts of body away from openings and moving parts. • Use extra care when cleaning on stairs to avoid personal injury or damage, and to prevent the cleaner from the outlet... by cord, use without Dirt Cup and/or Filters in injury or damage. Not intended for indoor use with damaged cord or plug. Use only Hoover® recommended attachments and products. • Do not use by children age 12 and under. Do not place vacuum on cord. Close supervision is ...
...fire or temperature above 130ºC may reduce air flow. • Keep hair, loose clothing, fingers, and all parts of body away from openings and moving parts. • Use extra care when cleaning on stairs to avoid personal injury or damage, and to prevent the cleaner from the outlet... by cord, use without Dirt Cup and/or Filters in injury or damage. Not intended for indoor use with damaged cord or plug. Use only Hoover® recommended attachments and products. • Do not use by children age 12 and under. Do not place vacuum on cord. Close supervision is ...
Product Manual
Page 5
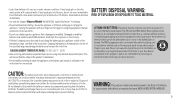
Seek medical attention immediately. • Use only the charger (Hoover Model #440010414) supplied by a qualified repair person using only identical replacement parts. Damaged or modified batteries may damage the battery and increase the risk of fire or explosion. Charging ... RANGE: 5°C-50°C (41°F - 122°F) • Have servicing performed by Hoover® to repair the appliance or the battery pack except as indicated in this program is part of the temperature range specified in the instructions. This will ensure that is maintained. •...
Seek medical attention immediately. • Use only the charger (Hoover Model #440010414) supplied by a qualified repair person using only identical replacement parts. Damaged or modified batteries may damage the battery and increase the risk of fire or explosion. Charging ... RANGE: 5°C-50°C (41°F - 122°F) • Have servicing performed by Hoover® to repair the appliance or the battery pack except as indicated in this program is part of the temperature range specified in the instructions. This will ensure that is maintained. •...
Product Manual
Page 8
WARNING To reduce the risk of personal injury from moving parts, turn the power switch to recharge. In between uses or when carrying out any maintenance always lie flat on the floor in a suitable ...
WARNING To reduce the risk of personal injury from moving parts, turn the power switch to recharge. In between uses or when carrying out any maintenance always lie flat on the floor in a suitable ...

Product Manual
Page 13
When the battery level is ON, the Hoover® Dashboard will display the battery level. Release the trigger to page 11 for an extended period of personal injury from moving parts, turn the vacuum ON. NOTE: When power is getting low, recharge the battery. 4 HARD BOOST FLOOR MODE ...WARNING Never leave the vacuum cleaner in use, the Hoover® Dashboard will illuminate. 1 Select modes by pressing the...
When the battery level is ON, the Hoover® Dashboard will display the battery level. Release the trigger to page 11 for an extended period of personal injury from moving parts, turn the vacuum ON. NOTE: When power is getting low, recharge the battery. 4 HARD BOOST FLOOR MODE ...WARNING Never leave the vacuum cleaner in use, the Hoover® Dashboard will illuminate. 1 Select modes by pressing the...
Product Manual
Page 16
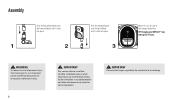
... floor in a suitable location so it does not become a trip hazard or can also be stepped on the side of personal injury from moving parts, turn the power switch to OFF and disconnect all accessories before servicing. 16 IMPORTANT This vacuum cleaner is not free standing. Maintenance: Emptying the Dirt...
... floor in a suitable location so it does not become a trip hazard or can also be stepped on the side of personal injury from moving parts, turn the power switch to OFF and disconnect all accessories before servicing. 16 IMPORTANT This vacuum cleaner is not free standing. Maintenance: Emptying the Dirt...
Product Manual
Page 17
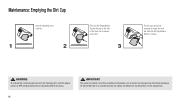
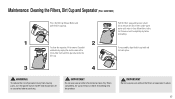
... wiping the metal screen with a micro-fiber cloth and then place back into place. 3 4 WARNING To reduce the risk of personal injury from moving parts, turn the power switch to remove. Dry filters completely, for 24 hours or until water is clear. IMPORTANT Do not use vacuum without the...
... wiping the metal screen with a micro-fiber cloth and then place back into place. 3 4 WARNING To reduce the risk of personal injury from moving parts, turn the power switch to remove. Dry filters completely, for 24 hours or until water is clear. IMPORTANT Do not use vacuum without the...
Product Manual
Page 18
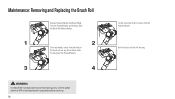
Turn the Powered Nozzle upside down. Slide the Brush Roll Release Button. 1 2 Clear any threads or hair from both ends of the brush roll and any dirt or debris inside the housing of the Powered Nozzle. 3 4 WARNING To reduce the risk of personal injury from moving parts, turn the power switch to OFF and disconnect all accessories before servicing. 18 Lift the end of brush roll to remove from Reach Wand. Re-fit the brush roll into the housing. Maintenance: Removing and Replacing the Brush Roll Remove Powered Nozzle from the Powered Nozzle.
Turn the Powered Nozzle upside down. Slide the Brush Roll Release Button. 1 2 Clear any threads or hair from both ends of the brush roll and any dirt or debris inside the housing of the Powered Nozzle. 3 4 WARNING To reduce the risk of personal injury from moving parts, turn the power switch to OFF and disconnect all accessories before servicing. 18 Lift the end of brush roll to remove from Reach Wand. Re-fit the brush roll into the housing. Maintenance: Removing and Replacing the Brush Roll Remove Powered Nozzle from the Powered Nozzle.

Product Manual
Page 19
...;ashing, brush roll has stalled. Turn product off the unit and then disconnect the nozzle to reset stall protection. 19 PROBLEM Dust escaping from moving parts, turn ON or charge POSSIBLE CAUSE 1. Battery is clogged or dirty. 3. Review filter removal and cleaning. (see page 17) 2. Reinstall dirt cup, make sure lid...
...;ashing, brush roll has stalled. Turn product off the unit and then disconnect the nozzle to reset stall protection. 19 PROBLEM Dust escaping from moving parts, turn ON or charge POSSIBLE CAUSE 1. Battery is clogged or dirty. 3. Review filter removal and cleaning. (see page 17) 2. Reinstall dirt cup, make sure lid...
Product Manual
Page 20
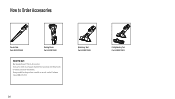
How to Order Accessories Crevice Tool Part #440012840 Dusting Brush Part #440012841 WHAT TO BUY: Buy Genuine Hoover® Parts & Accessories: If you are in need of a new part, attachment or accessory, visit Hoover.com or Hoover.ca for more information. Upholstery Tool Part #440012842 20 Pet Upholstery Tool Part #440012853 Having trouble locating an item or model on our site, contact Customer Care at 888 679-2121.
How to Order Accessories Crevice Tool Part #440012840 Dusting Brush Part #440012841 WHAT TO BUY: Buy Genuine Hoover® Parts & Accessories: If you are in need of a new part, attachment or accessory, visit Hoover.com or Hoover.ca for more information. Upholstery Tool Part #440012842 20 Pet Upholstery Tool Part #440012853 Having trouble locating an item or model on our site, contact Customer Care at 888 679-2121.
Product Manual
Page 21
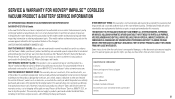
... repair performed under the laws of the state of North Carolina. During the Warranty Period, Hoover® will provide labor and parts at www.hoover.com. This warranty does not apply to a Hoover® Sales and Service Center for model number. 21 OTHER IMPORTANT TERMS: This warranty is not ...transferable and may not be extended by visiting our website at www.hoover.com. The Warranty Period ...
... repair performed under the laws of the state of North Carolina. During the Warranty Period, Hoover® will provide labor and parts at www.hoover.com. This warranty does not apply to a Hoover® Sales and Service Center for model number. 21 OTHER IMPORTANT TERMS: This warranty is not ...transferable and may not be extended by visiting our website at www.hoover.com. The Warranty Period ...


