
Product Manual
Page 2
Hoover will replace your vacuum by: Visiting Hoover.com or Hoover.ca Calling 888 679-2121 IT'S GUARANTEED. See Warranty for complete details. Register your batteries under our 2 year limited warranty. Welcome to Hoover ownership. Make it official.
Hoover will replace your vacuum by: Visiting Hoover.com or Hoover.ca Calling 888 679-2121 IT'S GUARANTEED. See Warranty for complete details. Register your batteries under our 2 year limited warranty. Welcome to Hoover ownership. Make it official.
Product Manual
Page 4
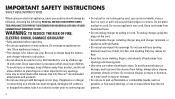
...on cord. Store appliances indoors. • The charger is for use only. Not intended for indoor use by children age 12 and under. Use only Hoover® recommended attachments and products. • Do not use with any opening blocked; Do not run appliance over cord. To unplug charger, grasp the ... or combustible liquids, such as gasoline, or fine wood shavings, or use in a dry place. • Do not allow children to always keep the battery and charger indoors in areas where they may reduce air flow. • Keep hair, loose clothing, fingers, and all parts of stairs on cord. If...
...on cord. Store appliances indoors. • The charger is for use only. Not intended for indoor use by children age 12 and under. Use only Hoover® recommended attachments and products. • Do not use with any opening blocked; Do not run appliance over cord. To unplug charger, grasp the ... or combustible liquids, such as gasoline, or fine wood shavings, or use in a dry place. • Do not allow children to always keep the battery and charger indoors in areas where they may reduce air flow. • Keep hair, loose clothing, fingers, and all parts of stairs on cord. If...
Product Manual
Page 5
...with clean water continuously for directions. • Do not attempt to recharge. • Use only the battery (Hoover Part #440009633) supplied by Hoover® to disassemble battery. • Unplug the charger from the outlet before connecting or disconnecting Motorized Turbo Tool or tools. •... immediately. • Use only the charger (Hoover Part #440009553) supplied by Hoover®. If any liquid gets into battery pack or charger terminals. • Do not attempt to short circuit the battery or charger terminals. The batteries can explode in place. • Turn power...
...with clean water continuously for directions. • Do not attempt to recharge. • Use only the battery (Hoover Part #440009633) supplied by Hoover® to disassemble battery. • Unplug the charger from the outlet before connecting or disconnecting Motorized Turbo Tool or tools. •... immediately. • Use only the charger (Hoover Part #440009553) supplied by Hoover®. If any liquid gets into battery pack or charger terminals. • Do not attempt to short circuit the battery or charger terminals. The batteries can explode in place. • Turn power...

Product Manual
Page 6
Unit Model BH52200/PC/CDI BH52210/PC/CA BH52212 Handheld ü ü ü Powered Nozzle ü ü ü Reach Wand ü ü ü Crevice Tool ü ü ü Wall Mount ü ü ü Dusting Brush Upholstery Tool Articulating Dusting Brush ü ü ü ü ALL MODELS COME WITH A CHARGER, BATTERY, SCREWS, SCREW COVERS AND USER MANUAL. 6 WHAT'S IN THE BOX? Getting started with your Cruise™ Cordless: CONTENTS VARY DEPENDING ON THE MODEL PURCHASED.
Unit Model BH52200/PC/CDI BH52210/PC/CA BH52212 Handheld ü ü ü Powered Nozzle ü ü ü Reach Wand ü ü ü Crevice Tool ü ü ü Wall Mount ü ü ü Dusting Brush Upholstery Tool Articulating Dusting Brush ü ü ü ü ALL MODELS COME WITH A CHARGER, BATTERY, SCREWS, SCREW COVERS AND USER MANUAL. 6 WHAT'S IN THE BOX? Getting started with your Cruise™ Cordless: CONTENTS VARY DEPENDING ON THE MODEL PURCHASED.
Product Manual
Page 7
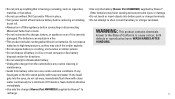
... Powered Nozzle. In between uses must always be placed in the wall bracket or laid flat on . 7 To reduce the risk of personal injury, remove battery before cleaning or servicing. IMPORTANT ! Assembly: Line up the connector on . Push the Reach Wand down onto the Reach Wand until it clicks into place...
... Powered Nozzle. In between uses must always be placed in the wall bracket or laid flat on . 7 To reduce the risk of personal injury, remove battery before cleaning or servicing. IMPORTANT ! Assembly: Line up the connector on . Push the Reach Wand down onto the Reach Wand until it clicks into place...
Product Manual
Page 8
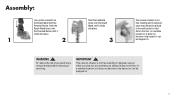
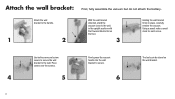
... wall bracket to the wall, in place, carefully remove the vacuum. Attach the wall bracket: First, fully assemble the vacuum but do not attach the battery. Holding the wall bracket firmly in the upright position with the Powered Nozzle flat on the wall bracket.
... wall bracket to the wall, in place, carefully remove the vacuum. Attach the wall bracket: First, fully assemble the vacuum but do not attach the battery. Holding the wall bracket firmly in the upright position with the Powered Nozzle flat on the wall bracket.

Product Manual
Page 9
How to use: 1. Power Nozzle/accessory release button 6. Dirt empty button 14. Continuous power lever (hidden) 6 16. Filter cover release buttons 11 9. Dirt container 14 15 16 17 9 Powered Nozzle 10 7. Handle 4 10. Dirt container removal button (hidden) 13. Battery 7 17. Handheld release button 8 4. Brush roll 8. Battery Charging Port 12 11. Brush roll On/Off button 2. Reach Wand 3 9 5. Battery release button 12. On/Off trigger 5 13 15. On/Off & charging light 1 2 3.
How to use: 1. Power Nozzle/accessory release button 6. Dirt empty button 14. Continuous power lever (hidden) 6 16. Filter cover release buttons 11 9. Dirt container 14 15 16 17 9 Powered Nozzle 10 7. Handle 4 10. Dirt container removal button (hidden) 13. Battery 7 17. Handheld release button 8 4. Brush roll 8. Battery Charging Port 12 11. Brush roll On/Off button 2. Reach Wand 3 9 5. Battery release button 12. On/Off trigger 5 13 15. On/Off & charging light 1 2 3.
Product Manual
Page 10
...wall mount by removing the attachments and laying the Handheld on the back of the handle. 3 4 NOTE: DUE TO FEDERAL REGULATIONS THE BATTERY DOES NOT COME FULLY CHARGED. Plug the charger plug into the charging port located on its side. To reduce the risk of the ...depending upon use. If the vacuum cleaner is blocked, remove the battery before cleaning or servicing. WARNING ! Before you begin cleaning: Slide the battery into the back of personal injury, remove battery before removing the blockage. 10 The battery will click into position when correctly fitted. 1 2 Insert the ...
...wall mount by removing the attachments and laying the Handheld on the back of the handle. 3 4 NOTE: DUE TO FEDERAL REGULATIONS THE BATTERY DOES NOT COME FULLY CHARGED. Plug the charger plug into the charging port located on its side. To reduce the risk of the ...depending upon use. If the vacuum cleaner is blocked, remove the battery before cleaning or servicing. WARNING ! Before you begin cleaning: Slide the battery into the back of personal injury, remove battery before removing the blockage. 10 The battery will click into position when correctly fitted. 1 2 Insert the ...
Product Manual
Page 11
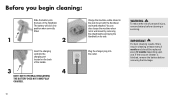
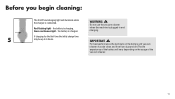
... plugged in and charging. Green continuous light - Do not use the vacuum cleaner when the machine is charging. IMPORTANT ! the battery is connected. If charging for the first time the initial charge time 5 may be clean and free from dust and dirt.The life expectancy of ...the vacuum cleaner. 11 For best performance the terminals on the battery and vacuum cleaner must be up to 6 hours. Before you begin cleaning: The On/Off and charging light will vary depending on the usage of...
... plugged in and charging. Green continuous light - Do not use the vacuum cleaner when the machine is charging. IMPORTANT ! the battery is connected. If charging for the first time the initial charge time 5 may be clean and free from dust and dirt.The life expectancy of ...the vacuum cleaner. 11 For best performance the terminals on the battery and vacuum cleaner must be up to 6 hours. Before you begin cleaning: The On/Off and charging light will vary depending on the usage of...
Product Manual
Page 12
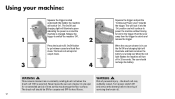
... the On/Off and charging light will continue to power the machine without having to hold in 20 seconds. The brush roll should recharge the battery. Release the trigger to switch the machine 'Off'. 1 2 Press the brush roll's On/Off button to unlock and release the trigger. WARNING ! Turn ...power switch Off and remove the battery before cleaning of servicing the brush roll. 12 Push the lever away from the trigger to go between carpet and hard floor mode. The brush...
... the On/Off and charging light will continue to power the machine without having to hold in 20 seconds. The brush roll should recharge the battery. Release the trigger to switch the machine 'Off'. 1 2 Press the brush roll's On/Off button to unlock and release the trigger. WARNING ! Turn ...power switch Off and remove the battery before cleaning of servicing the brush roll. 12 Push the lever away from the trigger to go between carpet and hard floor mode. The brush...
Product Manual
Page 16
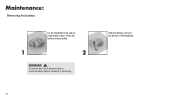
Lie the Handheld on its side on a flat stable surface. Maintenance: Removing the battery. To reduce the risk of personal injury, remove battery before cleaning or servicing. 16 Slide the battery out from the bottom of the Handheld. Press the battery release button. 1 2 WARNING !
Lie the Handheld on its side on a flat stable surface. Maintenance: Removing the battery. To reduce the risk of personal injury, remove battery before cleaning or servicing. 16 Slide the battery out from the bottom of the Handheld. Press the battery release button. 1 2 WARNING !
Product Manual
Page 17
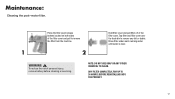
... is clear. 1 2 WARNING ! NOTE: DO NOT USE SOAP OR ANY OTHER CHEMICAL TO CLEAN. Hold filter cover and pull filter off of personal injury, remove battery before cleaning or servicing. Press the filter cover release buttons located on both sides of the filter cover and pull to remove any dirt or...
... is clear. 1 2 WARNING ! NOTE: DO NOT USE SOAP OR ANY OTHER CHEMICAL TO CLEAN. Hold filter cover and pull filter off of personal injury, remove battery before cleaning or servicing. Press the filter cover release buttons located on both sides of the filter cover and pull to remove any dirt or...

Product Manual
Page 18
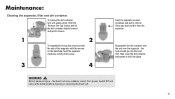
To reduce the risk of personal injury, remove battery before cleaning or servicing. 18 The Reach Wand when attached to one side. Place safely and securely to the Powered Nozzle/accessory is not free standing. Pull to separate the Handheld from the Reach Wand. 1 2 Ensure the battery has been removed and hold the Handheld over a trash bin. 3 4 WARNING ! Maintenance: Emptying the dirt container. Press the Handheld release button. Press the dirt empty button.
To reduce the risk of personal injury, remove battery before cleaning or servicing. 18 The Reach Wand when attached to one side. Place safely and securely to the Powered Nozzle/accessory is not free standing. Pull to separate the Handheld from the Reach Wand. 1 2 Ensure the battery has been removed and hold the Handheld over a trash bin. 3 4 WARNING ! Maintenance: Emptying the dirt container. Press the Handheld release button. Press the dirt empty button.
Product Manual
Page 19
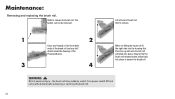
... ! the hook should go onto the front first. Reassemble the dirt container onto the unit over the separator - Turn power switch Off and remove the battery before cleaning or servicing the brush roll. 19 To remove the dirt container, turn unit upside down. Risk of the separator with the arrows on...
... ! the hook should go onto the front first. Reassemble the dirt container onto the unit over the separator - Turn power switch Off and remove the battery before cleaning or servicing the brush roll. 19 To remove the dirt container, turn unit upside down. Risk of the separator with the arrows on...
Product Manual
Page 20
.... When re-fitting the brush roll fit the right side into place to secure the brush roll. 3 4 WARNING ! Turn power switch Off and remove the battery before cleaning or servicing the brush roll. 20 Then line up left end of brush roll first to release the brush roll. the brush roll...
.... When re-fitting the brush roll fit the right side into place to secure the brush roll. 3 4 WARNING ! Turn power switch Off and remove the battery before cleaning or servicing the brush roll. 20 Then line up left end of brush roll first to release the brush roll. the brush roll...
Product Manual
Page 21
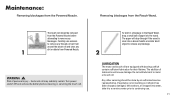
The brush roll should be done by an authorized service representative. Turn power switch Off and remove the battery before attempting to remove any dirt or debris from the Powered Nozzle before cleaning or servicing the brush roll. Use a broom handle or similar blunt ...
The brush roll should be done by an authorized service representative. Turn power switch Off and remove the battery before attempting to remove any dirt or debris from the Powered Nozzle before cleaning or servicing the brush roll. Use a broom handle or similar blunt ...
Product Manual
Page 23
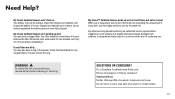
.../support or Hoover.ca/support Connect with clear warm water for any clogged debris. If you 're vacuuming, look to turn on the brush roll. Your battery may also have a clogged filter. If appliance is spinning. Your filter should be done by an authorized service representative. Any other servicing should be charged... should , has been dropped, damaged, left outdoors, or dropped into water, take up to continuing use. Rinse with us: Twitter: @HooverUSA • Facebook: facebook.com/hoover Do not return to federal regulations the battery does not come fully charged.
.../support or Hoover.ca/support Connect with clear warm water for any clogged debris. If you 're vacuuming, look to turn on the brush roll. Your battery may also have a clogged filter. If appliance is spinning. Your filter should be done by an authorized service representative. Any other servicing should be charged... should , has been dropped, damaged, left outdoors, or dropped into water, take up to continuing use. Rinse with us: Twitter: @HooverUSA • Facebook: facebook.com/hoover Do not return to federal regulations the battery does not come fully charged.

Product Manual
Page 24
...in normal household use outside the United States, including its territories and possessions, a U.S. During the Warranty Period, Hoover® will provide a replacement battery at www.hoover.com. 24 WHAT THIS WARRANTY DOES NOT COVER: This warranty does not cover belts, filters and brush rolls,...IN CONTRACT, NEGLIGENCE, TORT OR STRICT PRODUCTS LIABILITY OR ARISING FROM ANY CAUSE WHATSOEVER. SERVICE & WARRANTY FOR HOOVER® CRUISE CORDLESS VACUUM PRODUCT & BATTERY SERVICE INFORMATION ANY SERVICING SHOULD BE DONE BY AN AUTHORIZED SERVICE REPRESENTATIVE Call 888 679-2121 USA & Canada ...
...in normal household use outside the United States, including its territories and possessions, a U.S. During the Warranty Period, Hoover® will provide a replacement battery at www.hoover.com. 24 WHAT THIS WARRANTY DOES NOT COVER: This warranty does not cover belts, filters and brush rolls,...IN CONTRACT, NEGLIGENCE, TORT OR STRICT PRODUCTS LIABILITY OR ARISING FROM ANY CAUSE WHATSOEVER. SERVICE & WARRANTY FOR HOOVER® CRUISE CORDLESS VACUUM PRODUCT & BATTERY SERVICE INFORMATION ANY SERVICING SHOULD BE DONE BY AN AUTHORIZED SERVICE REPRESENTATIVE Call 888 679-2121 USA & Canada ...


