Manual
Page 2
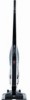
...of 15 minutes. Keep cord away from battery cells can explode in place. • Use extra care when cleaning on cord, or pull cord around sharp edges or corners. Seek medical attention immediately. • Use only the charger (Hoover Part# BH50005) supplied by pulling on ... run appliance over cord. Use only manufacturer's recommended attachments. • Do not use the unit, store, or charge battery outdoors or on cord. THIS VACUUM IS INTENDED FOR HOUSEHOLD USE ONLY. IMPORTANT SAFETY INSTRUCTIONS WARNING: CLEANER ASSEMBLY MAY INCLUDE SMALL PARTS. SMALL PARTS CAN PRESENT...
...of 15 minutes. Keep cord away from battery cells can explode in place. • Use extra care when cleaning on cord, or pull cord around sharp edges or corners. Seek medical attention immediately. • Use only the charger (Hoover Part# BH50005) supplied by pulling on ... run appliance over cord. Use only manufacturer's recommended attachments. • Do not use the unit, store, or charge battery outdoors or on cord. THIS VACUUM IS INTENDED FOR HOUSEHOLD USE ONLY. IMPORTANT SAFETY INSTRUCTIONS WARNING: CLEANER ASSEMBLY MAY INCLUDE SMALL PARTS. SMALL PARTS CAN PRESENT...
Manual
Page 4
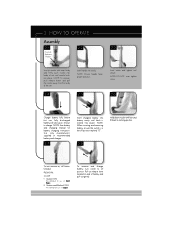
...Insert screw and tighten until nozzle locks into place. NOTE: See battery and charging manual for use on carpet. PUSH DIAL: O - OFF I - Suction and Brushroll ON - To remove and charge battery, turn vacuum on end of battery and pull out gently. HOW TO OPERATE Assembly 2.1 2.2 2.3...release button and pull the nozzle away from the body of unit until secure. Use only manufacturer's supplied or recommended battery and charger. 2.7 Insert charged battery into body. To turn switch to off position marked "O". 2.8 Hold down nozzle with main body and firmly push ...
...Insert screw and tighten until nozzle locks into place. NOTE: See battery and charging manual for use on carpet. PUSH DIAL: O - OFF I - Suction and Brushroll ON - To remove and charge battery, turn vacuum on end of battery and pull out gently. HOW TO OPERATE Assembly 2.1 2.2 2.3...release button and pull the nozzle away from the body of unit until secure. Use only manufacturer's supplied or recommended battery and charger. 2.7 Insert charged battery into body. To turn switch to off position marked "O". 2.8 Hold down nozzle with main body and firmly push ...
Manual
Page 6
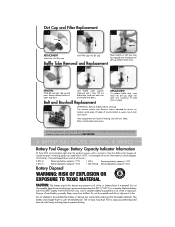
... when the product's power switch is turned on bottom nozzle plate. Keep away from the battery terminals. Prior to disposal, protect exposed terminals with HOOVER®® battery Part # BH50000 only. Pull out baffle tube, hold over . Belt and Brushroll Replacement ...www.hoover.com to prevent shorting. Insert filter cap into filter cap. Return nozzle plate and screws. Turn vacuum nozzle over trash can and shake free debris. The battery and charger have no user serviceable parts. BATTERY FUEL GAUGE, DISPOSAL & SERVICE Battery Fuel Gauge: Battery Capacity...
... when the product's power switch is turned on bottom nozzle plate. Keep away from the battery terminals. Prior to disposal, protect exposed terminals with HOOVER®® battery Part # BH50000 only. Pull out baffle tube, hold over . Belt and Brushroll Replacement ...www.hoover.com to prevent shorting. Insert filter cap into filter cap. Return nozzle plate and screws. Turn vacuum nozzle over trash can and shake free debris. The battery and charger have no user serviceable parts. BATTERY FUEL GAUGE, DISPOSAL & SERVICE Battery Fuel Gauge: Battery Capacity...


