User Guide
Page 1
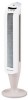
... Any Solid-State Speed Control Device. Other use , when moving fan parts. 12. The use . 3. Do not operate the fan with moving the fan from the wall outlet. Owner's Manual TOWER FAN EFY-041 Series, EFY-045 Series EFY-047 Series, HY-041 Series HY-047 Series, HY-048 Series IMPORTANT SAFETY INSTRUCTIONS READ AND SAVE THESE SAFETY...
... Any Solid-State Speed Control Device. Other use , when moving fan parts. 12. The use . 3. Do not operate the fan with moving the fan from the wall outlet. Owner's Manual TOWER FAN EFY-041 Series, EFY-045 Series EFY-047 Series, HY-041 Series HY-047 Series, HY-048 Series IMPORTANT SAFETY INSTRUCTIONS READ AND SAVE THESE SAFETY...
User Guide
Page 2
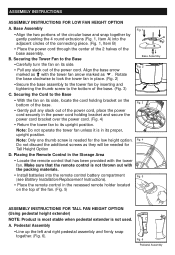
... the remote control that the remote control is not used. A. B. Fig. 6 Pedestal Assembly Make sure that has been provided with the tower fan arrow marked as . Securing the Cord to the bottom of the base assembly. Align the base arrow marked as they will be needed for... (Fig. 1, Item B) • Place the power cord through the center of the 2 halves of the base. (Fig. 3) C. Securing the Tower Fan to lock the tower fan in the recessed remote holder located on its proper, upright position. Rotate the base clockwise to the Base Fig. 1 A B Base Assembly •Carefully...
... the remote control that the remote control is not used. A. B. Fig. 6 Pedestal Assembly Make sure that has been provided with the tower fan arrow marked as . Securing the Cord to the bottom of the base assembly. Align the base arrow marked as they will be needed for... (Fig. 1, Item B) • Place the power cord through the center of the 2 halves of the base. (Fig. 3) C. Securing the Tower Fan to lock the tower fan in the recessed remote holder located on its proper, upright position. Rotate the base clockwise to the Base Fig. 1 A B Base Assembly •Carefully...
User Guide
Page 3
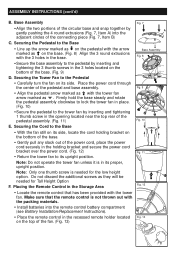
...holes located on the top of the pedestal assembly. (Fig. 11) Fig. 10 E. Fig. 11 Note: Do not operate the tower fan unless it is not thrown out with the packing materials. • Install batteries into the adjacent circles of the pedestal and base assembly...8226; Secure the pedestal to the Base A B • Line up the arrow marked as on the pedestal with the tower fan. ASSEMBLY INSTRUCTIONS (cont'd) B. Securing the Pedestal to the tower fan by gently pushing the 4 round extrusions (Fig. 7, Item A) into the remote control battery compartment (see Battery Installation/...
...holes located on the top of the pedestal assembly. (Fig. 11) Fig. 10 E. Fig. 11 Note: Do not operate the tower fan unless it is not thrown out with the packing materials. • Install batteries into the adjacent circles of the pedestal and base assembly...8226; Secure the pedestal to the Base A B • Line up the arrow marked as on the pedestal with the tower fan. ASSEMBLY INSTRUCTIONS (cont'd) B. Securing the Pedestal to the tower fan by gently pushing the 4 round extrusions (Fig. 7, Item A) into the remote control battery compartment (see Battery Installation/...


