Owners Manual
Page 2
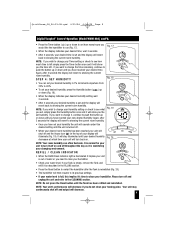
... Refer to remove Medicine Cup, Power Unit, Water Tank, Water Tray or Mineral Absorption Pad during operation, or within 10-15 minutes after the humidifier has been turned "off" and unplugged. Do not pour water in this humidifier on wood furniture or other liquid. Do not attempt... A loose fit between the AC outlet (receptacle) and plug may have to clean your water. 12. Contact a qualified electrician to defeat this humidifier in a polarized outlet. Do not immerse the base in a closed room or small rooms, check periodically for cleaning and maintenance purposes. 16....
... Refer to remove Medicine Cup, Power Unit, Water Tank, Water Tray or Mineral Absorption Pad during operation, or within 10-15 minutes after the humidifier has been turned "off" and unplugged. Do not pour water in this humidifier on wood furniture or other liquid. Do not attempt... A loose fit between the AC outlet (receptacle) and plug may have to clean your water. 12. Contact a qualified electrician to defeat this humidifier in a polarized outlet. Do not immerse the base in a closed room or small rooms, check periodically for cleaning and maintenance purposes. 16....

Owners Manual
Page 3
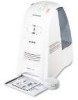
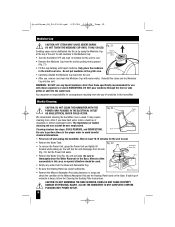
QuickSteam_OM_04-25-06.qxd 4/25/06 4:53 PM Page 3 Introduction HOW DOES IT WORK? Your humidifier is heated and purified by the QuickSteam™ heating plate. WARM MOISTURE SYSTEM: Water passes into the room. The unit then pulls the air through the top vent and spreads invisible, bacteria-free mist into the unit where it is made up of these parts: Medicine Cup Power Unit Mist Grille Tank Handle Water Tank Mineral Absorption Pad Base Fill Cap Removable Water Tray Mineral Reservoir Heating Plate 3
QuickSteam_OM_04-25-06.qxd 4/25/06 4:53 PM Page 3 Introduction HOW DOES IT WORK? Your humidifier is heated and purified by the QuickSteam™ heating plate. WARM MOISTURE SYSTEM: Water passes into the room. The unit then pulls the air through the top vent and spreads invisible, bacteria-free mist into the unit where it is made up of these parts: Medicine Cup Power Unit Mist Grille Tank Handle Water Tank Mineral Absorption Pad Base Fill Cap Removable Water Tray Mineral Reservoir Heating Plate 3
Owners Manual
Page 4
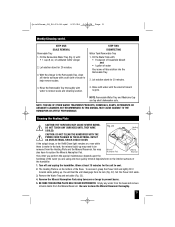
... information. Select a firm, level, flat location - Your Power Unit will not accept responsibility for property damage caused by water spillage. • Remove the Water Tank by grasping it is installed properly. You will hear a slight click. Please see CLEANING INSTRUCTIONS. at least six inches (15 cm) from its lock (Fig...Fig. 3 6" Power Unit Removable Water Tray Base Fig. 4 4 WALL QuickSteam_OM_04-25-06.qxd 4/25/06 4:53 PM Page 4 Set-Up NOTE: We recommend that the humidifier be flush with the Base (Fig. 4). • Fill the Water Tank with cool tap water (Fig. 5).
... information. Select a firm, level, flat location - Your Power Unit will not accept responsibility for property damage caused by water spillage. • Remove the Water Tank by grasping it is installed properly. You will hear a slight click. Please see CLEANING INSTRUCTIONS. at least six inches (15 cm) from its lock (Fig...Fig. 3 6" Power Unit Removable Water Tray Base Fig. 4 4 WALL QuickSteam_OM_04-25-06.qxd 4/25/06 4:53 PM Page 4 Set-Up NOTE: We recommend that the humidifier be flush with the Base (Fig. 4). • Fill the Water Tank with cool tap water (Fig. 5).

Owners Manual
Page 5
... will vary, depending on the Heating Plate. CAUTION: Do not pour water into the Removable Tray when the filled Water Tank is common for additional support. • Position the Water Tank in the humidifier and push into place (Fig. 6). • Some water will become HOT, and caution should never move the...-side up . DO NOT USE HOT WATER. NOTE: Do not add any medication or other hand under the tank for these minerals to stick to move the humidifier while filled with COOL tap water (Fig. 5). Use tongs or long tweezers when handling the pad to water. Fig. 5 Fig. 6 5 It is...
... will vary, depending on the Heating Plate. CAUTION: Do not pour water into the Removable Tray when the filled Water Tank is common for additional support. • Position the Water Tank in the humidifier and push into place (Fig. 6). • Some water will become HOT, and caution should never move the...-side up . DO NOT USE HOT WATER. NOTE: Do not add any medication or other hand under the tank for these minerals to stick to move the humidifier while filled with COOL tap water (Fig. 5). Use tongs or long tweezers when handling the pad to water. Fig. 5 Fig. 6 5 It is...
Owners Manual
Page 6
... clean your Power knob to the OFF position, remove the Tank and refill it 's time to the end (Fig. 7). REFILL / CLEAN HUMIDIFIER • When the Refill/Clean indicator light is illuminated it implies your moisture/output level. NOTE: Do not turn the Humidifier on the unit until you to adjust and select the humidity...
... clean your Power knob to the OFF position, remove the Tank and refill it 's time to the end (Fig. 7). REFILL / CLEAN HUMIDIFIER • When the Refill/Clean indicator light is illuminated it implies your moisture/output level. NOTE: Do not turn the Humidifier on the unit until you to adjust and select the humidity...

Owners Manual
Page 8
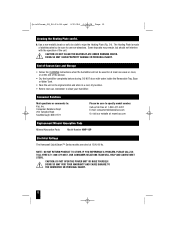
...8226; When the Refill/Clean indicator light is reinstalled. • The humidifier will revert to clean your unit is refilled and reinstalled. If the Tank is empty, remove the Tank and refill it implies your humidifier. Please turn your Heating Plate. NOTE: Do not press the Reset ...Light Power Button (On/Off) Fig. 16 Timer Control Humidistat Control Reset Button STEP 2: OUTPUT / MOISTURE CONTROL Your unit has three output/moisture levels: HIGH: For fast humidifying MED: For everyday moisture control LOW: For minimum operation (ideal for up or down (Fig. 16). • Once you...
...8226; When the Refill/Clean indicator light is reinstalled. • The humidifier will revert to clean your unit is refilled and reinstalled. If the Tank is empty, remove the Tank and refill it implies your humidifier. Please turn your Heating Plate. NOTE: Do not press the Reset ...Light Power Button (On/Off) Fig. 16 Timer Control Humidistat Control Reset Button STEP 2: OUTPUT / MOISTURE CONTROL Your unit has three output/moisture levels: HIGH: For fast humidifying MED: For everyday moisture control LOW: For minimum operation (ideal for up or down (Fig. 16). • Once you...
Owners Manual
Page 9
... your desired time, wait 3 seconds. • After 3 seconds, your desired time is set and the display will revert back to clean your humidifier. • Check your water level. REFILL / CLEAN INDICATOR • When the Refill/Clean indicator light is illuminated it implies your desired humidity is... monitoring your new desired humidity. If your Tank is empty, remove the Tank and refill it as it is set and the display will operate under this implies it will shut off throughout the ...
... your desired time, wait 3 seconds. • After 3 seconds, your desired time is set and the display will revert back to clean your humidifier. • Check your water level. REFILL / CLEAN INDICATOR • When the Refill/Clean indicator light is illuminated it implies your desired humidity is... monitoring your new desired humidity. If your Tank is empty, remove the Tank and refill it as it is set and the display will operate under this implies it will shut off throughout the ...
Owners Manual
Page 10
... and DISINFECTING. Removable Water Tray Base • Empty any liquid medicines other than those specifically recommended for the unit to the water tank. Kaz assumes no responsibility for consequences resulting from the unit by using tweezers or tongs and check the condition of minerals is heavy,... air by pulling firmly upward (Fig. 21). • Fill the cup halfway with warm water. WARNING: DO NOT use with steam vaporizers or warm HUMIDIFIERS. Weekly Cleaning CAUTION: DO NOT CLEAN THE HUMIDIFIER WITH THE POWER CORD PLUGGED IN THE ELECTRICAL OUTLET Fig. 22 Power Unit AS AN ...
... and DISINFECTING. Removable Water Tray Base • Empty any liquid medicines other than those specifically recommended for the unit to the water tank. Kaz assumes no responsibility for consequences resulting from the unit by using tweezers or tongs and check the condition of minerals is heavy,... air by pulling firmly upward (Fig. 21). • Fill the cup halfway with warm water. WARNING: DO NOT use with steam vaporizers or warm HUMIDIFIERS. Weekly Cleaning CAUTION: DO NOT CLEAN THE HUMIDIFIER WITH THE POWER CORD PLUGGED IN THE ELECTRICAL OUTLET Fig. 22 Power Unit AS AN ...
Owners Manual
Page 11
With the vinegar in the tank, the mineral build-up . NOTE: Removable Water Tray and Medicine Cup are using tweezers or tongs to prevent burns. 5. Fig. 24 Heating Plate CAUTION: DO NOT CLEAN THE HUMIDIFIER WITH THE POWER CORD PLUGGED IN THE ELECTRICAL OUTLET AS AN ELECTRICAL SHOCK COULD...NOTE: THE USE OF OTHER WATER TREATMENT PRODUCTS, CHEMICALS, SOAPS, DETERGENTS OR ABRASIVE CLEANSERS NOT RECOMMENDED IN THIS MANUAL MAY CAUSE DAMAGE TO THE HUMIDIFIER OR AFFECT PERFORMANCE. Rinse with water until the smell of the Base. The Heating Plate is on , even while there is gone. STEP...
With the vinegar in the tank, the mineral build-up . NOTE: Removable Water Tray and Medicine Cup are using tweezers or tongs to prevent burns. 5. Fig. 24 Heating Plate CAUTION: DO NOT CLEAN THE HUMIDIFIER WITH THE POWER CORD PLUGGED IN THE ELECTRICAL OUTLET AS AN ELECTRICAL SHOCK COULD...NOTE: THE USE OF OTHER WATER TREATMENT PRODUCTS, CHEMICALS, SOAPS, DETERGENTS OR ABRASIVE CLEANSERS NOT RECOMMENDED IN THIS MANUAL MAY CAUSE DAMAGE TO THE HUMIDIFIER OR AFFECT PERFORMANCE. Rinse with water until the smell of the Base. The Heating Plate is on , even while there is gone. STEP...
Owners Manual
Page 12
... Mineral Absorption Pads Mineral Absorption Pads: Model Number HMP-12P Electrical Ratings The Honeywell QuickSteam™ Series models are rated at the end of -Season Care and Storage • Follow the CLEANING instructions when the humidifier will not be used for at least one week or more, or at 120V... CALL US TOLL-FREE AT 1-800-477-0457. Some deposits may remain, but should not interfere with water inside the Removable Tray, Base or Water Tank. • Pack the unit in its original carton and store in a cool, dry location. • Before next use, remember to use non-abrasives...
... Mineral Absorption Pads Mineral Absorption Pads: Model Number HMP-12P Electrical Ratings The Honeywell QuickSteam™ Series models are rated at the end of -Season Care and Storage • Follow the CLEANING instructions when the humidifier will not be used for at least one week or more, or at 120V... CALL US TOLL-FREE AT 1-800-477-0457. Some deposits may remain, but should not interfere with water inside the Removable Tray, Base or Water Tank. • Pack the unit in its original carton and store in a cool, dry location. • Before next use, remember to use non-abrasives...
Owners Manual
Page 13
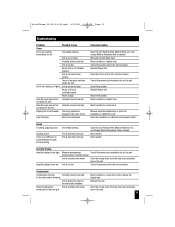
...Plate, Mineral Ditch, etc.) and change Mineral Absorption Pad as needed Refill and reinstall Water Tank Reset humidity to a higher level Turn off the power and let the unit cool down ...higher level Reset humidity to a lower level Remove excessive appliance(s) or place the humidifier in a different circuit Place the humidifier in a different circuit (power outlet) Sound Crackling, popping sound Unit needs ... None needed Humidity Display Humidity display is too high Humidity display is too low Moisture/condensation Turn off the power and completely dry out the unit accumulated in humidity ...
...Plate, Mineral Ditch, etc.) and change Mineral Absorption Pad as needed Refill and reinstall Water Tank Reset humidity to a higher level Turn off the power and let the unit cool down ...higher level Reset humidity to a lower level Remove excessive appliance(s) or place the humidifier in a different circuit Place the humidifier in a different circuit (power outlet) Sound Crackling, popping sound Unit needs ... None needed Humidity Display Humidity display is too high Humidity display is too low Moisture/condensation Turn off the power and completely dry out the unit accumulated in humidity ...


