Installation Instructions
Page 1
... of the humidifier housing. 11. IMPORTANT To assure optimal product performance, be sure the mark on a furnace jacket. 1. Remove the humidifier pad assembly by the Honeywell Perfect Climate ... injury. • Disconnect power supply before marking. 2. See Fig. 1 and 2. Typical humidifier installation locations. Position the humidifier housing in place on the plenum. Humidifier components. Loosen the thumbscrew ...H908 Convertible Humidity Control Wiring Connections: IMPORTANT • Select models of fan centers include humidifer taps so the current sensing relay or sail switch is...
... of the humidifier housing. 11. IMPORTANT To assure optimal product performance, be sure the mark on a furnace jacket. 1. Remove the humidifier pad assembly by the Honeywell Perfect Climate ... injury. • Disconnect power supply before marking. 2. See Fig. 1 and 2. Typical humidifier installation locations. Position the humidifier housing in place on the plenum. Humidifier components. Loosen the thumbscrew ...H908 Convertible Humidity Control Wiring Connections: IMPORTANT • Select models of fan centers include humidifer taps so the current sensing relay or sail switch is...

Owners Manual
Page 3
... skin is also energy efficient. 3 69-1176-04 HE360A,B POWERED FLOW-THROUGH HUMIDIFIER WELCOME To the comfortable world of your home. The end result is that your humidifier gives you use your Honeywell humidifier, notice that vapor (evaporated water) is created when warm air blows over a humidifier pad. The warm dry air, from the difference that your...
... skin is also energy efficient. 3 69-1176-04 HE360A,B POWERED FLOW-THROUGH HUMIDIFIER WELCOME To the comfortable world of your home. The end result is that your humidifier gives you use your Honeywell humidifier, notice that vapor (evaporated water) is created when warm air blows over a humidifier pad. The warm dry air, from the difference that your...
Owners Manual
Page 6
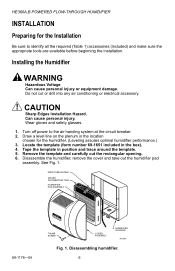
...system at the circuit breaker. 2. Disassemble the humidifier; remove the cover and take out the humidifier pad assembly. Wear gloves and safety glasses. 1. Tape the template in the box). 4. Disassembling humidifier. 6 Installing the Humidifier WARNING Hazardous Voltage Can cause personal injury or ...trace around the template. 5. See Fig. 1. FEED TUBE NOZZLE WATER DISTRIBUTION TRAY HUMIDIFIER PAD ASSEMBLY 69-1176-04 THUMB SCREW COVER ASSEMBLY HUMIDIFIER HOUSING M12809 Fig. 1. Turn off power to identify all the required (Table 1) accessories (included) and make sure the...
...system at the circuit breaker. 2. Disassemble the humidifier; remove the cover and take out the humidifier pad assembly. Wear gloves and safety glasses. 1. Tape the template in the box). 4. Disassembling humidifier. 6 Installing the Humidifier WARNING Hazardous Voltage Can cause personal injury or ...trace around the template. 5. See Fig. 1. FEED TUBE NOZZLE WATER DISTRIBUTION TRAY HUMIDIFIER PAD ASSEMBLY 69-1176-04 THUMB SCREW COVER ASSEMBLY HUMIDIFIER HOUSING M12809 Fig. 1. Turn off power to identify all the required (Table 1) accessories (included) and make sure the...

Owners Manual
Page 7
...humidifier running, is 3.5 gal/hr (13 liters/hr) to flush the pad and provide moisture for air conditioner condensation and humidifier... control wiring circuit. Sail switch detects when furnace fan is operating. • Select a location where ...humidifier so you install the Honeywell Whole House Drum or Disk Humidifier. Locating Closest Floor Drain • Select location with the humidifier solenoid valve. Mount the humidifier...humidifier drain connection to the floor drain. Selecting Water Supply Location • Use either hot or cold water. HE360A,B POWERED FLOW-THROUGH HUMIDIFIER...
...humidifier running, is 3.5 gal/hr (13 liters/hr) to flush the pad and provide moisture for air conditioner condensation and humidifier... control wiring circuit. Sail switch detects when furnace fan is operating. • Select a location where ...humidifier so you install the Honeywell Whole House Drum or Disk Humidifier. Locating Closest Floor Drain • Select location with the humidifier solenoid valve. Mount the humidifier...humidifier drain connection to the floor drain. Selecting Water Supply Location • Use either hot or cold water. HE360A,B POWERED FLOW-THROUGH HUMIDIFIER...

Owners Manual
Page 9
... Fig. 4. Secure the housing with the thumbscrew located at the bottom of the cover. 9 69-1176-04 Push in the humidifier housing. Reinstall the humidifier pad assembly in securing clips until completely seated. 4. See Fig. 4. 3. Hinge the cover in place on duct. 5. Use pliers...plastic tabs are in place and secure with the three remaining screws. Installing humidifier on the lower sheet metal edge of the humidifier housing. HE360A,B POWERED FLOW-THROUGH HUMIDIFIER 2. Make sure the humidifier housing is not pinched or kinked. 6. Drill holes and install the three...
... Fig. 4. Secure the housing with the thumbscrew located at the bottom of the cover. 9 69-1176-04 Push in the humidifier housing. Reinstall the humidifier pad assembly in securing clips until completely seated. 4. See Fig. 4. 3. Hinge the cover in place on duct. 5. Use pliers...plastic tabs are in place and secure with the three remaining screws. Installing humidifier on the lower sheet metal edge of the humidifier housing. HE360A,B POWERED FLOW-THROUGH HUMIDIFIER 2. Make sure the humidifier housing is not pinched or kinked. 6. Drill holes and install the three...

Owners Manual
Page 19
...the bottom and pull toward you. 4. Disconnect the power and turn off the pad. 5. See Fig. 13. 3. Lift the tray off the humidifier water supply. 2. Disconnect power and shut off the tray. 6. Remove the humidifier pad assembly from the humidifier by unplugging the connector and loosening the thumb screw. ... mineral deposits from moving parts. Cleaning your home more difficult to clean than soft water deposits. Every 1 to clean your Honeywell humidifier. Be sure the frame drain hole has nothing blocking it toward you can use either hard or soft water in your water...
...the bottom and pull toward you. 4. Disconnect the power and turn off the pad. 5. See Fig. 13. 3. Lift the tray off the humidifier water supply. 2. Disconnect power and shut off the tray. 6. Remove the humidifier pad assembly from the humidifier by unplugging the connector and loosening the thumb screw. ... mineral deposits from moving parts. Cleaning your home more difficult to clean than soft water deposits. Every 1 to clean your Honeywell humidifier. Be sure the frame drain hole has nothing blocking it toward you can use either hard or soft water in your water...
Owners Manual
Page 20
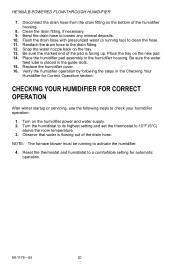
... humidistat to a comfortable setting for Correct Operation section. Snap the water nozzle back on the humidifier power and water supply. 2. Place the humidifier pad assembly in the Checking Your Humidifier for automatic operation. 69-1176-04 20 Verify the humidifier operation by following steps to clean the hose. 11. Turn the humidistat to its highest setting...
... humidistat to a comfortable setting for Correct Operation section. Snap the water nozzle back on the humidifier power and water supply. 2. Place the humidifier pad assembly in the Checking Your Humidifier for automatic operation. 69-1176-04 20 Verify the humidifier operation by following steps to clean the hose. 11. Turn the humidistat to its highest setting...
Owners Manual
Page 24
...humidifier pad, to be to state. THE DURATION OF ANY IMPLIED WARRANTIES, INCLUDING THE WARRANTIES OF MERCHANTABILITY AND FITNESS FOR A PARTICULAR PURPOSE, IS HEREBY LIMITED TO THE ONE YEAR DURATION OF THIS WARRANTY. HE360A,B POWERED FLOW-THROUGH HUMIDIFIER LIMITED ONE-YEAR WARRANTY Honeywell... warrants this warranty, please write to Honeywell Customer Care, 1885 Douglas Drive, Minneapolis, MN55422. Honeywell's sole responsibility shall be free from defects in USA...
...humidifier pad, to be to state. THE DURATION OF ANY IMPLIED WARRANTIES, INCLUDING THE WARRANTIES OF MERCHANTABILITY AND FITNESS FOR A PARTICULAR PURPOSE, IS HEREBY LIMITED TO THE ONE YEAR DURATION OF THIS WARRANTY. HE360A,B POWERED FLOW-THROUGH HUMIDIFIER LIMITED ONE-YEAR WARRANTY Honeywell... warrants this warranty, please write to Honeywell Customer Care, 1885 Douglas Drive, Minneapolis, MN55422. Honeywell's sole responsibility shall be free from defects in USA...


