
Owner's Manual
Page 1
... This kit contains your new Honeywell HE360 Humidifier, H8908 Humidistat and all the required (Table 1) accessories (included) and make sure the appropriate tools are available before beginning the installation. Can cause property or equipment damage. Registered Trademark Copyright © 2002 Honeywell • •All Rights...) 1/4 in. (6.35 mm) OD feed water tubing 1/2 in reducing the zapping you create when you use your Honeywell humidifier, notice that humidified air makes. Be sure supply plenum static pressure is no greater than 124 psi. • Select a location for the...
... This kit contains your new Honeywell HE360 Humidifier, H8908 Humidistat and all the required (Table 1) accessories (included) and make sure the appropriate tools are available before beginning the installation. Can cause property or equipment damage. Registered Trademark Copyright © 2002 Honeywell • •All Rights...) 1/4 in. (6.35 mm) OD feed water tubing 1/2 in reducing the zapping you create when you use your Honeywell humidifier, notice that humidified air makes. Be sure supply plenum static pressure is no greater than 124 psi. • Select a location for the...
Owner's Manual
Page 2
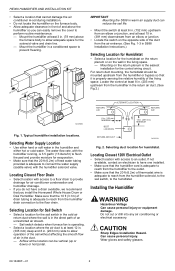
... so that the 10 ft (3.1m) of the duct from the air entrance. (See Fig. 1-3 in . (78 mm) above the humidifier so you install the Honeywell Whole House Drum or Disk Humidifier. Locate the control at least 3 in S688 Installation Instructions.) Selecting Location for Humidistat • Select a location for the control wiring circuit...
... so that the 10 ft (3.1m) of the duct from the air entrance. (See Fig. 1-3 in . (78 mm) above the humidifier so you install the Honeywell Whole House Drum or Disk Humidifier. Locate the control at least 3 in S688 Installation Instructions.) Selecting Location for Humidistat • Select a location for the control wiring circuit...
Owner's Manual
Page 3
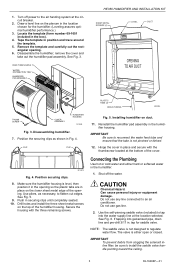
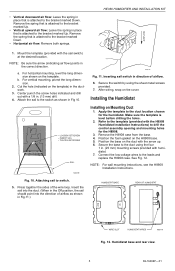
... assembly. Position the securing clips as necessary, to install the saddle valve handle pointing toward the ceiling. 3 69-1646EF-01 Make sure the humidifier housing is either hard or softened water in place on the top of the cover. See Fig. 5. 9. Connecting the Plumbing Use hot or ... place and secure with the three remaining screws. The valve is level, then position it in the opening so the plastic tabs are in the humidifier. 1. 1. Tape the template in the location chosen for saddle valve. PLASTIC TABS (2) DRAIN TUBING M20204 Fig. 5. Hinge the cover in . Use the self-...
... assembly. Position the securing clips as necessary, to install the saddle valve handle pointing toward the ceiling. 3 69-1646EF-01 Make sure the humidifier housing is either hard or softened water in place on the top of the cover. See Fig. 5. 9. Connecting the Plumbing Use hot or ... place and secure with the three remaining screws. The valve is level, then position it in the opening so the plastic tabs are in the humidifier. 1. 1. Tape the template in the location chosen for saddle valve. PLASTIC TABS (2) DRAIN TUBING M20204 Fig. 5. Hinge the cover in . Use the self-...
Owner's Manual
Page 4
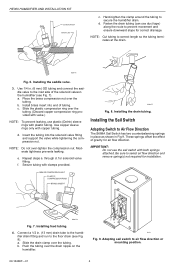
... 3. Moderate tightness prevents leaking. for air flow direction. Installing the drain tubing. Connect a 1/2 in. (13 mm) drain tube to the humidifier drain fitting and run to the floor drain (see Fig. 7). d. NOTE: Cut tubing to air flow direction or mounting position. 69-1646EF-01...Insert the tubing into end of tubing. through d. Secure tubing with copper tubing. These springs offset the effect of the solenoid valveon the humidifier (see Fig. 8). Installing feed tubing. 4. Push the tubing over the tubing. Install brass insert into the solenoid valve fitting and ...
... 3. Moderate tightness prevents leaking. for air flow direction. Installing the drain tubing. Connect a 1/2 in. (13 mm) drain tube to the humidifier drain fitting and run to the floor drain (see Fig. 7). d. NOTE: Cut tubing to air flow direction or mounting position. 69-1646EF-01...Insert the tubing into end of tubing. through d. Secure tubing with copper tubing. These springs offset the effect of the solenoid valveon the humidifier (see Fig. 8). Installing feed tubing. 4. Push the tubing over the tubing. Install brass insert into the solenoid valve fitting and ...
Owner's Manual
Page 5
... as shown in the correct direction. After wiring, snap on the template) in the ductwork. 3. Remove the H8908 case from the base. 4. Fig. 10. HE360 HUMIDIFIER AND INSTALLATION KIT AIRFLOW 1. NOTE: Be sure the arrow (indicating air flow) points in Fig 10. - a. For vertical mounting, plumb the long dimension. 2. TIGHTEN SETSCREW...
... as shown in the correct direction. After wiring, snap on the template) in the ductwork. 3. Remove the H8908 case from the base. 4. Fig. 10. HE360 HUMIDIFIER AND INSTALLATION KIT AIRFLOW 1. NOTE: Be sure the arrow (indicating air flow) points in Fig 10. - a. For vertical mounting, plumb the long dimension. 2. TIGHTEN SETSCREW...
Owner's Manual
Page 6
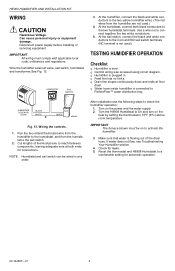
.... q Feed line has no kinks. Wiring the controls. 1. Run the two-strand thermostat wire from the humidifier to the sail switch. 2. If water does not flow, see Troubleshooting Your Humidifier section. 4. HUMIDISTAT Humidity Control Régulateur d'humidité OUTDOOR TEMPERATURE -20 ¡F -30 ¡C...between components, leaving adequate wire at floor drain. Make sure that water is flowing out of thermostat wire to activate the humidifier. 3. q Drain line slopes continuously down and ends at both black conductors to connect together the two white conductors. ...
.... q Feed line has no kinks. Wiring the controls. 1. Run the two-strand thermostat wire from the humidifier to the sail switch. 2. If water does not flow, see Troubleshooting Your Humidifier section. 4. HUMIDISTAT Humidity Control Régulateur d'humidité OUTDOOR TEMPERATURE -20 ¡F -30 ¡C...between components, leaving adequate wire at floor drain. Make sure that water is flowing out of thermostat wire to activate the humidifier. 3. q Drain line slopes continuously down and ends at both black conductors to connect together the two white conductors. ...
Owner's Manual
Page 7
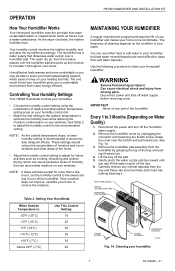
.... If the condition does not improve, ventilate your home to lower your thermostat heating setpoint, which can use either hard or soft water in your Honeywell humidifier. The frequency of cleaning depends on the condition of relative humidity/outdoor temperature setting scale on your humidity control dial. • Match the dial setting...
.... If the condition does not improve, ventilate your home to lower your thermostat heating setpoint, which can use either hard or soft water in your Honeywell humidifier. The frequency of cleaning depends on the condition of relative humidity/outdoor temperature setting scale on your humidity control dial. • Match the dial setting...

Owner's Manual
Page 8
...10°F (6°C) above the room temperature. 3. NOTE: The furnace blower must be running to loosen any mineral depos- CHECKING YOUR HUMIDIFIER FOR CORRECT OPERATION After winter startup or servicing, use the following the steps in the guide slots. 15. Turn the humidistat to a ... setting for Correct Operation section. Be sure the water feed tube is placed in the Checking Your Humidifier for automatic operation. 69-1646EF-01 8 Observe that water is facing up. HE360 HUMIDIFIER AND INSTALLATION KIT 7. Turn on the tray. 13. Reset the thermostat and humidistat to its ...
...10°F (6°C) above the room temperature. 3. NOTE: The furnace blower must be running to loosen any mineral depos- CHECKING YOUR HUMIDIFIER FOR CORRECT OPERATION After winter startup or servicing, use the following the steps in the guide slots. 15. Turn the humidistat to a ... setting for Correct Operation section. Be sure the water feed tube is placed in the Checking Your Humidifier for automatic operation. 69-1646EF-01 8 Observe that water is facing up. HE360 HUMIDIFIER AND INSTALLATION KIT 7. Turn on the tray. 13. Reset the thermostat and humidistat to its ...
Owner's Manual
Page 9
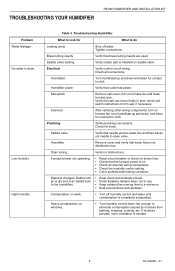
... etc. Saddle valve leaking. Verify that brass tubing inserts are used. TROUBLESHOOTING YOUR HUMIDIFIER HE360 HUMIDIFIER AND INSTALLATION KIT Problem Water leakage No water to do Leaking joints. Troubleshooting Humidifier. Humidifier power Verify that water flows into distribution tray. turn humidistat up and down low ... fuse. • Check that needle pierces water line and then backs out needle to click. Tighten connections. Humidifier Remove cover and verify that outlet has power. Condensation on . • Check all connections. Verify rubber pad is an...
... etc. Saddle valve leaking. Verify that brass tubing inserts are used. TROUBLESHOOTING YOUR HUMIDIFIER HE360 HUMIDIFIER AND INSTALLATION KIT Problem Water leakage No water to do Leaking joints. Troubleshooting Humidifier. Humidifier power Verify that water flows into distribution tray. turn humidistat up and down low ... fuse. • Check that needle pierces water line and then backs out needle to click. Tighten connections. Humidifier Remove cover and verify that outlet has power. Condensation on . • Check all connections. Verify rubber pad is an...
Owner's Manual
Page 10
... INSTALLATION KIT LIMITED ONE-YEAR WARRANTY Honeywell warrants this product, excluding humidifier pad, to be to repair or replace the product within a reasonable period of a consumer. HONEYWELL SHALL NOT BE LIABLE FOR ANY LOSS OR DAMAGE OF ANY KIND, INCLUDING ANY INCIDENTAL OR CONSEQUENTIAL DAMAGES RESULTING...proof of purchase by damage which vary from the date of purchase, to state. In Canada, write Retail Products ON15-02H, Honeywell Limited/Honeywell Limitée, 35 Dynamic Drive, Scarborough, Ontario M1V 4Z9. 69-1646EF-01 10 THE DURATION OF ANY IMPLIED WARRANTIES, INCLUDING ...
... INSTALLATION KIT LIMITED ONE-YEAR WARRANTY Honeywell warrants this product, excluding humidifier pad, to be to repair or replace the product within a reasonable period of a consumer. HONEYWELL SHALL NOT BE LIABLE FOR ANY LOSS OR DAMAGE OF ANY KIND, INCLUDING ANY INCIDENTAL OR CONSEQUENTIAL DAMAGES RESULTING...proof of purchase by damage which vary from the date of purchase, to state. In Canada, write Retail Products ON15-02H, Honeywell Limited/Honeywell Limitée, 35 Dynamic Drive, Scarborough, Ontario M1V 4Z9. 69-1646EF-01 10 THE DURATION OF ANY IMPLIED WARRANTIES, INCLUDING ...

Owner's Manual
Page 11
HE360 HUMIDIFIER AND INSTALLATION KIT 11 69-1646EF-01
HE360 HUMIDIFIER AND INSTALLATION KIT 11 69-1646EF-01

Owner's Manual
Page 12
HE360 HUMIDIFIER AND INSTALLATION KIT Automation and Control Solutions Honeywell Honeywell Limited-Honeywell Limitée 1985 Douglas Drive North 35 Dynamic Drive Golden Valley, MN 55422 Scarborough, Ontario M1V 4Z9 69-1646EF-01 E.K. 06-09 Printed in U.S.A. on recycled paper containing at least 10% post-consumer paper fibers. www.honeywell.com/yourhome
HE360 HUMIDIFIER AND INSTALLATION KIT Automation and Control Solutions Honeywell Honeywell Limited-Honeywell Limitée 1985 Douglas Drive North 35 Dynamic Drive Golden Valley, MN 55422 Scarborough, Ontario M1V 4Z9 69-1646EF-01 E.K. 06-09 Printed in U.S.A. on recycled paper containing at least 10% post-consumer paper fibers. www.honeywell.com/yourhome


