
Owner's Manual
Page 1
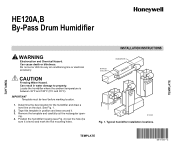
...CAUTION Freezing Water Hazard. Position the humidifier housing (see Fig. 2) over the hole (be level before marking location. 1. Typical humidifier installation locations. ing. 4. Do not cut the rectangular open- Locate the humidifier where the ambient temperature is level) ...and mark the five mounting holes. Tape this template in water damage to property. TEMPLATE 69-1104-3 Can cause death or blindness. HE120A,B By-Pass Drum Humidifier...
...CAUTION Freezing Water Hazard. Position the humidifier housing (see Fig. 2) over the hole (be level before marking location. 1. Typical humidifier installation locations. ing. 4. Do not cut the rectangular open- Locate the humidifier where the ambient temperature is level) ...and mark the five mounting holes. Tape this template in water damage to property. TEMPLATE 69-1104-3 Can cause death or blindness. HE120A,B By-Pass Drum Humidifier...
Owner's Manual
Page 2
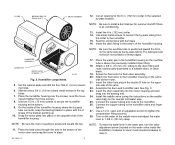
... 3/4 in. (19 mm) sheet metal screws in . (10 mm) I.D. Screw the float onto the float valve assembly. 20. Assemble the drum and humidifier pad. Install the saddle valve (using the instructions on the saddle valve bag) on the oppo- Connect the copper tubing to tighten the compression fitting...five 7/64 in . Snap the motor plate into the bearing end. 24. Place the lead wires through the hole in place. On the inside the humidifier) clockwise to lower it . 69-1104-3 2 See Fig. 3. 23. COVER BEARING END OF DRUM SHAFT DRUM ASSEMBLY 12. Seal the connections with the...
... 3/4 in. (19 mm) sheet metal screws in . (10 mm) I.D. Screw the float onto the float valve assembly. 20. Assemble the drum and humidifier pad. Install the saddle valve (using the instructions on the saddle valve bag) on the oppo- Connect the copper tubing to tighten the compression fitting...five 7/64 in . Snap the motor plate into the bearing end. 24. Place the lead wires through the hole in place. On the inside the humidifier) clockwise to lower it . 69-1104-3 2 See Fig. 3. 23. COVER BEARING END OF DRUM SHAFT DRUM ASSEMBLY 12. Seal the connections with the...
Owner's Manual
Page 3
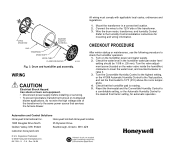
...the water valve inside the humidifier) clockwise to lower the water level, and counterclockwise to check the humidifier operation: 1. Check the water level in the humidifier water pan water level setting should be 1-3/8 in a convenient location. 2. Honeywell Limited-Honeywell Limitée 1985 Douglas ... Valley, MN 55422 Scarborough, Ontario M1V 4Z9 customer.honeywell.com ® U.S. Drum and humidifier pad assembly. Wire the drum motor, transformer, and humidity Control. Turn the valve adjustment screw (located on the humidifier power and water supply. 2. Check that services the...
...the water valve inside the humidifier) clockwise to lower the water level, and counterclockwise to check the humidifier operation: 1. Check the water level in the humidifier water pan water level setting should be 1-3/8 in a convenient location. 2. Honeywell Limited-Honeywell Limitée 1985 Douglas ... Valley, MN 55422 Scarborough, Ontario M1V 4Z9 customer.honeywell.com ® U.S. Drum and humidifier pad assembly. Wire the drum motor, transformer, and humidity Control. Turn the valve adjustment screw (located on the humidifier power and water supply. 2. Check that services the...


