
Owner's Manual
Page 1
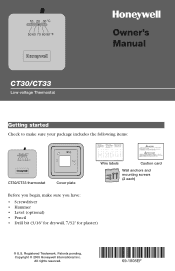
Registered Trademark. Patents pending. Copyright © 2005 Honeywell International Inc. All rights reserved. Owner's Manual CT30/CT33 Low-voltage Thermostat Getting started Check to make sure your package includes the following items: CT30/CT33 thermostat Cover plate Wire labels Caution card Wall anchors and mounting screws (2 each) Before you begin, make sure you have: • Screwdriver • Hammer • Level (optional) • Pencil • Drill bit (3/16" for drywall, 7/32" for plaster) ® U.S.
Registered Trademark. Patents pending. Copyright © 2005 Honeywell International Inc. All rights reserved. Owner's Manual CT30/CT33 Low-voltage Thermostat Getting started Check to make sure your package includes the following items: CT30/CT33 thermostat Cover plate Wire labels Caution card Wall anchors and mounting screws (2 each) Before you begin, make sure you have: • Screwdriver • Hammer • Level (optional) • Pencil • Drill bit (3/16" for drywall, 7/32" for plaster) ® U.S.
Owner's Manual
Page 2
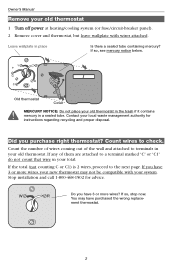
... the next page. Stop installation and call 1-800-468-1502 for instructions regarding recycling and proper disposal. Count the number of wires coming out of them are attached to terminals in your old thermostat in the trash if it contains mercury in a sealed tube. If so, stop... now. You may have 3 or more wires, your new thermostat may not be compatible with wires attached. If the total (not counting C or C1) is 2 wires, proceed to check. If you purchase right thermostat? Did you have 3 or more...
... the next page. Stop installation and call 1-800-468-1502 for instructions regarding recycling and proper disposal. Count the number of wires coming out of them are attached to terminals in your old thermostat in the trash if it contains mercury in a sealed tube. If so, stop... now. You may have 3 or more wires, your new thermostat may not be compatible with wires attached. If the total (not counting C or C1) is 2 wires, proceed to check. If you purchase right thermostat? Did you have 3 or more...
Owner's Manual
Page 3
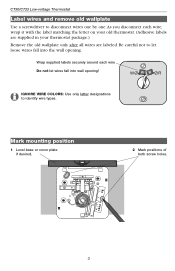
... positions of both screw holes. 3 IGNORE WIRE COLORS: Use only letter designations to disconnect wires one by one.As you disconnect each wire Do not let wires fall into wall opening . Be careful not to let loose wires fall into the wall opening ! CT30/CT33 Low-voltage Thermostat Label wires and remove old wallplate Use a screwdriver to...
... positions of both screw holes. 3 IGNORE WIRE COLORS: Use only letter designations to disconnect wires one by one.As you disconnect each wire Do not let wires fall into wall opening . Be careful not to let loose wires fall into the wall opening ! CT30/CT33 Low-voltage Thermostat Label wires and remove old wallplate Use a screwdriver to...
Owner's Manual
Page 4
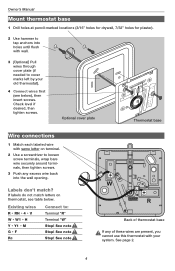
...terminal. 2 Use a screwdriver to loosen screw terminals, wrap bare wire securely around terminals, then tighten screws. 3 Push any of thermostat base If any excess wire back into holes until flush with your old thermostat). 4 Connect wires first (see table below ), then insert screws. See note ... 1 Drill holes at pencil-marked locations (3/16" holes for drywall, 7/32" holes for plaster). 2 Use hammer to tap anchors into the wall opening. Existing wires R • RH • 4 • V W • W1 • H Y • Y1 • M G•F Rc Connect to: Terminal "R" Terminal "W"...
...terminal. 2 Use a screwdriver to loosen screw terminals, wrap bare wire securely around terminals, then tighten screws. 3 Push any of thermostat base If any excess wire back into holes until flush with your old thermostat). 4 Connect wires first (see table below ), then insert screws. See note ... 1 Drill holes at pencil-marked locations (3/16" holes for drywall, 7/32" holes for plaster). 2 Use hammer to tap anchors into the wall opening. Existing wires R • RH • 4 • V W • W1 • H Y • Y1 • M G•F Rc Connect to: Terminal "R" Terminal "W"...


