
Owner's Manual
Page 1
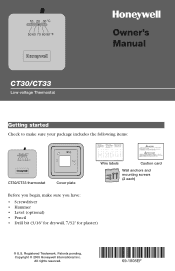
All rights reserved. Registered Trademark. Patents pending. Owner's Manual CT30/CT33 Low-voltage Thermostat Getting started Check to make sure your package includes the following items: CT30/CT33 thermostat Cover plate Wire labels Caution card Wall anchors and mounting screws (2 each) Before you begin, make sure you have: • Screwdriver • Hammer • Level (optional) • Pencil • Drill bit (3/16" for drywall, 7/32" for plaster) ® U.S. Copyright © 2005 Honeywell International Inc.
All rights reserved. Registered Trademark. Patents pending. Owner's Manual CT30/CT33 Low-voltage Thermostat Getting started Check to make sure your package includes the following items: CT30/CT33 thermostat Cover plate Wire labels Caution card Wall anchors and mounting screws (2 each) Before you begin, make sure you have: • Screwdriver • Hammer • Level (optional) • Pencil • Drill bit (3/16" for drywall, 7/32" for plaster) ® U.S. Copyright © 2005 Honeywell International Inc.
Owner's Manual
Page 2
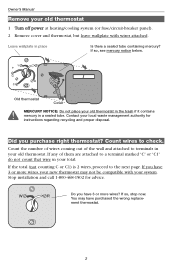
... out of them are attached to terminals in a sealed tube. If the total (not counting C or C1) is 2 wires, proceed to check. If so, stop now. Owner's Manual Remove your old thermostat. Stop installation and call 1-800-468-1502 for instructions regarding recycling and proper disposal. If any of the wall and...
... out of them are attached to terminals in a sealed tube. If the total (not counting C or C1) is 2 wires, proceed to check. If so, stop now. Owner's Manual Remove your old thermostat. Stop installation and call 1-800-468-1502 for instructions regarding recycling and proper disposal. If any of the wall and...
Owner's Manual
Page 3
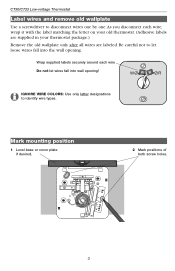
... label matching the letter on your old thermostat. (Adhesive labels are supplied in your thermostat package.) Remove the old wallplate only after all wires are labeled. Mark mounting position 1 Level base or cover plate if desired. 2 Mark positions of both screw holes. 3 CT30/CT33 Low-voltage Thermostat Label wires and remove old wallplate Use a screwdriver to...
... label matching the letter on your old thermostat. (Adhesive labels are supplied in your thermostat package.) Remove the old wallplate only after all wires are labeled. Mark mounting position 1 Level base or cover plate if desired. 2 Mark positions of both screw holes. 3 CT30/CT33 Low-voltage Thermostat Label wires and remove old wallplate Use a screwdriver to...
Owner's Manual
Page 4
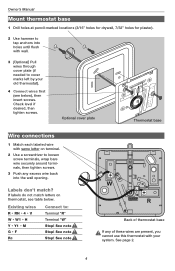
.... See note Stop! See note Stop! See note Back of thermostat base If any excess wire back into holes until flush with your old thermostat). 4 Connect wires first (see table below ), then insert screws. Check level if desired, then tighten screws. Existing wires R • RH • 4 • V W &#...terminal. 2 Use a screwdriver to loosen screw terminals, wrap bare wire securely around terminals, then tighten screws. 3 Push any of these wires are present, you cannot use this thermostat with wall. 3 [Optional] Pull wires through cover plate (if needed to : Terminal "R" Terminal "W" Stop...
.... See note Stop! See note Stop! See note Back of thermostat base If any excess wire back into holes until flush with your old thermostat). 4 Connect wires first (see table below ), then insert screws. Check level if desired, then tighten screws. Existing wires R • RH • 4 • V W &#...terminal. 2 Use a screwdriver to loosen screw terminals, wrap bare wire securely around terminals, then tighten screws. 3 Push any of these wires are present, you cannot use this thermostat with wall. 3 [Optional] Pull wires through cover plate (if needed to : Terminal "R" Terminal "W" Stop...


