
User Guide
Page 3
Table of Contents ABOUT THE 6270 5 Introduction to the 6270 5 The 6270 Interface 5 Navigating through the 6270 6 About Your Home Screen 6 6270 "Arming" Screen 8 SYSTEM OVERVIEW 10 Introduction to Your System 10 Burglary Protection 10 Partitions 10 Zones 10 Entry/Exit Delays 11 Alarms 11 Memory of ... OPERATION 29 Introduction to Fire Alarm System Operation 29 In Case of Fire Alarm 29 Silencing a Fire Alarm 29 Fire Display Lock 30 USER CODE SETUP 31 Introduction to User Code Setup 31 How to Access User...
Table of Contents ABOUT THE 6270 5 Introduction to the 6270 5 The 6270 Interface 5 Navigating through the 6270 6 About Your Home Screen 6 6270 "Arming" Screen 8 SYSTEM OVERVIEW 10 Introduction to Your System 10 Burglary Protection 10 Partitions 10 Zones 10 Entry/Exit Delays 11 Alarms 11 Memory of ... OPERATION 29 Introduction to Fire Alarm System Operation 29 In Case of Fire Alarm 29 Silencing a Fire Alarm 29 Fire Display Lock 30 USER CODE SETUP 31 Introduction to User Code Setup 31 How to Access User...
User Guide
Page 4
... Recording a Voice Message 42 Retrieving and Deleting a Voice Message 43 SUMMARY OF AUDIBLE NOTIFICATION 45 SUMMARY OF 6270 LED OPERATION 47 6270 LED Operation 47 6270 SETUP...48 How to Access 6270 Setup Options 48 How to Access Setup 48 How to Adjust the Touch Screen Contrast 50 How to Adjust the Volume 51 How to Select...
... Recording a Voice Message 42 Retrieving and Deleting a Voice Message 43 SUMMARY OF AUDIBLE NOTIFICATION 45 SUMMARY OF 6270 LED OPERATION 47 6270 LED Operation 47 6270 SETUP...48 How to Access 6270 Setup Options 48 How to Access Setup 48 How to Adjust the Touch Screen Contrast 50 How to Adjust the Volume 51 How to Select...

User Guide
Page 9
About the 6270 (Cont'd) ITEM MultiPartitions MORE CHOICES FUNCTION Check this button for more than one time (if the user is checked, all partitions within the system can be armed individually. When Multi-Partitions is so authorized). When the Arm Multi-Partitions circle does not contain a check mark, each partition must be armed at one partition. Press this circle when you want to arm more Security, Lighting, and 6270 setup features. 9
About the 6270 (Cont'd) ITEM MultiPartitions MORE CHOICES FUNCTION Check this button for more than one time (if the user is checked, all partitions within the system can be armed individually. When Multi-Partitions is so authorized). When the Arm Multi-Partitions circle does not contain a check mark, each partition must be armed at one partition. Press this circle when you want to arm more Security, Lighting, and 6270 setup features. 9

User Guide
Page 12
Extended Functionality Extended functions are programmed in order to gain access to your 6270 touch screen. System Overview (cont'd) User Codes Each user must be assigned a name with a corresponding 4-digit user code in a central user setup location that can be accessed through a standard alpha keypad or through emulation mode on your Control Panel User Guide for authorization level, partition assignment, and RF button assignment. Refer to various features and functions. Users for the system are advanced functions that provides the specific questions for these features. 12
Extended Functionality Extended functions are programmed in order to gain access to your 6270 touch screen. System Overview (cont'd) User Codes Each user must be assigned a name with a corresponding 4-digit user code in a central user setup location that can be accessed through a standard alpha keypad or through emulation mode on your Control Panel User Guide for authorization level, partition assignment, and RF button assignment. Refer to various features and functions. Users for the system are advanced functions that provides the specific questions for these features. 12

User Guide
Page 23
Press the DISARM ALL button if you must first highlight the partition(s) to be disarmed, then press the DISARM SELECTED button. The 6270 beeps once and the "Arming" screen is displayed showing the system as Ready to disarm the system. Note: If you wish to disarm only selected ... if any zone is faulted (open ). Note: Once the system is selected on the "Setup" screen. 23 This time is disarmed, the 6270 will return to Arm or not ready if any zone is faulted (open ). The 6270 beeps once and the "Arming" screen is displayed showing the system as Ready to the...
Press the DISARM ALL button if you must first highlight the partition(s) to be disarmed, then press the DISARM SELECTED button. The 6270 beeps once and the "Arming" screen is displayed showing the system as Ready to disarm the system. Note: If you wish to disarm only selected ... if any zone is faulted (open ). Note: Once the system is selected on the "Setup" screen. 23 This time is disarmed, the 6270 will return to Arm or not ready if any zone is faulted (open ). The 6270 beeps once and the "Arming" screen is displayed showing the system as Ready to the...
User Guide
Page 31
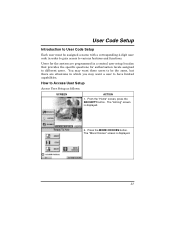
... levels assigned to different users. From the "Home" screen, press the SECURITY button. The "More Choices" screen is displayed. 2. User Code Setup Introduction to User Code Setup Each user must be the same, but there are programmed in order to gain access to various features and functions. The "Arming" screen... is displayed. 31 You may want these users to be assigned a name with a corresponding 4-digit user code in a central user setup location that provides the specific questions for the system are situations in which you may want a user to Access User...
... levels assigned to different users. From the "Home" screen, press the SECURITY button. The "More Choices" screen is displayed. 2. User Code Setup Introduction to User Code Setup Each user must be the same, but there are programmed in order to gain access to various features and functions. The "Arming" screen... is displayed. 31 You may want these users to be assigned a name with a corresponding 4-digit user code in a central user setup location that provides the specific questions for the system are situations in which you may want a user to Access User...

User Guide
Page 32
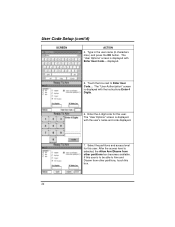
Press the USER SETUP button on the "More Choices" screen. The User Setup screen is displayed. 4. Press the SETUP button on the "Setup" screen. The "Setup" screen is displayed. 32 User Code Setup (cont'd) SCREEN ACTION 3.
Press the USER SETUP button on the "More Choices" screen. The User Setup screen is displayed. 4. Press the SETUP button on the "Setup" screen. The "Setup" screen is displayed. 32 User Code Setup (cont'd) SCREEN ACTION 3.

User Guide
Page 33
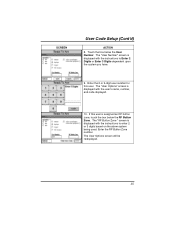
... Enter Data keyboard screen is dependent upon the system you have. Press the box next to Add a User Add a user as follows: SCREEN User Code Setup (Cont'd) ACTION Note: Three selections are available: add a user, edit a user, or delete a user. 1. Note: The authorized code for adding users is displayed. 33...
... Enter Data keyboard screen is dependent upon the system you have. Press the box next to Add a User Add a user as follows: SCREEN User Code Setup (Cont'd) ACTION Note: Three selections are available: add a user, edit a user, or delete a user. 1. Note: The authorized code for adding users is displayed. 33...
User Guide
Page 34
User Code Setup (cont'd) SCREEN ACTION 4. The "User Options" screen is displayed with the user's name and code displayed. 7. The "User Authorization" screen is displayed with the instructions ...
User Code Setup (cont'd) SCREEN ACTION 4. The "User Options" screen is displayed with the user's name and code displayed. 7. The "User Authorization" screen is displayed with the instructions ...
User Guide
Page 35
The "RF Button Zone " screen is displayed with the instructions to enter 2 or 3 digits based on the alarm system being used. SCREEN User Code Setup (Cont'd) ACTION 8. The "User Options" screen is displayed with the instructions to Enter 2 Digits or Enter 3 Digits dependent upon the system you have. 9. Enter the ...
The "RF Button Zone " screen is displayed with the instructions to enter 2 or 3 digits based on the alarm system being used. SCREEN User Code Setup (Cont'd) ACTION 8. The "User Options" screen is displayed with the instructions to Enter 2 Digits or Enter 3 Digits dependent upon the system you have. 9. Enter the ...

User Guide
Page 36
Press the SAVE button. The system will save is complete, the User Setup screen is displayed with the new user's name shown. 36 When the save the configuration. User Code Setup (cont'd) SCREEN ACTION 11.
Press the SAVE button. The system will save is complete, the User Setup screen is displayed with the new user's name shown. 36 When the save the configuration. User Code Setup (cont'd) SCREEN ACTION 11.

User Guide
Page 37
... your system installer to determine who can delete users. 3. Note: The authorized code for deleting users is displayed. 37 The User Setup screen is dependent upon the system you have. From the User Setup screen, touch the circle next to the user to Delete a User Delete a User as follows: SCREEN User Code...
... your system installer to determine who can delete users. 3. Note: The authorized code for deleting users is displayed. 37 The User Setup screen is dependent upon the system you have. From the User Setup screen, touch the circle next to the user to Delete a User Delete a User as follows: SCREEN User Code...
User Guide
Page 38
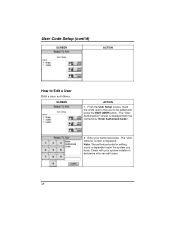
Enter your system installer to determine who can edit users. 38 Check with the instructions "Enter Authorized Code:". 2. Note: The authorized code for editing users is displayed. User Code Setup (cont'd) SCREEN ACTION How to be edited and press the EDIT USER button. The "User Authorization" screen is displayed with your Authorized code. The "User Options" screen is dependent upon the system you have. From the User Setup screen, touch the circle next to the user to Edit a User Edit a user as follows: SCREEN ACTION 1.
Enter your system installer to determine who can edit users. 38 Check with the instructions "Enter Authorized Code:". 2. Note: The authorized code for editing users is displayed. User Code Setup (cont'd) SCREEN ACTION How to be edited and press the EDIT USER button. The "User Authorization" screen is displayed with your Authorized code. The "User Options" screen is dependent upon the system you have. From the User Setup screen, touch the circle next to the user to Edit a User Edit a user as follows: SCREEN ACTION 1.

User Guide
Page 39
SCREEN User Code Setup (Cont'd) ACTION 3. The configuration changes are returned to select for this user and press the SAVE button. Select whatever options you are saved and you wish to the User Setup screen. 39
SCREEN User Code Setup (Cont'd) ACTION 3. The configuration changes are returned to select for this user and press the SAVE button. Select whatever options you are saved and you wish to the User Setup screen. 39

User Guide
Page 48
... SECURITY button. Additionally, you to adjust the touch screen contrast and/or adjust the 6270 speaker volume. How to Access Setup Access the "Setup" features as follows: SCREEN ACTION 1. The "More Choices" screen is displayed. 2. 6270 Setup How to Access 6270 Setup Options Setup allows you may also select the time interval that must pass prior to the...
... SECURITY button. Additionally, you to adjust the touch screen contrast and/or adjust the 6270 speaker volume. How to Access Setup Access the "Setup" features as follows: SCREEN ACTION 1. The "More Choices" screen is displayed. 2. 6270 Setup How to Access 6270 Setup Options Setup allows you may also select the time interval that must pass prior to the...

User Guide
Page 49
SCREEN 6270 Setup (Cont'd) ACTION 3. Press the SETUP button on the "More Choices" screen. The "Setup" screen is displayed. 49
SCREEN 6270 Setup (Cont'd) ACTION 3. Press the SETUP button on the "More Choices" screen. The "Setup" screen is displayed. 49
User Guide
Page 50
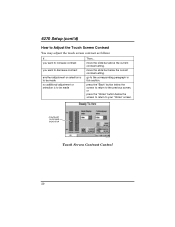
move the slide bar above the current contrast setting. go to be made Then... CONTRAST SLIDE BAR INDICATOR 6270-006-V0 Touch Screen Contrast Control 50 you want to increase contrast you want to decrease contrast another adjustment or selection is to be made ... this section. press the "Back" button below the screen to return to the previous screen, or press the "Home" button below the current contrast setting. 6270 Setup (cont'd) How to your "Home" screen. move the slide bar below the screen to return to Adjust the Touch Screen Contrast You may adjust the...
move the slide bar above the current contrast setting. go to be made Then... CONTRAST SLIDE BAR INDICATOR 6270-006-V0 Touch Screen Contrast Control 50 you want to increase contrast you want to decrease contrast another adjustment or selection is to be made ... this section. press the "Back" button below the screen to return to the previous screen, or press the "Home" button below the current contrast setting. 6270 Setup (cont'd) How to your "Home" screen. move the slide bar below the screen to return to Adjust the Touch Screen Contrast You may adjust the...
User Guide
Page 51
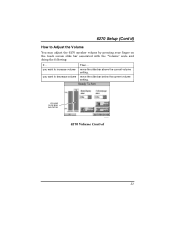
you want to increase volume you want to Adjust the Volume You may adjust the 6270 speaker volume by pressing your finger on the touch screen slide bar associated with the "Volume" scale and doing the following: If... move the slide bar above the current volume setting. move the slide bar below the current volume setting. 6270 Setup (Cont'd) How to decrease volume Then... VOLUME SLIDE BAR INDICATOR 6270-007-V0 6270 Volume Control 51
you want to increase volume you want to Adjust the Volume You may adjust the 6270 speaker volume by pressing your finger on the touch screen slide bar associated with the "Volume" scale and doing the following: If... move the slide bar above the current volume setting. move the slide bar below the current volume setting. 6270 Setup (Cont'd) How to decrease volume Then... VOLUME SLIDE BAR INDICATOR 6270-007-V0 6270 Volume Control 51

User Guide
Page 52
... Select the time period option you want by using the up/down "arrows" to Select Screen Saver Activation Time When the 6270 is displayed in blue. On the "Setup" screen, press the Blank Display After: "arrow" button. The pop-up window displaying the time period options is selected).... automatically go into screen saver mode (display goes blank) after the selected blank display time has expired (unless never option is displayed. 2. 6270 Setup (cont'd) How to scroll through the time period options. 52 A pop-up window closes automatically and the selection is not armed and not...
... Select the time period option you want by using the up/down "arrows" to Select Screen Saver Activation Time When the 6270 is displayed in blue. On the "Setup" screen, press the Blank Display After: "arrow" button. The pop-up window displaying the time period options is selected).... automatically go into screen saver mode (display goes blank) after the selected blank display time has expired (unless never option is displayed. 2. 6270 Setup (cont'd) How to scroll through the time period options. 52 A pop-up window closes automatically and the selection is not armed and not...

User Guide
Page 53
Select Yes to save the change or No to the "Home" screen or "More Choices" screen depending on whether you pressed the "Home" or "Back" button, respectively ("Home" screen shown). 53 When the Update is displayed asking "Settings Changed! Press either the "Home" or "Back" button. A Settings Changed! pop-up window is complete the 6270 goes to discard the change. Remember New Settings?" SCREEN 6270 Setup (Cont'd) ACTION 3.
Select Yes to save the change or No to the "Home" screen or "More Choices" screen depending on whether you pressed the "Home" or "Back" button, respectively ("Home" screen shown). 53 When the Update is displayed asking "Settings Changed! Press either the "Home" or "Back" button. A Settings Changed! pop-up window is complete the 6270 goes to discard the change. Remember New Settings?" SCREEN 6270 Setup (Cont'd) ACTION 3.

