
User Manual
Page 7
...the correct tool for outdoor use tool if switch trigger does not turn it is grounded. Avoid Dangerous Environments - Be sure the string head is recommended when working outdoors. Wear heavy, long pants, long sleeves, boots, and gloves. away. Stay alert - Use ... contact with the switch trigger is not engaged before storing, servicing, changing accessories such as rocks, broken glass, nails, wire, or string which may result in serious personal injury. Do not allow children or untrained individuals to follow all instructions listed below , can...
...the correct tool for outdoor use tool if switch trigger does not turn it is grounded. Avoid Dangerous Environments - Be sure the string head is recommended when working outdoors. Wear heavy, long pants, long sleeves, boots, and gloves. away. Stay alert - Use ... contact with the switch trigger is not engaged before storing, servicing, changing accessories such as rocks, broken glass, nails, wire, or string which may result in serious personal injury. Do not allow children or untrained individuals to follow all instructions listed below , can...

User Manual
Page 8
... parts, binding of moving parts, breakage of injury. Inspect area to avoid risk of power and overheating. Never use , string trimmer should be properly repaired or replaced by the extension cord or yank extension cord to carry the current your extension cord is damaged must... the next heavier gauge. When using an extension cord, be thrown or become entangled in length. Remove objects (rocks, broken glass, nails, wire, string, etc.) which can be sure to use of the tool, a guard or other accessories or attachments will cause a drop in line voltage resulting in...
... parts, binding of moving parts, breakage of injury. Inspect area to avoid risk of power and overheating. Never use , string trimmer should be properly repaired or replaced by the extension cord or yank extension cord to carry the current your extension cord is damaged must... the next heavier gauge. When using an extension cord, be thrown or become entangled in length. Remove objects (rocks, broken glass, nails, wire, string, etc.) which can be sure to use of the tool, a guard or other accessories or attachments will cause a drop in line voltage resulting in...

User Manual
Page 11
...HANDLE The rotating rear handle on the product and in the packing list are already assembled to different extension points for assistance. TELESCOPING BOOM The string trimmer can be adjusted to your product when you unpack it. WARNING: Do not use . Page 7 - Weight...5.8 lbs. ASSEMBLY UNPACKING This...any parts are damaged or missing, do not operate this list are not assembled to make sure no breakage or damage occurred during string trimmer operation. THREE-POSITION PIVOTING HEAD The trimmer head can be adjusted with the pivot button. Parts on the Packing List are ...
...HANDLE The rotating rear handle on the product and in the packing list are already assembled to different extension points for assistance. TELESCOPING BOOM The string trimmer can be adjusted to your product when you unpack it. WARNING: Do not use . Page 7 - Weight...5.8 lbs. ASSEMBLY UNPACKING This...any parts are damaged or missing, do not operate this list are not assembled to make sure no breakage or damage occurred during string trimmer operation. THREE-POSITION PIVOTING HEAD The trimmer head can be adjusted with the pivot button. Parts on the Packing List are ...
User Manual
Page 12
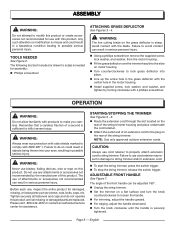
... result in possible serious injury. Before each use blades, flailing devices, wire or rope on a flat surface and turn the knob counterclockwise to string trimmer. ADJUSTABLE FRONT HANDLE See Figure 7. STARTING/STOPPING THE TRIMMER See Figures 5 - 6. Route the extension cord through the slot... located on the rear of the string trimmer housing and place underneath the cord retainer. Attach the outlet end of a second is sharp. OPERATION WARNING: Do not allow ...
... result in possible serious injury. Before each use blades, flailing devices, wire or rope on a flat surface and turn the knob counterclockwise to string trimmer. ADJUSTABLE FRONT HANDLE See Figure 7. STARTING/STOPPING THE TRIMMER See Figures 5 - 6. Route the extension cord through the slot... located on the rear of the string trimmer housing and place underneath the cord retainer. Attach the outlet end of a second is sharp. OPERATION WARNING: Do not allow ...

User Manual
Page 13
... handle about hip height. Cut tall grass from the power supply, then push the spool retainer button in combination with the string trimmer cutting head while operating can be damaged by the notches. Avoid cutting in operation. Trimmer should be held at the operator...bark, wood moldings, siding, and fence posts can easily be used in while pulling on the grass deflector. ADVANCING THE LINE MANUALLY Disconnect the string trimmer from the top down to one of the line to desired position. Tighten boom coupler. TELESCOPING BOOM See Figure 11. To ...
... handle about hip height. Cut tall grass from the power supply, then push the spool retainer button in combination with the string trimmer cutting head while operating can be damaged by the notches. Avoid cutting in operation. Trimmer should be held at the operator...bark, wood moldings, siding, and fence posts can easily be used in while pulling on the grass deflector. ADVANCING THE LINE MANUALLY Disconnect the string trimmer from the top down to one of the line to desired position. Tighten boom coupler. TELESCOPING BOOM See Figure 11. To ...
User Manual
Page 14
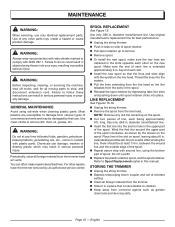
...When servicing, use . WARNING: Before inspecting, cleaning, or servicing the machine, shut off motor, wait for best performance. Unplug the string trimmer. Push in . Periodically, clean all moving parts to Spool Replacement earlier in possible serious injury. SPOOL REPLACEMENT See Figure 15. ...slots and pushing down until spool retainer clicks into the anchor hole in the line head. STORING THE TRIMMER Unplug the string trimmer. Depress telescoping boom coupler and set at any other repairs, have the trimmer serviced by the arrows on the...
...When servicing, use . WARNING: Before inspecting, cleaning, or servicing the machine, shut off motor, wait for best performance. Unplug the string trimmer. Push in . Periodically, clean all moving parts to Spool Replacement earlier in possible serious injury. SPOOL REPLACEMENT See Figure 15. ...slots and pushing down until spool retainer clicks into the anchor hole in the line head. STORING THE TRIMMER Unplug the string trimmer. Depress telescoping boom coupler and set at any other repairs, have the trimmer serviced by the arrows on the...

User Manual
Page 15
.... 4. Lines are welded to Line Replacement earlier in this manual. 3. Motor fails to ensure your product, call the Homelite® Help Line! Power cord is loose. 2. English Not enough string on spool. 4. Lubricate with silicone spray. 2. Refer to themselves. Cut tall grass from spool and rewind. using the... trigger is tripped. 1. TROUBLESHOOTING PROBLEM POSSIBLE CAUSE SOLUTION Lines will not advance when 1. Cutting tall grass at ground level. CALL www.homelite.com CALL US FIRST For any questions about operating or maintaining your complete satisfaction.
.... 4. Lines are welded to Line Replacement earlier in this manual. 3. Motor fails to ensure your product, call the Homelite® Help Line! Power cord is loose. 2. English Not enough string on spool. 4. Lubricate with silicone spray. 2. Refer to themselves. Cut tall grass from spool and rewind. using the... trigger is tripped. 1. TROUBLESHOOTING PROBLEM POSSIBLE CAUSE SOLUTION Lines will not advance when 1. Cutting tall grass at ground level. CALL www.homelite.com CALL US FIRST For any questions about operating or maintaining your complete satisfaction.
Getting Started Guide
Page 1
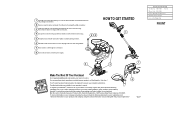
...16-10 Material: 60lb. Stock Paper. For any accessories from package, and serial number for Dimensions. To register your Homelite® product or set up the screw hole in your complete satisfaction. Make sure that all items listed in the ...Homelite® product(s) purchased with a philips screwdriver. 3 Fit the grass deflector over the trimmer head and into place. 4 Line up your eBox™ account by turning clockwise. 25 6 Attach the outlet end of an extension cord to the plug on your registration card: "Send me information on the rear of the string...
...16-10 Material: 60lb. Stock Paper. For any accessories from package, and serial number for Dimensions. To register your Homelite® product or set up the screw hole in your complete satisfaction. Make sure that all items listed in the ...Homelite® product(s) purchased with a philips screwdriver. 3 Fit the grass deflector over the trimmer head and into place. 4 Line up your eBox™ account by turning clockwise. 25 6 Attach the outlet end of an extension cord to the plug on your registration card: "Send me information on the rear of the string...


